
Temari
Pattern GT10 / TemariKai
Simple Division Patterns
| Accomplished beginner to intermediate design. This is a traditional pattern, found in many sources. Uwagake chidoi kagari is worked in sakasa and jyouge douji styles to create sakura in the white space at the poles. This was done as a StitchAlong on TalkTemari. Originally posted in 2008; contributed by Ginny T. | |
 |
Materials: 25 cm circum mari, wrapped in white and marked in Simple 10. Pearl Cotton #5 in 2 shades of pink, and green; fine and medium gold metallic threads. Bunka thread may be used as alternative, as in this example. |
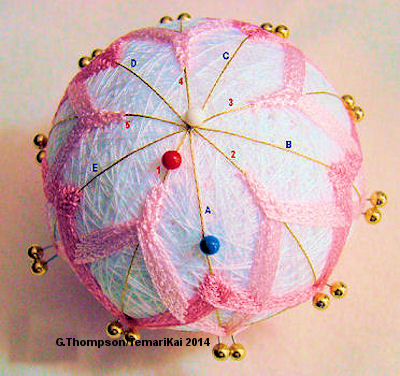 |
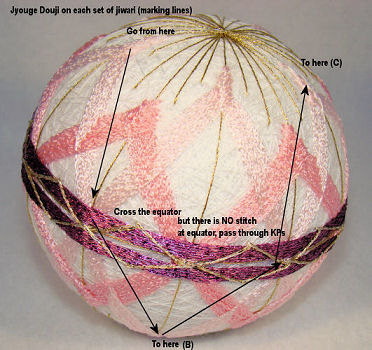
Place a pin for the North Pole and do not remove it during stitching. If you lose the NP orientation (i.e. turn it upside down) when working Jyouge Douji, half of your stitches reverse. Mentally divide the ten marking lines into 2 sets of 5. You'll stitch Jyouge Douji around on each set of 5 lines, but since this is an odd number, you'll actually travel around the ball twice to get back to where you started. |
| One set of lines will be worked in the lighter pink - and this is the set that creates the "centers" and "sides" of the petal image. Place a red pin on one line - this becomes the starting line for the "red set" - Lines 1 - 5. The other set of lines will be worked in the darker shade. Place a blue pin on one of these lines - which becomes the "blue set", Lines A - B. The stitching on this set of lines forms the bottom, outer edge of the petal image.Divide the 10 marking lines into 2 sets of five: 1-5 and A-D. | |
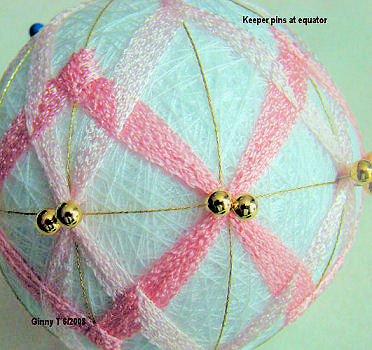 |
Place keeper pins at each intersection of the equator with marking lines. Remember to always lay the threads smoothly going into each set of pins; it's also important to stack them neatly as you go; and it's very important to keep them all crossing sharply at the equator. If they wander or just bunch up, it detracts a great deal from the finished temari. |
 |
Mark the polar stitch placements - on Lines 1 - 5, you will start 1.5 cm from the pole. On Lines A - B, you start stitch 1/2 the distance between pole and equator. These distances repeat on both north and south poles. Using lighter pink, stitch one round of Jyouge Douji on lines 1- 5 remembering that you will go around the ball twice to return to the starting point. Leave your thread hanging. Change to darker pink and repeat using the alternate set of lines and points, stitching around once. Pass threads through the keeper pins at the equator on both rounds and all further rounds. |
 |
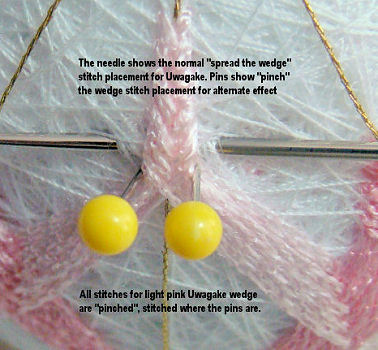 |
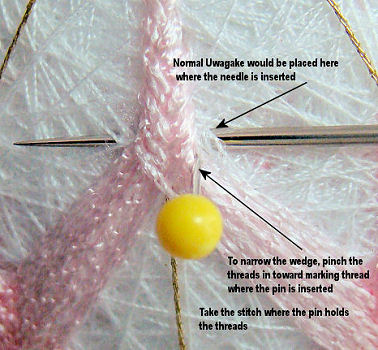
| The pattern will be formed by repeat alternate rounds (one round light pink, one round dark pink) of Jyouge Douji using Uwagake technique at each stitch. When working the light pink rounds, pinch the previous rounds in toward the marking line to narrow the wedge (see photo). You can place pins to hold the threads, or you can get the feel of it and just adjust the threads as you stitch. BUT it's important to remember that this is NOT just pulling a normal stitch tighter. The actual needle placement is altered to make it narrower. Keep a bit of tension on the stitch to maintain the effect (but not kill it) - You may also find it helps to loosen your tension just a little bit on with the light pink, it makes for a better narrowing effect. | |
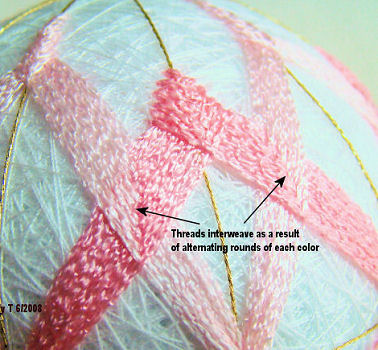 |
Repeat alternating rounds (you should see the threads
interweaving, forming Kousa effect, as you go) until you have
bands of color in a pleasing width (probably about 5 - 8 mm) for
the size of your mari. There is no set rule for how many rounds,
but just be sure that you have worked enough for the negative
space image to emerge. If you are wondering if it's enough it
probably isn't. The light pink bands will bend and soften some because of the "pinching" while the dark pink remains as usual (broader) and forms the bottom of the sakura petal when viewed from the poles and the negative space image appears. |
 |
Obi can be purely decorative on a temari or they can also be functional, and this is a design where it's serving a BIG function - it's going to hold all of the threads that cross the equator from the Jyouge Douji stitching in place, since there is no stitch at the equator while doing the Jyouge Douji. Part of what makes or breaks a JD design is keeping those crossing threads neat and inline...there are several ways to "secure" them but for this example and design it's going to be a flat wrapped obi. |
| Wrap with color thread of your choice.
It helps to check and prepare the thread bundles at each
crossing. You might find it easier and helpful to move your
keeper pins out (as in widen the space between them) just a bit,
to allow the thread bundle to ease and flatten. Be sure to keep
the threads in alignment and smooth. Remember, the obi
will cover probably about 3/8 to 1/2 inch (upwards of 1cm) when
you are done wrapping it, and will cover up some of the true
middle of the crossings. To get a flat and smooth wrap with the
obi threads: Replace your keeper pins so that for each pair, the
left one is below the equator marking thread, and the right one
is above it. Again, allow that little extra wiggle and
flattening space....not a lot, but perhaps 2 or 3 mm. Work
the thread bundles so they are compressed/flattened a little bit
yet still smooth and aligned. Measure off how ever many wraps of
the thread you are going to use for the obi. Figure perhaps
about five or seven on either side of the equator in total -
plus enough to start and stop. Enter the thread right along the
equator thread on one side of it, just to one side of a crossing
bundle. Wrap around the mari as close to the equator as you can,
and with a fair amount of tension (the point is to flatten the
thread bundles and hold them in place). Go around a second time,
right next to the first - and you should be able to remove
the keeper pins that are ON THE SAME SIDE of the equator as you
are wrapping (keep the other side in until you wrap that side so
you don't loose the lay of the threads. Finish wrapping the
total number of rounds you desire and end off. Repeat on the
other side of the equator. Work a chidori
kagari (zig zag) stitch over the obi threads - both for
embellishment as well as to help hold everything in proper
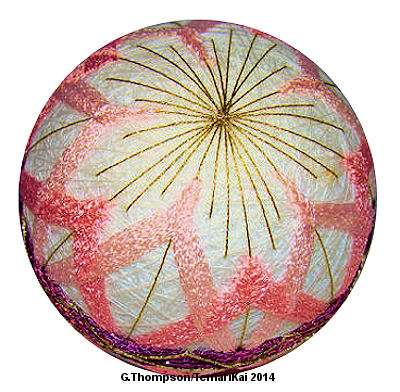
place. Lastly, work sets of matsuba kagari long stitches across each pole in gold thread to simulate and enhance the floral illusion. When you view the temari from the polar perspective you should be seeing the sakura image outlined by the bands of color from the Jyouge Douji stitching in light pink and the bottom of the petals formed with the wedge and bands of the dark pink. The flower itself emerges from the mari wrap in negative space (white wrap). |
|
This
is a TemariKai.com Printable Page; © 2014, all rights reserved.
Right click to print one copy for personal use.
Last updated 1/2014 © 1998 - 2014 TemariKai.com, G. Thompson/PuffinStuff, Inc.