
TemariKai ToolKit - Jyouge Douji 上 下同時かがり
Jyouge Douji translates to up and down from jyouge, and concurrent/synchronous from douji. A jyouge douji design will zig-zag up and down while traveling around the mari, both at the same time. It's usually worked on a Simple Division. The sequence is: stitch at NP,
 pass the thread over the equator (keeper
pins are used to hold the threads in place at the equator), take a
stitch at SP, pass the thread again over the equator, return to the NP
and take another stitch. Subsequent rows follow the same sequence with
the crossovers at the equator being bundled by the keeper pins.
The northern hemisphere mirrors the southern hemisphere. No stitches are
taken at the equator in the process of working jyouge douji. Tabane kagari or an obi
design may be stitched at the equator later, but these are separate
elements and not part of the jyouge douji design.
pass the thread over the equator (keeper
pins are used to hold the threads in place at the equator), take a
stitch at SP, pass the thread again over the equator, return to the NP
and take another stitch. Subsequent rows follow the same sequence with
the crossovers at the equator being bundled by the keeper pins.
The northern hemisphere mirrors the southern hemisphere. No stitches are
taken at the equator in the process of working jyouge douji. Tabane kagari or an obi
design may be stitched at the equator later, but these are separate
elements and not part of the jyouge douji design.The stitches used in jyouge douji can vary according to design: chidori kagari, uwagake chidori and/or shitagake chidori are most common. How many sets of marking lines are used varies with design as well. One of the major impacts of this element is not so much the individual needle stitch but, the concept of the design going from pole to opposite pole in continuous travel around the mari. Essentially, a whole revolution of the design is completed with one thread, as opposed to individual parts. This puts it in the renzoku class of stitches. Maintaining even symmetry around the ball as it's being worked is a must.Also, it's a must to maintain the same north-pole orientation during stitching the whole design - if you "flip" in the process, you will reverse the thread crosses in the stitches, which interrupts the lay of the threads and becomes noticeable in the overall design. Jyouge Douji is one of the requirements for JTA Honka certification.
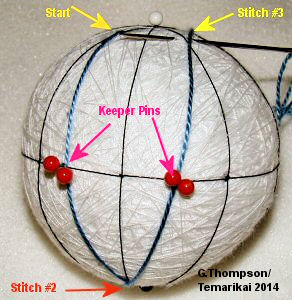 |
 Place pairs of keeper pins at the equator. Anchor a working length of thread close to the NP, to the left of a marking line. Move to the keeper pins, carry thread through, move to next marking line and take a stitch at the SP. Move to the next pair of keeper pins, carry thread through. Move to next marking line, take a stitch at the NP. Continue until returning to the starting point. |
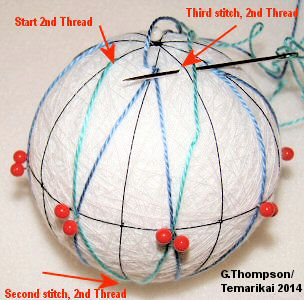 |
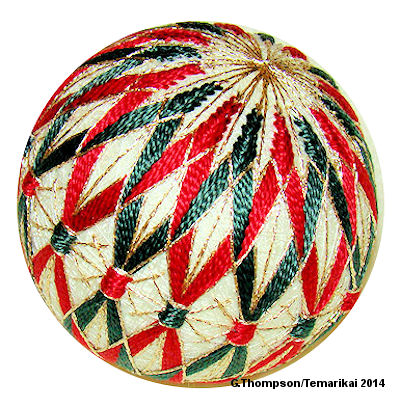
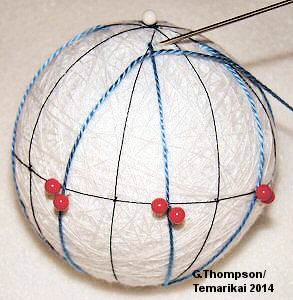
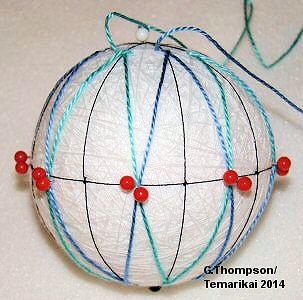 If design requires, repeat the stitching process on the other set of marking lines with a second thread. Be sure to stay oriented to the north pole. If the ball is flipped during the stitching process, it reverses the direction of the stitches and will be visible in the design. Return to the first thread for the second round; use sakasa technique with uwagake on both poles. It will resemble the red and green example shown at the top of the page. |
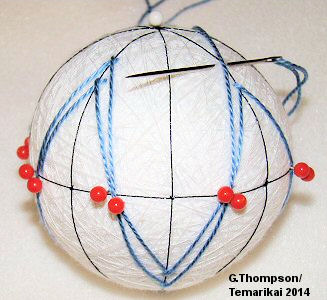 |
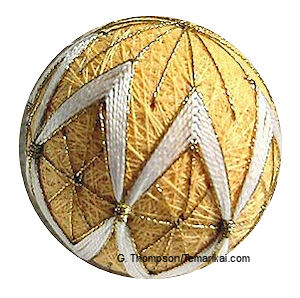 The photo to the left shows a variation using chidori kagari, worked with open space. The example to the right uses shitagake chidori. When stitching is complete, the crossovers need to be anchored. This is done with neatly applied tack or back stitches around the bundle, being sure that the threads are laying smoothly. These stitches are called tabane kagari; they are seen at the equator crossovers in the photo to the right and at the top of the page. Alternatively an obi may be wrapped to secure the crossovers. |
Last updated 11/20154 © 1998 - 2014 G. Thompson/PuffinStuff, Inc.