
Using a V-Ruler for 10 Combination Division
Please note: This info remains on TemariKai.com due to V-Rulers being in use for so many years; however they are no longer available and have been replaced with C-10 Rulers.
The one tool unique to temari-making is a V-ruler (or now a C-10 Ruler). They are great little gadgets that are simple to use as one method for placing the pins for a 10 Combination Division. They are supplied through the Japan Temari Association in Tokyo; the JTA agreed to allow them to be offered through Temarikai, in good faith only at the cost of purchase/shipping from the JTA (supplies and related items sold through the JTA and Temari Museum are what help to provide the operating funds for the Association).
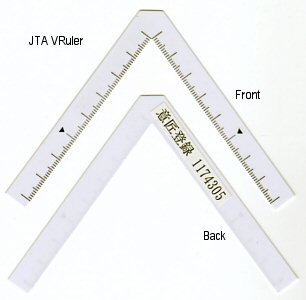 A V-ruler is a flexible plastic device shaped like a
V, with the inside of the V cut to the required angle of 72 degrees.
Each leg has a metric measuring rule printed on it, hashed in mm and cm
with an arrow on the 5cm (50mm) mark. Using a V-ruler eliminates
the need the paper strip when setting up a C10, and is a quick, direct
way to mark the mari. You need only know the circumference
in cm. For those not comfortable with using metric units - you
will want to for this division. Once the circumference in cm is known,
you then determine the V-Ruler value for that measurement. It is an easy
calculation but, a simple reference chart eliminates the need to
calculate values for most standard mari sizes.
A V-ruler is a flexible plastic device shaped like a
V, with the inside of the V cut to the required angle of 72 degrees.
Each leg has a metric measuring rule printed on it, hashed in mm and cm
with an arrow on the 5cm (50mm) mark. Using a V-ruler eliminates
the need the paper strip when setting up a C10, and is a quick, direct
way to mark the mari. You need only know the circumference
in cm. For those not comfortable with using metric units - you
will want to for this division. Once the circumference in cm is known,
you then determine the V-Ruler value for that measurement. It is an easy
calculation but, a simple reference chart eliminates the need to
calculate values for most standard mari sizes.For reference, the formula is an easy three-step process. For the non-math folks: divide the circumference (measured in cm) by 6, and remember that result (call it Result A). Divide the circumference by 100 and remember that result (call it Result B). Add Result A and Result B together, and you have the V-Ruler value you need for your mari. For the math folks, it's written as (circum/6)+(circum/100)=V-ruler value.
The V-Ruler value, is the distance between the centers of the pentagons on a C10, and each pin placed for a C10 marking will be this distance apart; any 3 points will be oriented on 72 degree angles from each other along this distance. Thus, each pin placement is a center of a pentagon. If you multiply the distance between the centers (V-ruler value) by 0.679, and you will get the length of the side of the pentagons, which some people fine useful for when you are adjusting the marking threads into final placement before tacking the intersections.
Here is the basic method for using the V-ruler:
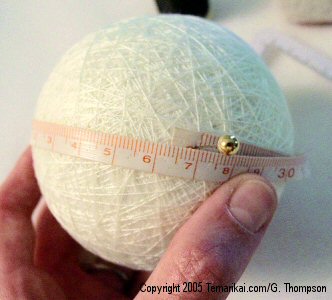 |
Measure the circumference in cm. This example is 27 cm. Once the circumference is determined, use a V-ruler reference chart (below) to determine the V-ruler value. Look up 27 and the V-ruler Value is 4.8. Or, using the formula (which, if you are using a paper strip, you must do), the standard calculation of (27/6)+(27/100) = 4.77. Round to the nearest tenth cm so 4.77 rounds to 4.8. Either method works (!). |
|
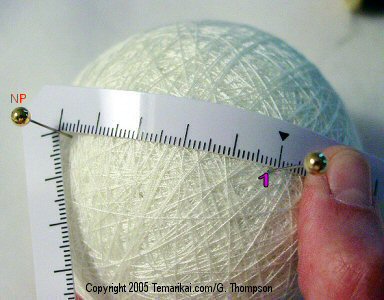
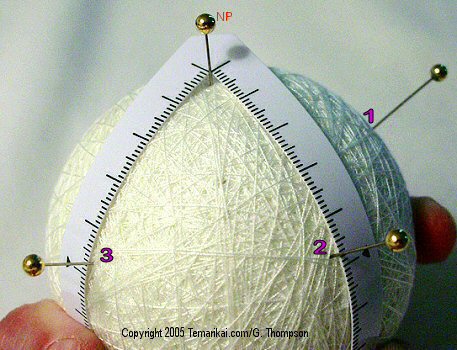
Choose any point to be the temporary North Pole and place a pin. Hook the inside of the angle of the V-ruler on the pin, flatten one leg of the ruler along the mari and place a pin (Pin 1) at the V-ruler value (here it is 4.8). Note that a C10 division does not have north and south poles, it is fully 3-D symmetrical when completed, but to start the process we need to set a temporary one to make it easier. |
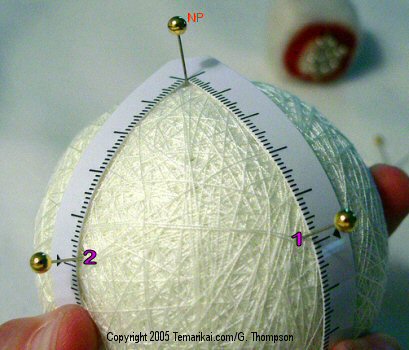 |
Flatten the opposite leg of the V-ruler on the mari (without "stretching" or "closing" the angle), and place the second pin (Pin 2) at the V-ruler value on the second leg. Note that the "back tab" of the ruler, behind the NP pin, is NOT flat on the mari; only the legs of the ruler are. If you remove the V-ruler from the NP pin and use it to measure the distance between Pins 1 and 2, it should be the same. It's very common, even with experience and practice, that the last placed pin will need to be adjusted a bit; check and adjust as needed. Remember that this number is the distance between centers, and you are pinning the centers of the 12 pentagons on a C10 Division; they need to be accurate. |
 |
Pivot the V-ruler around the NP pin and place the right leg against Pin 2. Flatten the ruler and place Pin 3 at the V-ruler value on the left leg. Try to be sure to not "stretch" the ruler out of shape, don't pull the legs apart. The tab behind the angle pin will not lay flat on the mari so don't try to force it, but the legs should be flat on the surface. Remember to check the distance between Pins 2 and 3, and adjust if needed, & adjusting is usually always needed. The V-Ruler needs to be flexible to work. Adjusting is part of using the tool. Remember too, within 1-2 mm is fine. |
 |
Continue pivoting the V-ruler around the NP pin until you have placed five pins around the NP. You now have six pins all spaced the same from each other, which is the V-ruler value, which is the distance between centers of a C10 Division on this particular mari size. You can check your pin placements by removing the V-ruler and aligning it against any 2 pins, one of which is in the inside angle. Adjust any pins as needed. |
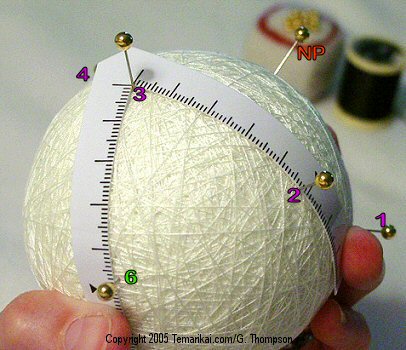 |
Remove the V-ruler from the NP and "hook" it on any other pin, here Pin 3 (which becomes the new temporary NP). Lay the right leg against Pin 2, flatten the left leg to place Pin 6 using the V-ruler value, just as you did for all the previous pins. Pivot around Pin 3 as it is the "new, temporary" NP and continue. |
|
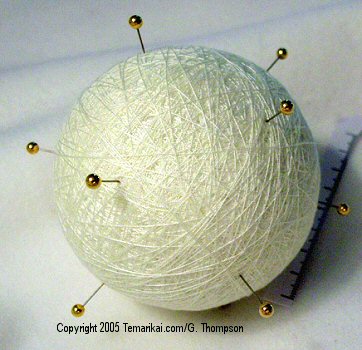
Repeat the process until you have placed 12 pins all the V-ruler value from each other. Move the V-ruler to another "NP" pin when needed. All 12 pins, will be the V-ruler distance apart and each one marks a pentagon center. You can use the V-ruler to check that all pins are the needed distance. Be careful about "adjusting", though - since moving one pin will affect several others (its neighbors). If things look to be really off, it's better to pull all the pins and start over. Don't be over compulsive, either. Being within 1-2 mm is "close enough". No ball is perfectly round and there will always be a little wiggle room.The marking threads can now be laid (see the 10-Combination marking threads page if needed). |
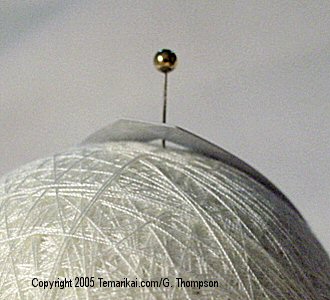 |
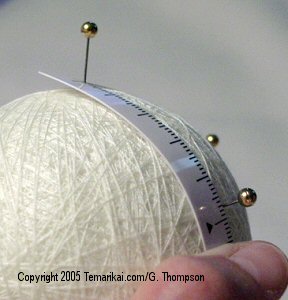 If there is one "trick" in
using the V-ruler, it's the "flattening" of the legs.
Keep the corner of the angle tight against the pin, but
notice that the tab behind the angle notch is allowed to
ride up the pin a tad - when you hold down the legs of the
ruler, allow this to happen. Notice the flattening and curve
of placement in the photos. A little practice will
make this easy.
|
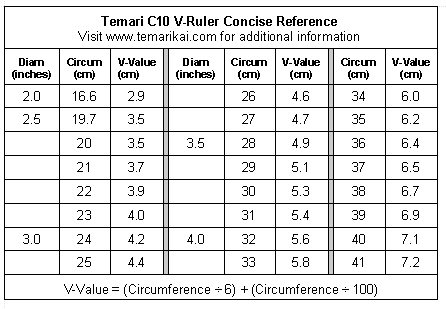 As mentioned above, one need not sit and crank out the center
distances (V-ruler value) for each mari size; these charts are
readily available in many Japanese books and other sources, as
well as here. Keep a copy in your stitching kit along with a
V-ruler and you're good to go.
As mentioned above, one need not sit and crank out the center
distances (V-ruler value) for each mari size; these charts are
readily available in many Japanese books and other sources, as
well as here. Keep a copy in your stitching kit along with a
V-ruler and you're good to go. |
Last updated 9/2017 © 1998 - 2017 TemariKai.com, G. Thompson/PuffinStuff, Inc.