
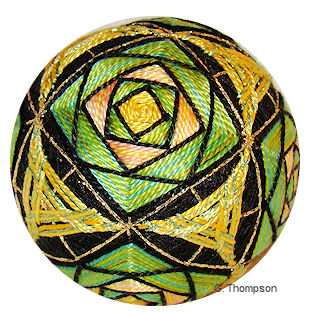
TemariKai ToolKit - Bara 薔薇
Bara translates from the Japanese to rose, and in temari making it means a design of layers of off-set polygons, which resembles rose petals when complete. It has at times taken on the English interpretation of "rose garden" which is a bit inaccurate but you may see it used and it means the same thing.
 Technically
however, the translation is singular, rose. It very often is seen based
on shikaku, but any value of a polygon
can be used as long as there are two sets of marking lines in order to
to alternate the layers.
Technically
however, the translation is singular, rose. It very often is seen based
on shikaku, but any value of a polygon
can be used as long as there are two sets of marking lines in order to
to alternate the layers. Bara is not suggested as a beginner's project for the same reasons as shikaku is not recommended: some stitching experience, especially paying attention to the basics, is required so that the overall outcome is positive. The polygons, no matter what shape is used, need to be regular and accurate, and this is aided by good stitch placement and tension.
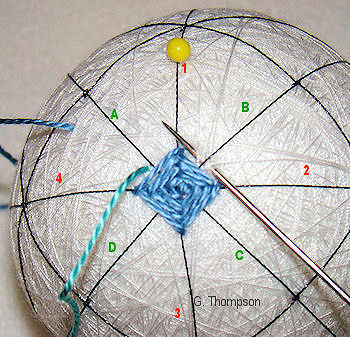
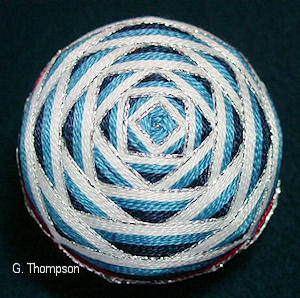
Bara begins with a solid shape/polygon; this example uses masu kagari as that is one of the most common choices but it can be any regular polygon. The center needs to be accurate or the remainder of the bara element will be lopsided. The design grows in layers as successive open versions of the shape are stitched over the previous. There needs to be a set of marking lines for each set of corners - so if the Bara is worked in masu, there needs to be an 8-point center, so the lines can be divided into two sets of four. Likewise, if the polygon being used is a pentagon, then there needs to be a 10-point center, so as to provide 2 sets of 5 lines.
 |
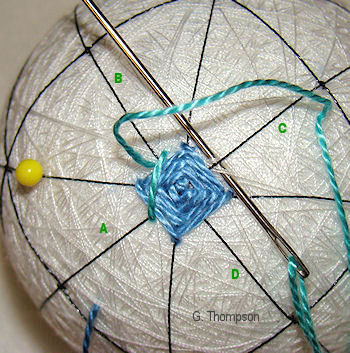 |
| 1) Divide the marking lines into 2 working sets (1234) and (ABCD). Work a solid masu around the point center, using one set of lines (1234). The number of rounds will be specified in the design, or at least enough rounds to compensate for the following layers covering the corners. After completing the center, change to the next color (usually there is a color change but it's not an absolute requirement). Enter the thread and come up at the starting point on the alternate set of lines (ABCD) Note the placement of the thread is about 1 thread-width up/away from the previous round. This is to prevent the first layer sides from being pulled inward or "caving in". | 2) Stitch an open masu using Lines (ABCD) following the usual
method; take care when placing the first row of this layer to
continue to "stretch" the stitch by placing them just above the
previous layer/row. Continue to work around and work as many
rows as required in the design. If free stitching, this will
usually enough to cover the corners of the previous layer. As
the design progresses it often will be the number of rows of the
previous layer plus 1 (or more, depending on the thread being
used), but this can vary according to the requirements of the
design. |
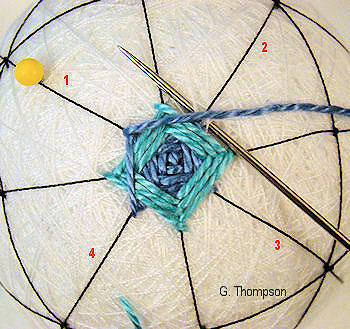 |
Repeat the sequence of alternating layers of open masu, until the desired size and depth is achieved. Be sure as you work to maintain sharpness of the shape, and corners. The number of rows will most likely adjust as the design grows in order to cover the corners, this is normal. |
 |
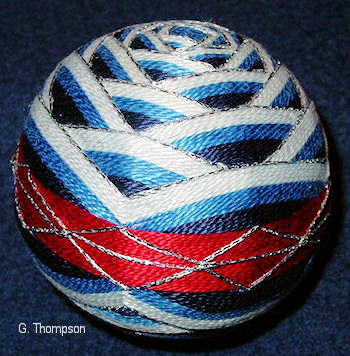 |
| While most bara designs do not extend out this wide, this design shows what develops as the curve of the ball takes over. It's from one of Ozaki Sensei's book, and is another illustration of using the way nature works to enhance design. | |
This is a TemariKai.com Printable Page; © 2014, all rights reserved. Right click to print one copy for personal use.
Last updated 11/2015 © 1998 - 2014 G. Thompson/PuffinStuff, Inc.