
Stitching Shapes and Polygons
Given that temari is so dependent upon geometry, some discussion on basic polygon shapes might be in order. Polygons are 2-dimensional shapes composed of straight lines, and they are closed - that is all the lines are connected. Polygon is a Greek word meaning many (poly) angles (gon). If all of the sides are the same length and all of the angles are equal, it's a regular polygon. If these conditions are not met, it's an irregular polygon. If the lines defining the shape do not cross over each other, it's a simple polygon. If they do, it's a complex polygon. You will see all types occurring in temari designs.
The basic polygons that frequently appear in temari designs are as follows:
| Diamond |
Hishi or Ryou 菱 | Simple, 4 sides, irregular |
| Triangle | Sankaku 三角 |
Simple, 3 sides, either |
| Square | Shikaku, Masu 四角 |
Simple 4 sides, regular |
| Five point star |
Hoshi 星かがり |
Complex |
| Pentagon | Gokaku 五角 |
Simple, 5 sides, either |
| Hexagon |
Rokkaku, Lokkaku
六角 |
Simple, 6 sides, either |
| Octagon | Hachikakkei
八角形 |
Simple, 8 sides, either |
Understanding the Japanese: kaku 角 means corner. San means 3; thus, sankakku is 3 corners, or triangle. (Another word for 3 is mitsu as in mitsubishi. "Bishi" is how "hishi" is pronounced, when written as mitsuhishi, so it has become mitsubishi in English vernacular - and this means 3 diamonds.) Go means 5, so gokakku is a pentagon, 5 corners. Roku means six; rokkaku is a 6 cornered figure, or hexagon. (Another word for six is kikkou; this is used in Mitsubane Kikkou which is based on a 6 cornered center).
When stitching polygons and shapes, the things to concentrate on are keeping it symmetrical if it's a regular shape (side lengths equal and the shape symmetrical) and making sure that the rounds are distinct - that is, they all appear independent, rather than spiraling out from the center. Remember to stretch the points on corners (stretching the points refers to allowing space for the volume of the thread as it turns corners). The more acute (smaller) the internal angle (inside the shape), the sharper the corner becomes and the more the stitch needs to be stretched. This correlates to the number of sides of the polygon: the more sides it has, the less stretching is needed. Without the correct positioning of the stitch, the threads will not lay smoothly and form sharp, clear corners. Remember that each round of a shape is just that - one distinct round. When placing the stitches, be careful to maintain the individuality of each round rather than it appearing to be a continuous path from the center. Shapes and polygons can be stitched as either solids, or with open areas. The same standards apply either way - work for sharp, clear corners and distinct rows.
| Another major criteria for working polygons is how the last stitch of the final row (either of a color or of the total motif) is finished off. It's so very easy to just "finish" the stitch as you've been working all of the others - but, in doing this, the thread rhythm is broken. It can be seen in the image to the right that if this is done, the final overlap of the last stitch is out of synch with the rest of the stitches. The row began at Point 1; Points 2, 3, and 4 all have the thread entering the stitch from the left and under. If the thread is carried back to Point 1 and the needle inserted per usual, the thread enters the stitch from the left but over. | 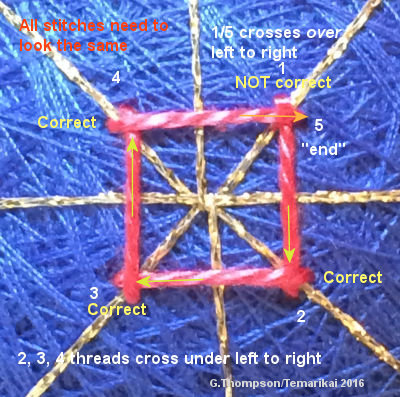 |
| In order to correct this reversal, and in doing so maintain the correct lay so that all of the stitches look the same, pass the needle under the starting thread prior to taking the stitch. Informally, I refer to this as "underpassing". It should also be noted that underpassing applies in all cases, not just polygons. For example, the last stitch of Uwagake Chidori should also be handled this way. The goal is to not be able to tell where the last stitch is. | |
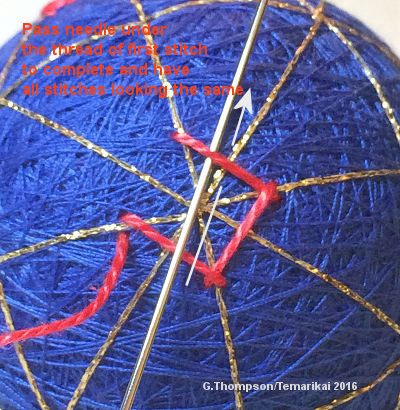 |
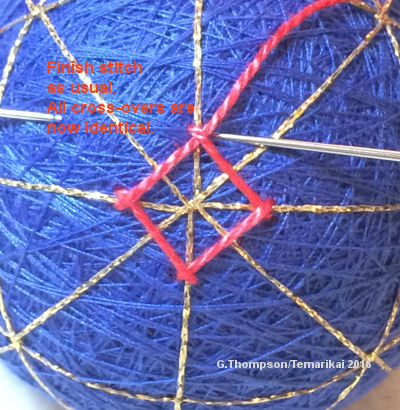 When coming to the last stitch, carry the thread under the starting thread. Pull the thread through to normal tension, and then insert the needle in the normal position to complete the stitch. |
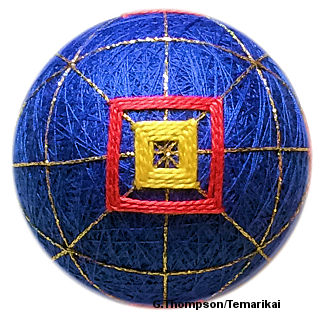 |
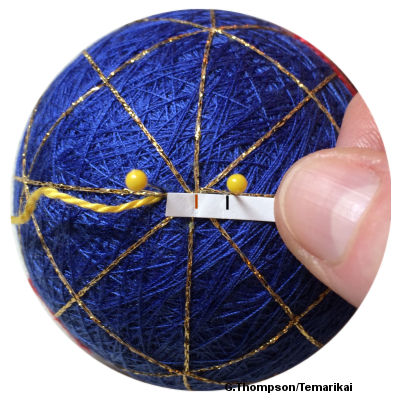
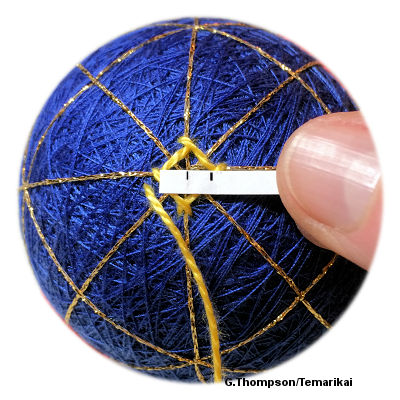
Very often, polygons are regular: the sides should be of equal length & corner angles equal. This can be tricky especially on open shapes. There are a few tricks for getting polygons to be regular and equal and replicating them. This example is an open shikaku, it but can be applied to any polygon. It's easier and more accurate to concentrate on diagonals through the center of the shape rather than on the sides. It's also easier and more accurate to rely on relational distances for the dimensions. A paper strip, or a hem gauge (the little ruler that sewers use to set and repeat a distance, with the little slider on it) are both handy to help. If using a hem gauge, it's only for setting a distance using the slider, however on smaller mari it becomes less accurate. |
|
Open shapes need to be symmetrical (usually). The easiest way to achieve this is by using a paper strip. Determine the distance of the diagonals (distance through the center) of the shape. Mark a strip with the length, as well as the mid-point. Place the mid-point on the center of the face and then place pins for the corners. Repeat on all diagonals |
|
Check that the spacing is correct early on. This is most
easily done on small spaces with a paper strip. Mark the
diagonal and also the center. Check all diagonals for the same
length. This strip marking can also be used later on to
replicate the same size open shape elsewhere on the mari. If the
diagonals are equal, then the equal angles and equal side
lengths fall into place automatically. |
Last updated 2/2016 © 1998 - 2016 TemariKai.com, G. Thompson/PuffinStuff, Inc.