
Temari
Pattern DA06 / TemariKai
Simple Division Patterns
| Beginner design. original inspiration temari from Cosmo 3 pg 1 ISBN 4-8377-0281-3 Originally posted 2006; contributed by Debi A. | |
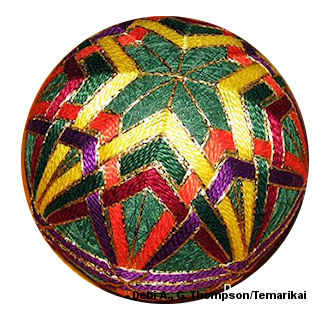 |
Materials: 24 cm circumference, wrapped in green Pearl Cotton #5 in 5 colors, one of which should match mari wrap Marking thread: gold metallic |
Mark a Simple 8 division. Place at pin at the N pole. Be sure to start all rounds at the same point on the N pole so the stitches line up correctly
 |
1. Stitch chidori
kagari, jyouge
douji style around the ball starting on line 1 halfway
between the N pole and equator (A), crossing the equator at line
2, and taking the bottom stitch halfway to the S pole on line 3
(B). Continue in this manner back to the starting point (C, D,
back to A). You'll have N pole stitches on lines 1 and 5, and S
pole stitches on lines 3 and 7. 2. Skip a line and work another zig zag using the next line (a, b, c, d, back to a). You'll now have N pole points on lines 1,3,5, and 7. |
| 3. Continue to alternate lines until you have a wide enough
band of your first color. On each row the stitches are placed
closer to the poles. Your threads will stack up at the equator
where they cross each other but since you are alternating each
time they should stay neat without keeper pins. (red band on
sample). You can use keeper
pins if you desire. 4. Start a new band on line 2, using the stitching path as described above. This band will go over the band you stitched in step 4. You'll have stitches on lines 2,4,6,and 8 now. (purple band on sample) 5. Go back to line 1 and stitch another band. This one will lie over the band you stitched in step 5. (green band on sample) 6. Go to line 2 and stitch another band. This time you must weave under the first band (step 4, red) and over the third band (step 6, green). (orange band on sample) 7. Go back to line one and stitch the last band, weaving under band two (step 5, purple) and over band four (step 7, orange). (yellow band on sample) 8. Wrap an obi to secure the thread bundles and embellish the pole space as desired. |
This
is a TemariKai.com Printable Page; © 2014, all rights reserved.
Right click to print one copy for personal use.
Last updated 2/2014 © 1998 - 2014 TemariKai.com, G. Thompson/PuffinStuff, Inc.