
Temari
Pattern GT66 / TemariKai
8-Combination Division Patterns
| Intermediate design; interpreted design. Worked as a TalkTemari StitchAlong, June 2013; contributed by Ginny T. interpreted from Harriet S. | |
 |
Materials: 23 cm mari, wrapped in blue Pearl Cotton #5 in blue (matching/close to mari wrap) and blue over dyed Marking thread is the solid blue pearl cotton Prepare an 8-Combination Division |
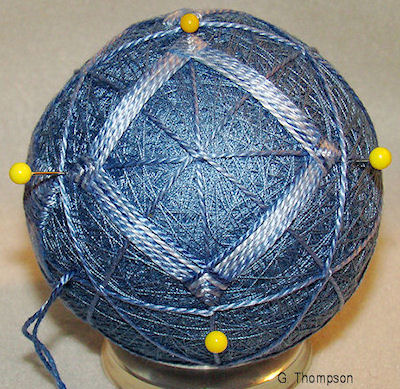 |
Locate the 6 8-point centers on the division (outlined by
squares with marking lines). Work an off-set Sakasa
Uwagake square in each of these. Start the corners of the
motif at the midpoints of the marking line outlines, as shown in
the photo. Work into the center, so that it closes in
completely; the shape should be even and symmetrical. Begin with
the perle color matching the mari wrap, that you also marked
with. Stitch a few rounds with that, and then change out to the
overdyed (or if you are not using overdyed/variegated, a few
rounds of shades close to the base color). There is no real
right or wrong on color placement, but you should keep it
interesting; don't be too enthusiastic. You will need several
rounds of solid versus several of shading to achieve the effect.
They can vary - in other words, each square can be a little
different. Just be sure to start with the matching solid. Work all of these 6 squares before moving on to the next shape. |
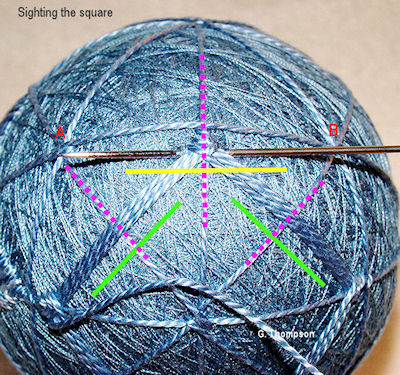 |
Keeping the square symmetrical and aligned is important. Be sure that if you have not tacked all of the marking line intersections (and you don't have to) - that you do check/adjust to be sure that they have not slipped out of place from handling the ball as you work, before you take a stitch around them. If you have trouble remembering to do this, then yes, go tack them in place before you expand an exercise in frustration. Most of the time (and absolutely in this design) the kagari stitch is ALWAYS taken with the needle perpendicular to the marking line that you are stitching around. You can use the marking line to help you sight and steady this by looking to be sure that when you have placed your needle (yellow line), it is parallel to the upper marking outline of the square as shown in the help photo, as well as perpendicular to the line (dotted pink) you are stitching around. Notice that the crossovers fall directly on the line we are stitching around. The side of the square being stitched will be the bottom/hypotenuse of a triangle imaged by the corner formed by the 2 marking lines (A, B). As the working thread passes over the marking line, it is perpendicular to it. Using these cues will help you keep things on track. In general, keep looking at the "bigger picture". As you work, continue to check that things are even, and symmetrical. |
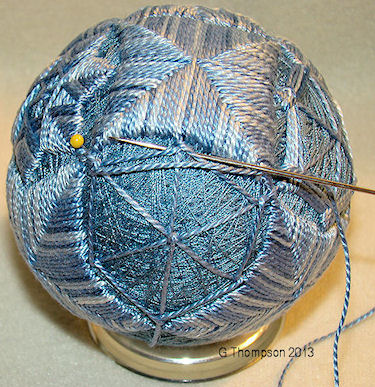 |
Work uwagake sakasa on each 6 point center, which will form a heavily bordered hexagon (they will not be regular). Start with the solid color again, and then randomly change out as one with the squares, but again the don't have to match. It's more interesting if they don't. The hexagons cannot be started until the surrounding squares are complete. The first round stitches of the hexagons are placed tight in against the border of the squares, as you can see in the photo. Ideally you don't want to see space between the hexagon point and the square, just as your square corners should be touching each other. The other 3 hex corners should meet, as well. Stitch only until the Uwagake wedges that are adjacent meet each other on the sides..... the hexagon may or may not have completely filled in based on the other dynamics on the ball - either way is fine. (See completed photo above). |
 |
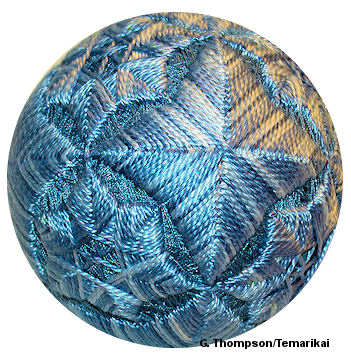
The same stitching sequence using a more structured color path gives an entirely different and lovely result as well. |
This
is a TemariKai.com Printable Page; © 2014, all rights reserved.
Right click to print one copy for personal use.
Last updated 1/2014 © 1998 - 2014 TemariKai.com, G. Thompson/PuffinStuff, Inc.