
Jyuttoubu no kumiawase /10-Combination Division Lines, Wrapping Method
The standard method for laying down the marking lines on Jyuttoubu no kumiawase is the traditional way of treating each of the 6 sets of pins as poles for a Simple 10 marking with 6 independent sets of wraps. There is an alternate method for laying the marking threads that accomplishes the majority of the division by using a continuous wrap of thread, thus eliminating most of the starts and stops of the traditional method. It helps to have a working knowledge of the Jyuttoubu no kumiawase/10-Combination Division in order to be able to stay oriented while using this method (beginners should first learn the traditional method).
The overall idea of this method can be summarized as the sets of poles will be wrapped using a continuous thread, except that when passing the last pin on the last cycle for any set, pivot the thread to the right on the last pin. This pin now becomes the new N pole for the next set of lines. There are a few segments of the marking that cannot be completed in the regular cycles, and they are finished on their own while tacking the centers.
Begin by placing the 12 pins for a 10-Combination Division by whatever method you prefer. While matching sets of colors are used here for demonstration, it's not necessary in normal work. Choose a starting pair of poles and anchor a continuous thread at one of the pins. Note that the 10-point centers will not be tacked until completing the marking so do not remove the marking pins until then.
At any given stage, concentrate on one set of pins as temporary N & S poles. As mentioned above, the working rule is when the thread reaches the last marking pin of the set, do not continue back to the starting pole but pivot the thread to the right at the last pin. This pin also becomes the "new" N pole, and the process is repeated.
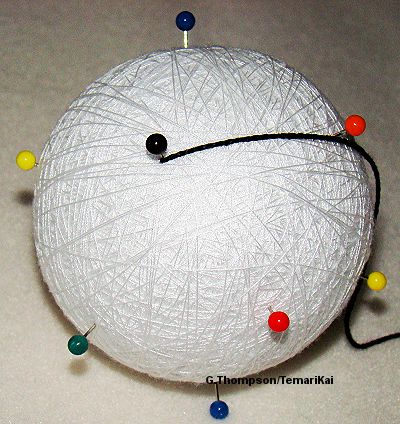 |
The black pins are the first set of working poles. Begin laying down lines as though for a Simple 10, starting by taking the thread to a pin above the equator (rather than a lower one). Continue in the usual way, BUT, do not complete the final segment of the cycle: |
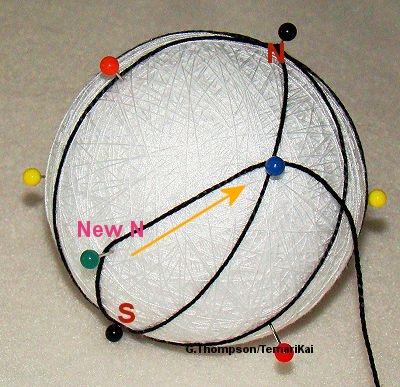 |
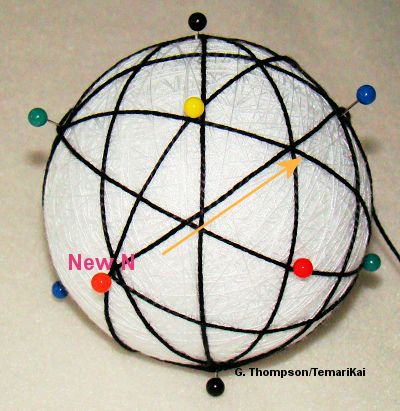
 After passing the S pole & upon arriving at the last pin (green in photo to left), stop before completing the cycle. Pivot the thread to the right around the last/green pin (now the "new" N pole) following the yellow arrow. Using these (green) pins as the N & S poles, begin the new set of simple 10. Continue in normal manner until reaching the last pin in this "green" cycle. |
 |
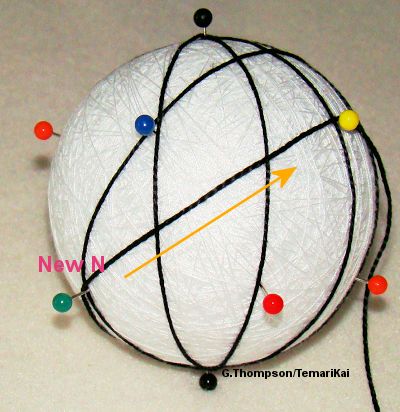
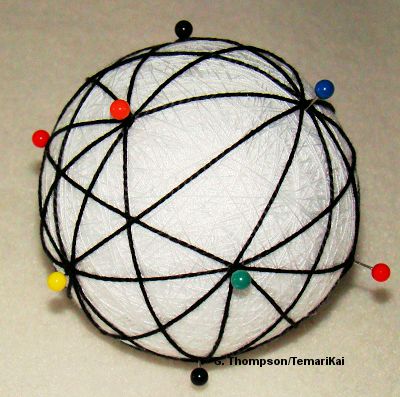
 Just like in the first set, stop at the last pin on the last cycle (orange in photo to left) and pivot the thread to the right. This is now "new" N pole. As before, follow the yellow arrow and lay down another set of simple 10 lines. It can be seen that the standard shapes of a C10 begin emerging, and notice that as work progresses lines are being added to adjacent sets of poles. The total number of wraps needed to be worked on each set is always decreasing. Continue in this same manner, changing to a new pole at the last pin of the current cycle, through five sets of pins. |
 |
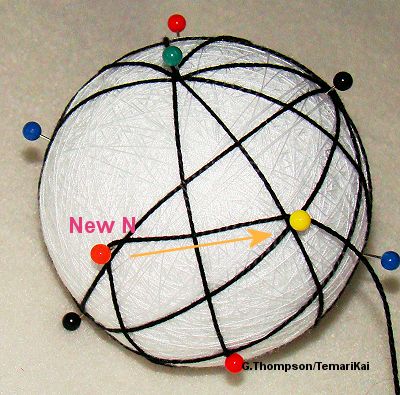
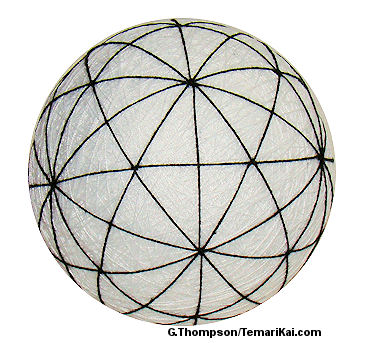 Stop when on the last set
of pins, you cannot continue; that is when there is no last pin
to pivot on that continues the process. The marking will look as
the photo to the left. It is normal that a few segments that
need to be completed individually. Measure off 3 1/2 to 4 wraps
of marking thread. Anchor the thread and begin by tacking the 12
point centers that have been completed (remove pins as centers
are secured) & then complete the needed fill-ins. Stop when on the last set
of pins, you cannot continue; that is when there is no last pin
to pivot on that continues the process. The marking will look as
the photo to the left. It is normal that a few segments that
need to be completed individually. Measure off 3 1/2 to 4 wraps
of marking thread. Anchor the thread and begin by tacking the 12
point centers that have been completed (remove pins as centers
are secured) & then complete the needed fill-ins.As mentioned, beginners should first learn the traditional method but once the understanding of a C10 is gained, this can be a preferred process for some stitchers. |
Resources:
Ai Mizuta, Sensei Takahara, Sensei
Shinazaki, Sensei Ozaki
This
is a TemariKai.com Printable Page; © 2015, all rights reserved.
Right click to print one copy for personal use.
Last updated 3/2015 © 1998 - 2015 TemariKai.com, G. Thompson/PuffinStuff, Inc.