
Temari
Pattern AW19 / TemariKai
Simple Division Patterns
| Advanced design. One of 6 JTA Kyoujyu exam designs. Personal composition, contributed by Anne W. | |
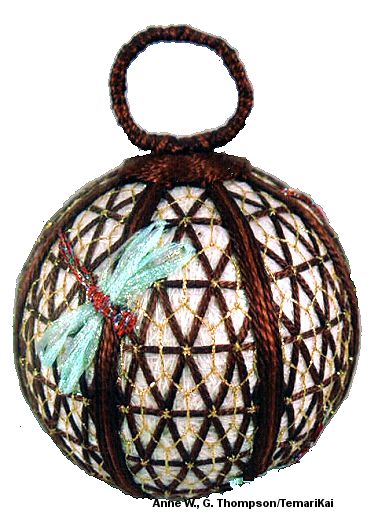 |
Materials: 30 cm circumference mari, wrapped in white
and iridescent blending filament (work as one thread) Pearl cotton #5 in dark and very dark brown; #3 pearl cotton on medium, dark and very dark brown; thin gold metallic; iridescent ribbon floss (3 mm) in blue and green; Nordic Gold Gold Rush in red; DMC memory thread (wired) Marking thread to match mari wrap Prepare a Simple 16 Division with invisible thread; |
 |
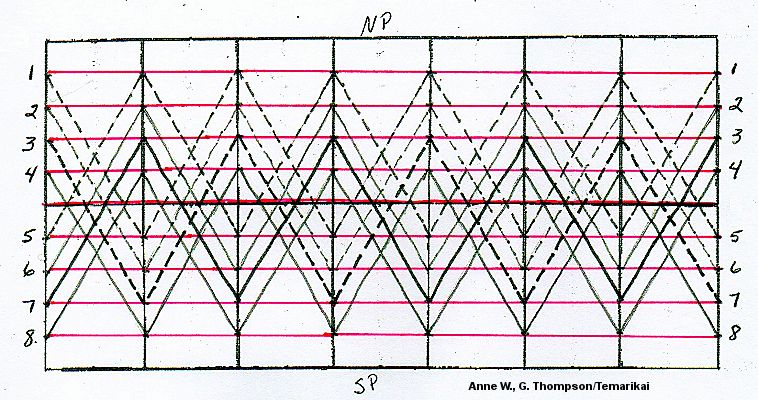
Divide N-S lines into five sections above and below the equator, mark with pins. Lattice is stitched using double thread - 1 strand each of dark and very dark brown #5 pearl cotton. Work chidori kagari rows in diagram to left: Row 1 starts at pt 1, (dotted red line); 2 passes around the mari to completed dotted red path. Remove pins as stitching progresses. Starting at Pt 4follow solid red path in same manner. Start at Pt 2, follow dotted blue line for first pass and solid blue line for second pass. Starting at Pt 3, follow dotted green line for first pass and solid green line for second pass. |
 |
Using pearl #3 work maki kagari on the S8 marking lines. Work 1 row medium brown directly over the marking line, then 1 row of dark brown on either side of medium brown. Work 1 row of very dark brown on either side of the dark brown. With medium brown #3 pearl, stitch a solid circle around north and south poles. Stitch around the maki kagari being careful not to alter the bands. Circles should be large enough to just cover the first line of lattice around the poles. |
 |
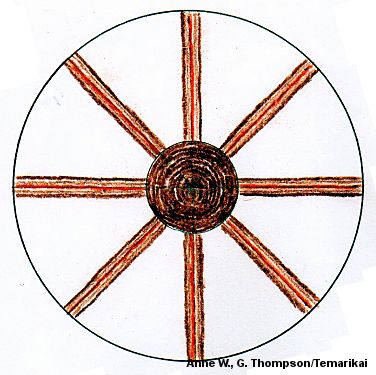
Add gold mesh following diagram to the left in all 8 sections around the mari. Stitch the light green zig zag, then connect with the dark green, using metallic gold thread. |
 |
Using pearl #3 work maki kagari on the S8 marking lines. Work 1 row medium brown directly over the marking line, then 1 row of dark brown on either side of medium brown. Work 1 row of very dark brown on either side of the dark brown. With medium brown #3 pearl, stitch a solid circle around north and south poles. Stitch around the maki kagari being careful not to alter the bands. Circles should be large enough to just cover the first line of lattice around the poles. Using memory thread, make a circle approximately 3-3.5cm diameter. Using dark brown and very dark brown #3 pearl cotton, wrap the memory thread circle, and attach to north pole. |
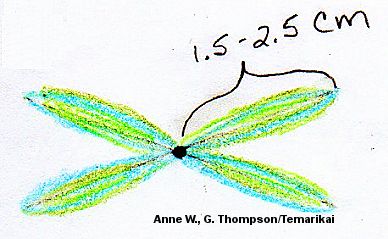 |
Dragonfly wings are each approximately 1.5-2.5cm in length each worked as 4 chain stitches. Use both blue & green ribbon floss worked as single thread. Stitches start at center point. |
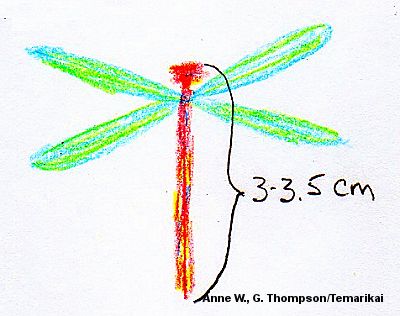 |
Dragonfly body is worked with red Gold Rush. Using double thread work 2 long stitches (3-3.5cm) as shown in diagram to the left. Dragonfly head is 3-4 small stitches round the end of long stitches as shown. Work a few cross stitches where wings and body intersect to add dimension. |
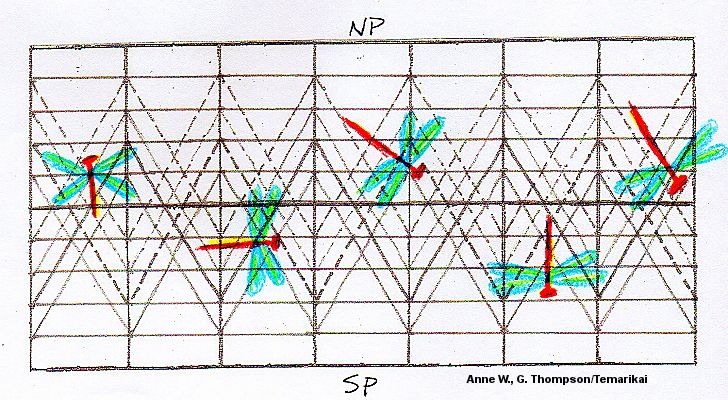 |
Dragonfly placement is shown in diagram to the left. |
This
is a TemariKai.com Printable Page; © 2015, all rights reserved.
Right click to print one copy for personal use.
Last updated 2/2015 © 1998 - 2015 TemariKai.com, G. Thompson/PuffinStuff, Inc.