
Temari
Pattern TB01 / TemariKai
Simple Division Patterns
| Intermediate design. An optical illusion of 3-D cubes created from a tight form of an older tri-direction weave pattern gives this temari its unique design. The design is developed mostly from wrapping and weaving rather than stitching. Any three colors may be used and will develop into the illusion; for this Mardi Gras colors were used: purple, gold and green. There is actually no need for marking thread, just keeper pins at the obi. The pattern was interpreted from a Japanese pattern. Originally posted in 2004; contributed by Terry B. | |
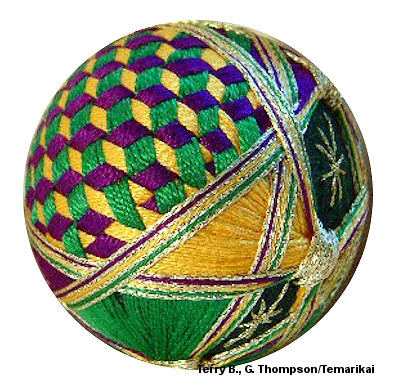 |
Materials: 28cm circumference mari, wrapped in dark green. DMC 5 pearl cotton in 550 purple, 742 gold and 909 green is used. Gold Rush 14 - WG4C gives the gold highlights in the multi-colored outlining. DMC 5282 gold metallic floss is used to create the free form stars. |
| 1. Divide into a simple vertical
6. There is no need to lay marking threads. Once all
pins have been checked and re-checked for placement accuracy add
keeper pins (two adjacent pins to hold a thread bunch) at each
of the 6 obi pins. The ball will have a north and south
pin and 6 sets of keeper pins around the obi. 2. First Weave. Cut 6 wraps plus 5 inches of DMC 742 gold. (Color order is not significant). Start by entering to exit at one of the obi keepers and wrap towards the north pole. On the first wrap you may chose to lay the first thread either left or right of the pole. If left of the north pole, when you reach the south pole lay it on the right side of the south pole (or, vice versa, north pole right, south pole left). Continue the 5 remaining wraps, laying each adjacent to previous wrap. Exit to hold. Adjust and lay stitches close together. |
|
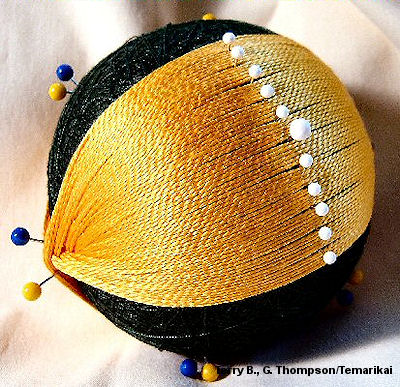 |
3. Place a pin (small is fine) outside the 6 wraps parallel with each pole pin. Continue doing bands in sets of 6 wraps with a pin between each band. I alternate bands left of north pole then right of north which gives a nice gather at the keeper pins. When completed, you have 6 bands on the left and 6 bands on the right of each pole pin, for a total of 12 bands. You will also have a straight line of pins marking the separation of each band at both poles. These pins are just markers, saving the time of counting 6 threads/band for the next weaving step. |
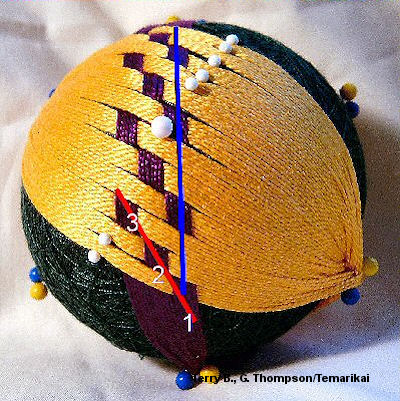
| 3. Second weave. Cut 6 wraps plus 5 inches of DMC 550 purple. (Color order is not significant). The weave will be laid from the center (by the pole) outward. Holding the mari north pole up, facing the keeper pins holding the first weave, turn the mari ¼ turn to the right for your next set of keeper pins (i.e. work the keepers to the left of the starting set). Start by entering to exit at the obi keepers and wrap towards the pole (either left or right of the pole pin). The weave pattern is over 1 band, under 2 bands, over 1 band, under 2, over 1, under 2 over 1, etc. The previously placed pins between each band will eliminate having to count the 6 threads per band. To begin go over the first gold band aiming towards the pole (blue line on photo). Using the eye of the needle, weave under the next 2 yellow bands. Then over 1 band followed by a weave under two. Continue weaving over 1 under 2 until you reach the end of the gold bands. | |
 |
4. Wrap the purple thread thru the keepers to the other
side. Start the same weave but this time you must aim to
the opposite side of the pole. If you aimed to the right
on north, then aim left on south or vice versa.
Follow the same weave pattern: over 1, under 2, over 1, under 2,
etc. Continue laying 5 more threads, using the first
weaved thread as the pattern. This completes the first
band of purple. Adjust and lay stitches close together. 5. The second purple band will have the “over” weave started on the gold band directly above the first weave. Or put another way; go under 1 gold band, then over 1 band, under 2, over 1, under 2, over 1 etc. Weave the same pattern on the south side, the only difference being it will be placed on the opposite side of the band. Adjust and lay stitches close together. |
| 6. The third purple band will have the “over” weave
started on the gold band directly above the second weave.
Or put another way; go under 2 gold bands, then over 1 band,
under 2, over 1, etc. Weave the same pattern on the other
side, the only difference being it will be placed on the
opposite side of the pole. Adjust and lay stitches close
together. The counter pins may be removed after the third
band is laid. 7. Continue laying bands by following the “diagonal” defined by the first three purple bands (note the red line in the photo) to guide where the “over” weaves are placed. Note that you never go “under” more than 2 adjacent bands. When starting a new band, if the “under” count looks like it should be 3 then it really should be over 1, under 2. On each band, once the “over” is placed the subsequent pattern is always under 2, over 1, under 2, over 1, etc. As on the first weave, I alternate bands left of the existing set then right of the existing set which gives a nice gather at the keeper pins. Always adjust and lay stitches close together after each band is completed. When completed, you have 6 bands on the left and 6 bands on the right of each pole pin, for a total of 12 bands. 8. Third Weave. Cut 7 wraps plus 5 inches of DMC 909 green. (Color order is not significant). This weave takes a little more thread per band. As with the previous, the weave will be laid from the center (by the pole) outward. Holding the mari north pole up, facing the keeper pins, turn the mari to face the last set of keeper pins. |
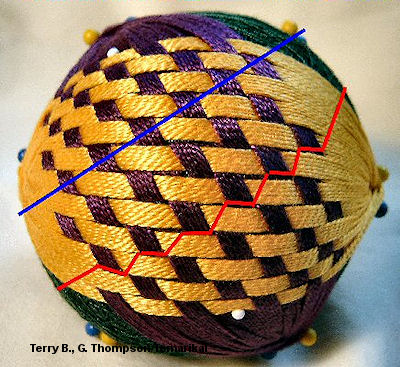 |
9. Finding the third weave path is the most difficult part of this temari. Laying a loose thread across the temari between the empty keeper pins will help your eye find the correct path. The diagonal will not flow directly between the last set of keeper pins. The path will be slightly offset so rotate the thread left or right but keeping the thread straight. The diagonal line is formed by the small rectangular “boxes” of the second weave, in this case by the purple wrap (blue line in photo). The purple “boxes” have an “open” end (where the gold passes under the purple) and a “closed” end (where the purple passes under the gold). Your diagonal must travel thru the “open” side of the rectangle (i.e. you needle has to pass under the purple in the direction of the diagonal). If the diagonal you find is thru the “closed” end the purple rectangle, you have to rotate your diagonal 90 degrees. |
This
is a TemariKai.com Printable Page; © 2014, all rights reserved.
Right click to print one copy for personal use.
Last updated 2/2014 © 1998 - 2014 TemariKai.com, G. Thompson/PuffinStuff, Inc.