
Temari
Pattern SM01 / TemariKai
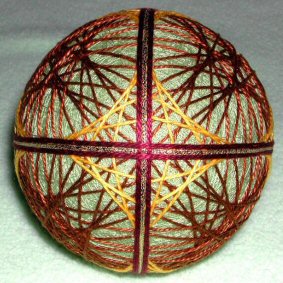
Simple Division Patterns
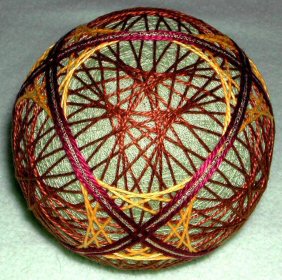
| Intermediate design. Personal composition by Sara M. And - as Sara says, "You are gonna need A LOT of pins. :>) " Originally posted 2004; contributed by Sara M. | |
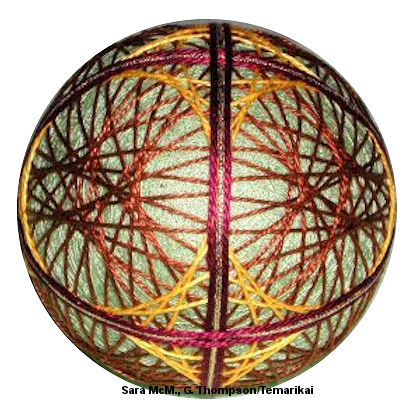 |
Materials: 32cm (or larger) circumference mari, wrapped in
red. Pearl Cotton #5 in 3 colors. Marking thread is not visible on completed design, so choice is not critical. |
| Prepare a Simple 4 division. When dividing the ball keep all your pins in at all the guide line crossings. There are 8 triangles formed from the Simple 4. You will work one triangle at a time. On each leg of the triangle you are working on, divide it into 8 even sections (you'll be adding 7 pins between the two corner pins). I measured the middle pin and eyeballed the other three. | |
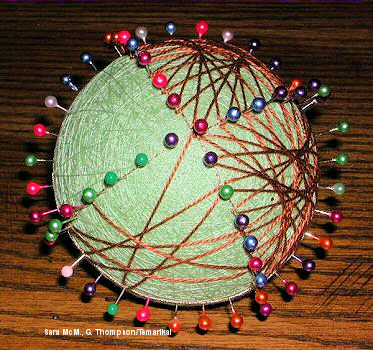 |
The photos show pin markings. Once
your triangle is marked on all sides with pins, pick a starting
point, any starting point. Bring your needle up behind the
marking pin making sure you are also on the outside of the
marking thread. Then count over 11 pins
counter-clockwise. On the 11th pin, pick up some thread on
the right side of the pin (include the marking thread) come
around the pin (over the marking thread) and count over another
11 pins and repeat. When looking at the photo at the left,
you can see the most of this. Also notice that it's going
to look pretty random until you finish all the lines. Go
to an adjacent triangle and mark the other two side with pins
and repeat. Make sure that you catch the loop of the
finished triangle side with your stitches. |
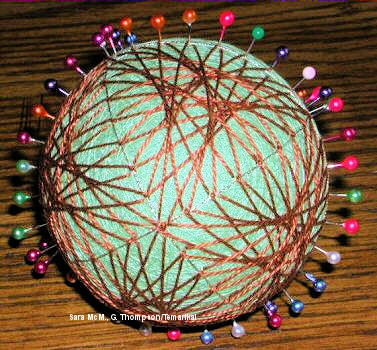 |
I grabbed very little thread of the mari wrap while doing
the stitches on this ball and relied on the actual stitches
themselves to keep each of the others in place. You
can see what I mean in picture at left. The pins did
get in the way and I would remove them when I finished two
adjacent sides. Also, I added the yellow stitches as an
afterthought after all the pins were removed. I didn't
re-add pins, I just used the existing loops. I did the
yellow the same way only counting over 5 pins and not doing
the stitches that would follow the marking thread (you'll
see what I mean when you get to that point.) Then you'll just do a wrap design along the marking threads. Note that along the marking threads with all your loopy stitching, it will be bulky along there. I used a gold Kreinik ribbon (sp?) gold to kind of PUSH the bulk down. |
 |
|
This is a TemariKai.com Printable Page; © 2014, all rights reserved. Right click to print one copy for personal use.
Last updated 2/2014 © 1998 - 2014 TemariKai.com, G. Thompson/PuffinStuff, Inc.