
Temari
Pattern SH04 / TemariKai Simple
Divisions Patterns
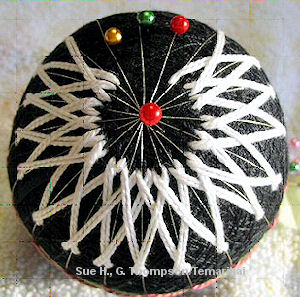
| Advanced beginner design. Sue H. learned this while studying in Japan with Ozaki Sensei. Originally posted 2005; contributed by Sue H. | |
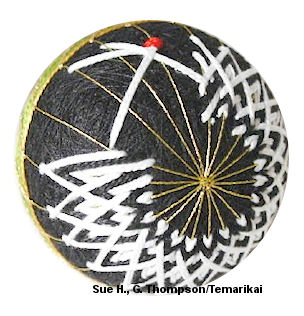 |
Materials: 24cm circumference mari, wrapped in
black. black temari base divided into 20 with equator in
gold thread. Pearl cotton #5 in white, black, red, green and brown; it is important to use these colors since they are associated with cranes. Gold marking thread Prepare a Simple 20 with gold marking thread. |
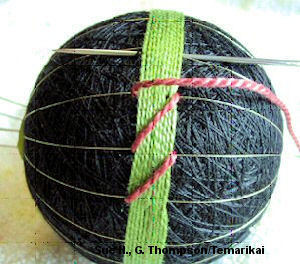 |
1: Thread your needle with a single strand of green and create
a wrapped obi – 5 rounds on the north side of the equator line,
5 rounds on the south side of the equator line. 2: Use brown thread to create a diagonal line across the obi from one marking line to the next. |
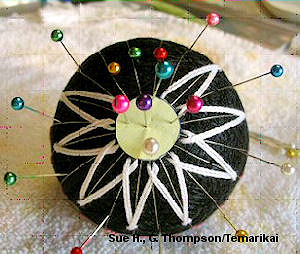 |
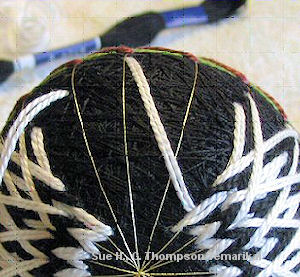
3: You will be stitching uwagake chidori kagari. If you have trouble keeping the pole stitches even, pin a small paper circle to the pole. Fold the paper into quarters to find the center. Pin marking lines, measuring 2 cm from the edge of the obi toward the North Pole; however, leave 3 consecutive marking lines without pins.Place a pin on these 3 marking lines near the pole to help remind you not to stitch on these lines until later. |
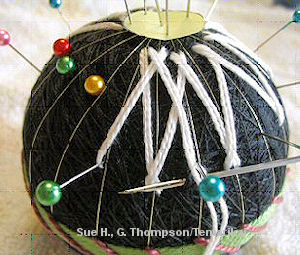 |
 5: You now have marking lines #1 through #17 designated with a pin 2 cm from the edge of the obi. Begin with a double strand of white. Enter the thread about 1 cm from pole or at the pole guide. Keeping both threads from twisting, take a stitch just below the pin near the obi on the next marking line. Continue around in this chidori kagari method to marking line #17. Anchor and exit the thread. |
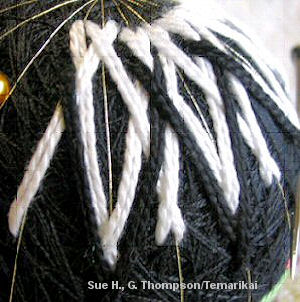 |
7: Using double thread in black, repeat steps 5 and 6 with
uwagake chidori kagari with the pole stitch 2-4 mm below the
white stitch, and the lower stitch 4-6 mm below the white
stitch. Don’t be afraid to stretch
the points. 8: Using double thread in white, repeat steps 5 and 6 with uwagake chidori kagari, with the pole stitch 2-4 mm below the black stitch, and the obi stitch 4-6 mm below the black stitch. Don’t be afraid to stretch the points. |
 |
 9: Remove the three pins on the unused marking lines (#20, #19, #18). With double thread in white, bring your needle up from under the 1st row pole stitch on marking line #17; bring the threads toward the obi on marking line #19 (the center one of the three unused marking lines) so that it ends about the same distance from the obi that the third round of kiku stitching ends (about 1 cm). 10: With double thread in white, bring your needle up about 2 cm from the edge of the obi on marking line #20; carry the threads to a point just over the line created in step 9 and take a stitch about 2-3 cm from the obi edge. Carry the threads back over the line created in step 9 and bury the end under the 1st white pole stitch on marking line #1. |
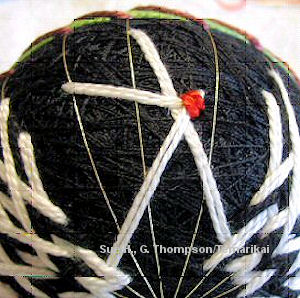 |
11: With single strand of red, take two overlapping stitches
on top of the white stitch. 12: Repeat pin placement and create another crane on the opposite pole. Crane heads may be on the same marking lines, or placed in the opposite direction |
This
is a TemariKai.com Printable Page; © 2014, all rights reserved.
Right click to print one copy for personal use.
Last updated 1/2014 © 1998 - 2014 TemariKai.com, G. Thompson/PuffinStuff, Inc.