
Temari
Pattern SC03 / TemariKai
Simple Division Patterns
| Accomplished beginner to intermediate design. Interpreted design. Originally posted 2005; contributed by Susan C. | |
 |
Materials: 32 cm circumference; mari wrap will not show Pearl Cotton #5 in colors of your choice Marking thread: 2 colors of sewing thread, will not show. Since mari wrap is covered, choose something close to color value of the stitching threads so any bleed-through is not conspicuous. Use inexpensive thread to mark; in a pattern where all the marking threads are to be covered, use regular sewing thread for the markings to avoid ridges in your finished ball. |
Mark the mari in a Simple 6. Add an extra marking line to form a hexagon around both the north and south poles, about 2cm from the pole. Label the 6 pentagon points at the north pole as A through F. Label the 6 pentagon points at the south pole as 1 through 6, with 1 being on the same vertical line as A, 2 being on the same vertical line as B, etc.
With a different color sewing thread add additional marking lines from point A at the north pole to point 4 at the south pole (should be directly opposite each other on
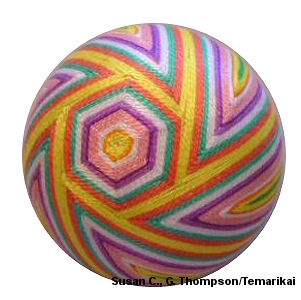 the mari),
from point B at the north pole to point 5 at the south pole, etc.,
continuing in this fashion until you have all 6 oblique lines from the
north pole hexagon to the south pole hexagon, with each one crossing a
vertical line at the equator. Tack these threads at the equator.
the mari),
from point B at the north pole to point 5 at the south pole, etc.,
continuing in this fashion until you have all 6 oblique lines from the
north pole hexagon to the south pole hexagon, with each one crossing a
vertical line at the equator. Tack these threads at the equator.Now work tsumu kagari spindles on the oblique marking lines (the ones marked in the second color thread.) Place two pins on the marking thread that runs from Point A to Point 4 (the “A to 4 line”), dividing that line into equal thirds. These are the pins around which you will stitch your spindle. (I found it helpful to put two more pins on the obi, one ½ way between the A to 4 line and the B to 5 line, and the other ½ way between the A to 4 line and the F to 3 line … these gave me a guide as to how wide to make my spindle.) As you work your spindle be sure to stretch the points. When the spindle is completed you want the sides of the points to fall alongside the lines marking the hexagons at the poles. Complete the other five spindles in the same manner … using the same number of rounds of each color as you did on the first spindle. As the last step, you will stitch the hexagons at the two poles. This pattern also has the potential for making a fun and interesting bits ball.
This
is a TemariKai.com Printable Page; © 2014, all rights reserved.
Right click to print one copy for personal use.
Last updated 2/2014 © 1998 - 2014 TemariKai.com, G. Thompson/PuffinStuff, Inc.