
Temari
Pattern HB02 / TemariKai
Simple Division Patterns
| Intermediate to advanced design. Interpreted from a Japanese book. Originally posted 2003; contributed by Helen B. | |
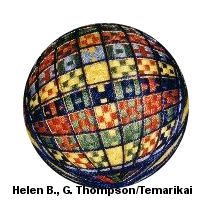 |
Materials: 28cm circumference mari, wrapped in red. Pearl Cotton #5 in light blue, a navy, a soft orange and a yellow |
From Helen: I will give directions for my exact placement of colors, numbers of rows, etc. which differ completely from the picture in the Japanese book. The weave and the colors can be varied infinitely. In my ball, the threads are placed very tightly and closely together.
Divide the ball into fourths, with pins at the North Pole, the South Pole, and along the equator at East and West. Place additional pins midway between East and West. (I use a green pin for West and a yellow pin for East, which helps me know where I am. Yellow for East because of the sunrise; green for West because green means go and because of "Go West young man." Blue pin for North Pole, red for South. I used a gold marker thread both to mark and for accent in the weave. Place marker thread from North Pole to South Pole, crossing the equator. Place another marker thread around the equator. Now place another marker thread around the ball, starting at the equator midway between East and West. Your ball will have 4 triangles above the equator and 4 below. With the North Pole facing up, enter another marker thread to start on the equator at the West, or green, pin, and run it in a shallow curve toward the East pin. The highest point of the curve is 2 cm. up from the equator at the midway marker thread. Curve back down to the East pin, reverse the ball, and mark it from East to West on the southern hemisphere. Place marker thread similarly from midpoint to midpoint, in a shallow curve with the highest point 2 cm from the equator at the East and West pins. This sounds complicated, but isn't. You are marking off the field which will be covered with the woven pattern. You will be wrapping the ball in the wide areas within those shallow curves.
Now you're ready to wrap. I used a light blue, a navy, a soft orange and a yellow. The navy is used within the wrap, and also after the wrap and on top of it for accent. The mari is a soft yellow. Starting with the North Pole up, toward the sky, and with the West pin facing you, wrap 2 rows of light blue to your right, completely around the ball along side the shallow curve marker thread, West to East, across the equator, and then down under and back up to the West pin. Keep the North Pole up, and wrap 2 rows of light blue on the opposite side of the ball, to your left but again going from West to East, then down under, then up to West again. Your threads cross over themselves at the equator. Keep them tidy and close together. They will be attractively "bundled" later. Those are the outsides of the pattern. Now to your right wrap a gold marker thread, then to your left.
Similarly, now wrap 12 rows of navy thread around the ball to your right, then around the ball to your left. Finish off with gold wrapper thread.
Next: 12 rows of orange around the ball to the right, then around the ball to the left. Then the gold wrapper thread.
Next: 12 rows of light blue in each direction, finished with gold thread.
Next: 12 rows of yellow in each direction. This is your center row. I kept my threads very close together and things got tight but there was room. Now for the weaving.
NOTE: I used DMC 5, but your wrapping threads may be wider or narrower. Or your wrapping may be tighter or looser than mine. You can alter and adjust to make your wrapped spaces fit and hold the same number of threads. But if you do adjust the number of wrapped threads, keep the number divisible by 3. In the woven part that follows, you weave under and over, repeatedly, always the same number of threads. So if you've wrapped in batches of 12, you can weave over 4, under 4, over 4. Batches of 10 would not work. Batches of 9 would work: over 3, under 3, over 3. Batches of 15 would work.
Now the weaving begins. You have been wrapping from West to East, starting at the equator. With the North Pole still up, move the ball so that you will begin wrapping also starting at the equator but now from midpoint to midpoint. The color sequence changes. So does the final number of rows. Gold marker threads are used between colors. Before you start weaving wrap two rows of light blue in each direction. They will lie on top of what you wrapped before, and will act as border/accent threads. Finish with gold thread.
Now start weaving. Your first color will be 12 rows wide. Use the eye end of the needle to pass under threads. Weave a 4/4/4 basket weave pattern, as follows: weave 4 rows of yellow over 4 of dark blue, then 4 rows under, then 4 rows over. The next color you'll encounter will be orange: weave four under and over making sure that as you go along weaving and encountering the different colors you always go under/over/under/over, never over/over or under/under. When you've made it all the way around then do the next four rows, with your under/over basket weave maintaining its change of direction. After 12 rows of yellow, finish with gold.
Next color: light blue, 12 rows wide. Similarly weave 4 rows of light blue, keeping the under/over sequence correct. Then 4 rows again, then again. Finish with gold.
Next: 12 rows of orange.
Now, for some reason I stopped being symmetrical. My next 12 rows are navy, woven under/over the same way in groups of 4 each; then 12 rows of yellow, then 12 rows of light blue. This completes the woven part of the ball.
Now outline each far side of your woven areas with four rows of navy. Essentially you are wrapping the navy threads over those first shallow curves you placed with marker thread. Then I accented each division, in each direction, with one wrap of one navy thread. The final gold threads show up nicely, making each "square" stand out. This helps make the quilted look.
To bundle the crossed threads at the equator, thread your needle with navy and enter it so that it exits on the equator at one side of a crossed mass of threads. Wrap it up around the mass neatly, go under it again, up and under again and again carefully placing each thread alongside the last until the mass has formed a neat attractive bundle. When all four masses are thus bundled, you can (if you choose) lay down four more navy threads for your equator, passing under the bundles. The ball is done. It takes a while and sounds very complex but once you get going it is easy. Good luck.
This
is a TemariKai.com Printable Page; © 2014, all rights reserved.
Right click to print one copy for personal use.
Last updated 2/2014 © 1998 - 2014 TemariKai.com, G. Thompson/PuffinStuff, Inc.