
Temari
Pattern GT03 / TemariKai
Simple Division Patterns
| Intermediate to advanced design. This was one of 8 JTA Shihan exam designs. Personal composition, originally posted 2007, contributed by Ginny T. | |
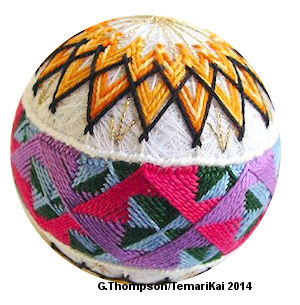 |
Materials: 25cm mari wrapped in white Pearl Cotton #5 in pink, lavender, dark green, medium blue, variegated yellow, black, white. Medium gold thread. Prepare Simple 16 division, using white thread for marking lines. Add extra horizontal marking lines 1.5cm above and below equator to form obi band. |
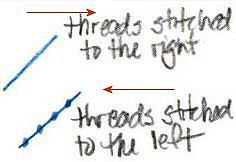
| The design is worked like a Yubinuki design. Stitching is done on a band of vertical sections from S16 division with chidori kagari, moving right to left or left to right on subsequent rows. Color placement in the sections, along with direction of stitching and number of rows, forms an interwoven design. | |
 |
Take small stitches just above and below the extra horizontal marking lines, being sure to keep even tension and straight lines on top and bottom of band. Adjust angle of stitch to keep thread laying smooth (may change based on size of mari). |
 |
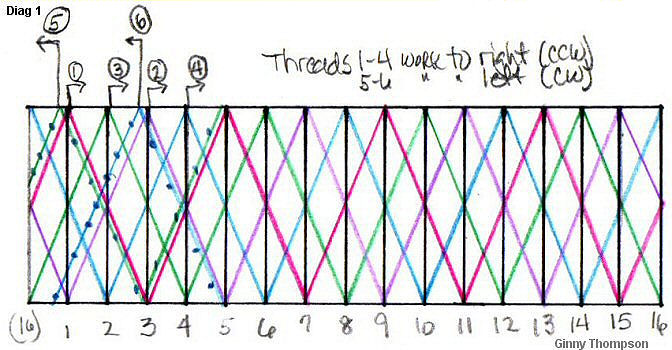
The pattern is worked in 2 layers. Layer 1 (short arrows) is six threads. One cycle is one row of each thread being stitched around the ball, back to the starting point. Complete the one row of each thread before doing the next one. |
 |
|
| Thread 1 is pink; work zigzag to the
right, around the ball starting at the top of Section 1, skip
down to the bottom of Section 3, to the top of Section 5, etc,
back around to 1. Thread 2 is lavender; Start at the top of Section 3, work to the right and skip to bottom of 5, top of 7, etc back around to 3. Thread 3 is green; Start at the top of Section 2, work to the right and skip down to the bottom of 4, back up to top of 6, etc back around to 2. Thread 4 is blue; Start at the top of Section 4, work to the right, down to bottom of 6, up to top of 8, etc back around to 4. Thread 5 is green; Start at the top of Section 1 just to the left of the pink thread, and work to the left, down to the bottom of Section 15, up to 13, etc back around to 1. Thread 6 is blue; Start at the top of Section 3 just to the left of lavender thread and work to the left, down to the bottom of 1, up to the top of 16 etc, back around to 3. Work about 5 +/- cycles of all six threads until the green-blue and blue-green sections have been filled. Pink and lavender sections will be half-filled. End off each thread. |
 |
|
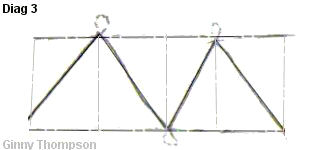
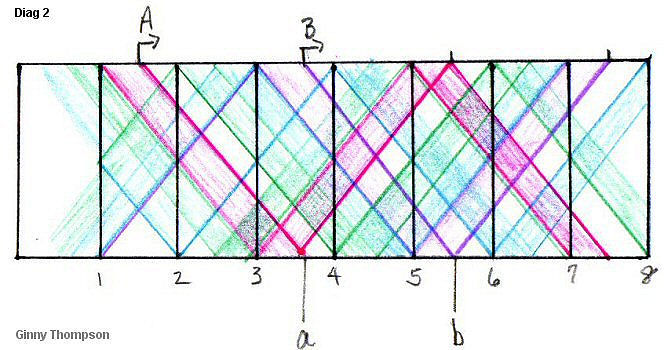
| See Diag 2. Layer 2: Thread A is pink. Thread B is lavender. Both threads work to the right. Work one round of Thread A from 1 1/2 to 3 1/2 (Pt. a) to 5 1/2 (Pt b) back to start. Work one round of Thread B from 3 1/2 (Pt a) to 5 1/2 (Pt b) etc., back to start. Repeat this cycle of both threads to fill the half-sections (i.e., 1 1/2 - 2) (about 5 rows). |
| Obi finishing: With white pearl cotton, work a decorative row
of Outline Stitch along edges of obi. (It adds to texture, but
may be omitted if desired). Pole design (can be decorated any way you choose): Work Kiku design, spacing top and bottom 1/3 from center and edge of obi band. Work 3 rows variegated yellow and one row of black using Uwagake Chidori Kagari, but work Uwagake only around thread of one previous row instead of all previous rows. With medium gold thread, work long straight stitches from V-notch to opposite V-notch of Kiku design on each pole; tack center. Work long and short stitch sprays in every other section between obi band and Kiku notch. |
This
is a TemariKai.com Printable Page; © 2014, all rights reserved.
Right click to print one copy for personal use.
Last updated 1/2014 © 1998 - 2014 TemariKai.com, G. Thompson/PuffinStuff, Inc.