
Temari
Pattern GK16 / TemariKai Simple
Divisions Patterns
| Intermediate to advanced. Interpreted from various Japanese sources. Originally posted 2005; contributed by Glenna K. | |
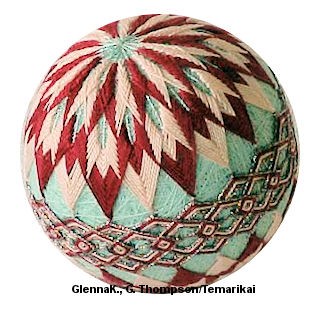 |
Materials: 32 cm circumference mari, wrapped in light
green #5 Perle Cotton in light and dark pink Pearl Cotton #5 in green, purple, blue. Plan to have a good amount of thread. Metallic thread in silver metallic |
| 1. Prepare a Simple 20 Division,
mark with silver metallic thread. Don't lay an equator thread,
but mark with pins. 2. Measure down and place pin half way between NP and equator and be sure to alternate two colors of pins. Stitch a narrow kiku pattern using uwagake chidori kagari for 5-6 rounds, working light pink on even mark lines and dark pink on odd mark lines. Weave the two colors by working one round of light, then one round of dark. |
|
 |
3. Work a “V” shaped outline pattern for 7 rounds.
This pattern is worked around the lower points of the previously
worked kiku. The “V” outline begins close beneath the last round
worked and forms an outline of that element. Enter the
wrap thread on the right side of the previous point. Exit
the wrap thread on the left side. Complete the outline by
stitching back into the wrap thread on the right of the mark
line. Take your needle into the wrap thread and under
everything to come up to the left of the 2nd mark line clockwise
from the entry point. Be careful not to pull these
stitches too tight. It might help to place a pin on either
side of the first kiku to prevent your stitches from collapsing
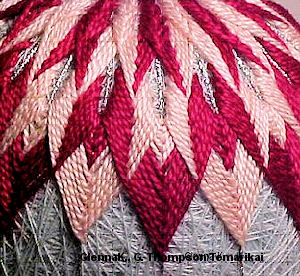
it. Begin the light pink pattern on odd mark lines immediately below the last round of dark pink. Begin the dark pink pattern on even mark lines. Work one round at a time on each mark line so colors weave. Work the dark color last. See the following example. |
 |
 |
 |
| In order to help illustrate this special variant of the pattern element, here is a set of photos showing the stitching element in four colors of thread for teaching purposes | ||
| 4. Measure along the mark lines from lower kiku point to point across the equator. Be sure the equator pin is in the center of each mark line segment. When any adjustments needed have been made, stitch the obi with Kreinik braid or silver metallic. | |
 |
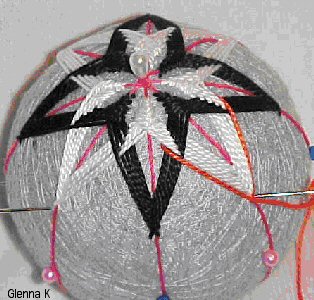
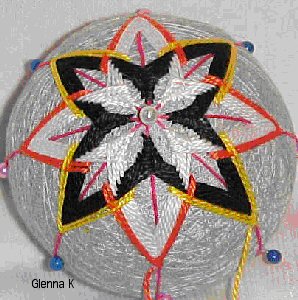
Determining obi placement and thickness: 5. Determine how wide (number of thread rounds) you want your obi pattern. My sample was 4 rounds. Lay those threads side by side on a piece of paper to get the width of your bands. Measure on each mark line and place pins for your north and south points. Use the band width measurement to be sure the final round you stitch lies where you want it. 6. Sketch this as a pattern on a piece of paper. |
 |
Draw 5 vertical lines (about 1 1/2” long and about 1/2”)
spaced about 1/2” apart. These represent your mark lines.
Draw 1 horizontal line through the middle of the vertical
lines. This is your obi. Measure 1/2” above the obi line
and place a dot on each vertical line. Make another dot
1/2” below the obi line. Locate the intersection of the obi with the far left vertical line. Write “12” to the left of the intersection. On the next vertical line to the right write “8” to the left of the obi intersection, write 11 by the north dot, and write 9 by the south dot. |
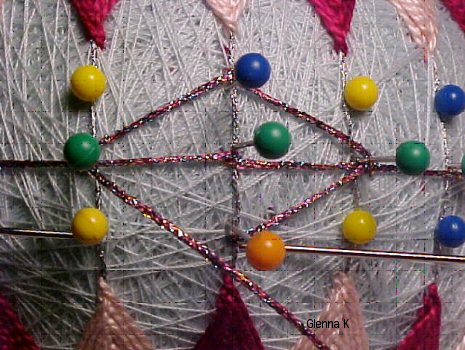
| On the next center vertical line write “4” to the left of the obi intersection, write “10” to the right of the obi intersection, write “7” by the north dot, and write “5” by the south dot. On the next vertical line to the right write “6” to the right of the obi intersection, write “3” by the north dot, and write “1” by the south dot. On the last vertical line write “2” to the right of the obi intersection. 7. You will now stitch the diamonds by taking herringbone stitches at each of the numbers in sequence. Thread your needle with #16 braid. Bring your thread up to the left of 1. Rotate the mari so the obi thread is vertical and stitch 2 around it. Rotate the mari again so 1 is north and 3 is south. Take a herringbone stitch at 3 around the vertical line. Rotate the mari again so 2 is north. Take a herringbone stitch around the obi line below the intersection of the vertical line. |
This
is a TemariKai.com Printable Page; © 2014, all rights reserved.
Right click to print one copy for personal use.
Last updated 1/2014 © 1998 - 2014 TemariKai.com, G. Thompson/PuffinStuff, Inc.