
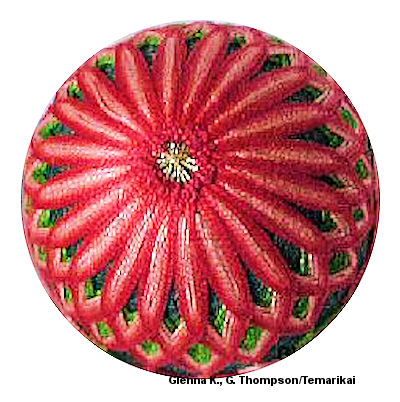
Temari
Pattern GK11 / TemariKai
Simple Division Patterns
| Advanced design. Interpreted from Japanese book. Originally posted 2005; contributed by Glenna B. | |
 |
 |
| Materials: 32cm mari, wrapped in dark green. #5 Perle Cotton (DMC Green #905, Brick #352, 351, 350, 349, 347). Gold marking thread. | |
2. Place two pins on each mark line: 1/2 way between pole and obi and 1/3 up from obi. You should now have 5 pins on each mark line.
Green Chidori Kagari
3. With doubled thread in green, Green work chidori kagari at the pins. Begin at a 1/3 pin, then take the next stitch above the 1/2 pin on the next mark line to the right, then back down to the 1/3 pin on the next mark line. Continue this zigzag pattern around the mari until you get back to your start point. DO NOT end thread. Repeat the same pattern on the alternate mark lines.
4. Stitch 4-5 more rounds using shitagake chidori. Each round is below the previous round and tucked up close so they touch. You will need to hold the upper point of the previous round up a little when you insert your needle. After the stitch is taken the previous round will naturally fall back in place. You should have a wide band of parallel rows which cross each other between the mark lines. Repeat on the opposite pole. Important: Leave the 1/2 mark pin in place until all stitching is complete.
Brick Spindles
5. Remove the 1/3 mark pins. Measure down 1/3 from pole and replace the pin. Tsumu kagari spindles will be worked around the1/3 pin (spindle top) and the 1/2 pin (spindle bottom). Use single thread in the lightest brick shade. Mentally number the mark lines counter clockwise around the mari or use pins if needed.
6. Bring needle up at the bottom of the green stitching on line 1. Lay the thread over the green pattern and to the right of the 1/2 pin on line 2. Rotate the mari so the pole is facing you and the stitch you just took below the green stitching is facing away from you. Take the stitch (touching the pin) between the 1/3 pin and the pole. Rotate the mari back to your starting position. Lay the thread over the green pattern and to the left of the 1/2 pin on line 2. Complete the spindle by taking a stitch below the green pattern on line 3. You should now have a spindle which begins on line 1, loops around two pins on line 2, and ends on line 3. Continue to work spindles in your lightest color until you get back to your start point. Repeat the round, stitching spindles on the alternate mark lines. End that color.
7. With your next darkest color and stitch the next spindle round. Be sure to stretch the points. The lower point of your spindle will grow toward the equator. Threads will cross at the bottom of the spindle and at a space between each mark line. Leave the 1/2 pin in place and groom the threads flat on either side and below it.
8. Continue to work spindle rounds. Each subsequent round is in a darker shade. Be careful not to pull the rounds too tight. Groom the threads so they lay flat.
9. When the last round is complete, go back and tack the last intersection of the bottom of the spindle (the threads cross over the mark line).
10. The last round of the spindle on the left side tends to slip. Secure the top of the spindle by stitching a French knot. Wrap the thread around the needle twice. Insert the needle point into the mari. Make sure it pierces that left side thread to hold it in place. Take up the slack in the thread on the needle so it is close to the point. Stitch under the thread wrap to another point which needs a French knot.
11. Repeat on the other pole.
OBI
12. The obi is a series of chidori kagari stitched in the same manner as in #3. Remove the equator mark pins. Determine how wide you want your bands and mark that width by measuring down from the bottom of each petal toward the equator and place a pin on the mark line. There will be 2 pins on each mark line.
13. Select any pin and with doubled thread stitch chidori kagari for 2 rounds in the darkest shade. Be sure the rounds are close together.
14. Sample was stitched in this sequence: darkest shade on odd mark line; then green on even mark line; then lightest shade on odd; then medium shade on even.
This
is a TemariKai.com Printable Page; © 2014, all rights reserved.
Right click to print one copy for personal use.
Last updated 2/2014 © 1998 - 2014 TemariKai.com, G. Thompson/PuffinStuff, Inc.