
Temari
Pattern EB01 / TemariKai
Simple Division Patterns
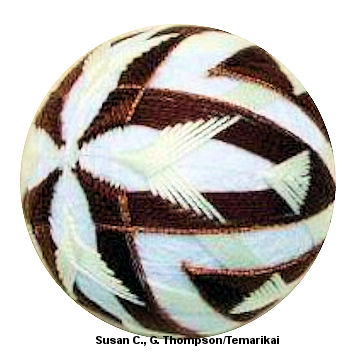
| Beginner design. "The Fish Temari"... inspired by TT member, Janny (from The Netherlands), Susan C. and Elsie B. collaborated on working this design out. If colors are chosen appropriately an image of a fish (or fish skeleton) out at you when you look at it. Elsie B. and Sue C. collaborated on this write up, originally posted in 2005. | |
 |
 |
From Elsie: I used a 3" mari. Experiment with other sizes if you wish (webmaster's note - if you go much beyond a 3" mari, you probably have to think about increasing the number of the vertical divide since close spacing is part of what makes this illusion work). Wrap with white or another light color. This will show, and becomes part of the fish. Choose two stitching threads--one color the exact same shade as the thread wrap (this will become the rest of the fish) and one dark color for contrast to set off the fish motif. The marking is a Simple 8 marking with an obi, using the perle cotton that's the same color as the mari.
ARRANGEMENT OF THE KIKU:
Around the North Pole you will be stitching a kiku using uwagake chidori kagari on four of the threads (every other thread of the eight) with the dark color. Also around the North Pole you will be stitching a kiku on the other four threads with the light color.
Do the same on the South Pole side of the mari, but if a marking thread has the dark color stitched on it at the NP, it will have white stitched on it at the SP. If there is white on a thread at the NP, stitch the dark color on that thread at the SP. Begin the dark kiku as close to the poles as possible. Begin the white/light kiku about a centimeter from the poles. When stitching the points toward the equator, stitch them on the side of the equator away from the original pole. For example, if the kiku is at the NP, the stitches at the equator are taken on the SP side of the equator, and vice versa. This allows the points to interweave with the kiku at the other pole and form the fish's tail fins. The first round is just "over the border" of the equator, and the subsequent rounds stretch toward the opposite pole.
STITCHING ORDER (Finally! You thought I'd never get to it, didn't you???)
NP - go around once with the dark color
SP - go around once with the dark color
NP - go around once with the white/light color
SP - go around once with the white/light color.
Here's a super hint from Susan:
"If you start with your color at the equator, rather than the pole, then when you've gone all around the top, you can just slide under the equator a little bit to the next MT (marking thread) and do the color around the bottom side (one less time to stop and start.)." Is that not a cool hint? That means you don't have to have four threads going at once! Keep stitching until the fish looks like it's a good size for your temari and the fins all look like they're the right size for your fish. When it looks OK to you, stitch a couple more rounds with the dark color so the fish really stands out and is framed by the dark thread. When it was all done, I did the official Hayashi (is that correct???) 'nudge and fudge' step with the tail fins. You can leave them so it looks like they are straight across (parallel to the obi), or play with them so they form a 'V' shape. The one in my TT file have v-shaped tail fins. Just use a blunt needle to move the threads about and see what you come up with.
This
is a TemariKai.com Printable Page; © 2014, all rights reserved.
Right click to print one copy for personal use.
Last updated 1/2014 © 1998 - 2014 TemariKai.com, G. Thompson/PuffinStuff, Inc.