
Temari
Pattern CVH01 / TemariKai
Simple Division Patterns
| Intermediate design. This pattern was inspired by a photo seen from the National Gotenmari Competition held in Akita Prefecture, Japan. Four elongated Kiku motifs stretch from the north to south pole. Originally posted in 2012; contributed by Cheryl VonH. | |
 |
Materials: 28cm circumference mari, wrapped in dark pink Pearl Cotton #5, 3 shades of green Metallic thread in silver Prepare a Simple 8 Division |
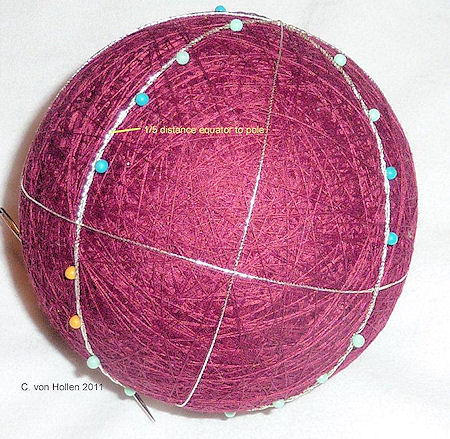 |
After completing the Simple 8 division, add extra marking
lines: Determine the distance from equator to pole. Use pins to divide this distance into fifths (1/5). Do this on alternate marking lines, in both hemispheres as shown in the photo to the left. |
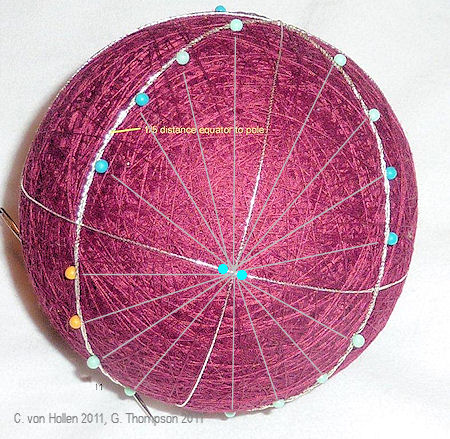 |
Working on a vertical marking line that does not have pins,
place a place a pair of keeper
pins at the intersection of that vertical line an the
equator. Add diagonal marking lines, going from a pin in the
northern hemisphere to the "matching" opposite in the southern
hemisphere, passing through the keeper pins at the equator. Tack
the threads at the equator. Repeat in the 3 other sections. |
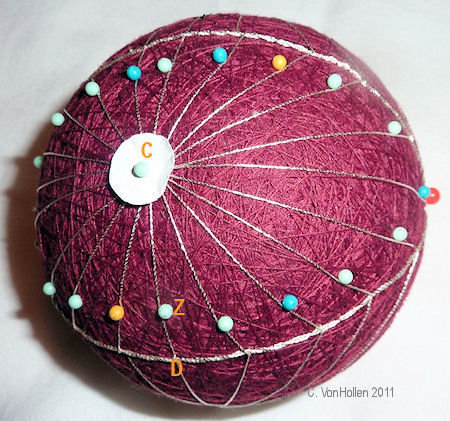 |
The design uses Uwagake
Chidori Kagari, to create a kiku motif that is centered on
the equator. The center points can be placed as close in as you
desire. In this example, a small paper circle is pinned to the
vertical marking line/equator intersection (which is the center
of the kiku motif) to make even spacing on the inner points
easier. To determine where the first row of the outer (bottom)
stitches of the kiku are placed, locate Segment C-D: Point C and
D are the intersections of the equator and vertical marking
lines, and Segment C-D is the length of the equator between 2
adjacent vertical marking lines (i.e., 1/8th of the
circumference). Locate point Z, which is placed 1/4 of the
length of Segment C-D in towards point C from the vertical
marking line. All remaining pins to locate the
outer/bottom starting points of the kiku are placed distance D-Z
in from the marking line, in each section. This is what
elongates the kiku yet keeps the edges even. |
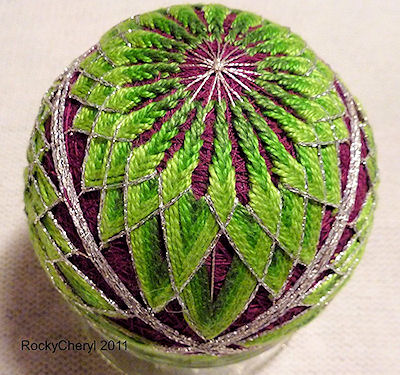 |
For this size mari and #5 pearl cotton, work 7 rows of uwagake
chidori kagari in the usual manner to create a kiku motif. This
example uses 2 rows of dark green, 2 of medium green and 3 rows
of light green. Finish with one row of metallic. Repeat in each
of the other three sections. Complete the design by adding maki kagari bands on the vertical marking lines between the kiku motifs. |
This
is a TemariKai.com Printable Page; © 2014, all rights reserved.
Right click to print one copy for personal use.
Last updated 1/2014 © 1998 - 2014 TemariKai.com, G. Thompson/PuffinStuff, Inc.