
Temari
Pattern AB02 / TemariKai
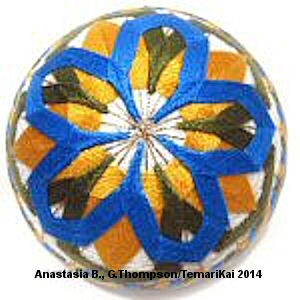
Simple Division Patterns
| Intermediate design. Personal composition. Originally posted 2006; contributed by Anastasia B. | |
 |
 |
| Materials: 28 mari wrapped in white.
Pearl cotton #5 in three colors (yellow, green, and blue);
Metallic gold. |
|
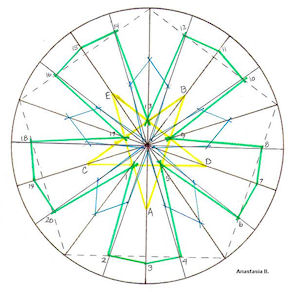 |
Prepare a Simple 20 division. 1) On every 4th mark line, mark the point 2cm up from the equator. With marking thread, stitch a pentagon using these points (see dashed lines in diagram). You will need these extra mark lines to place the green stitching. |
| 2) Next, stitch the yellow hoshi kagari (star). Double check to make sure you are on the correct mark line (you want one of the lines halfway between the lines that have the pentagon points). Measure two centimeters up from the point where the extra mark line crosses the original S20 mark line. Mark this same point on every 4th mark line. These are points A-B-C-D-E on the diagram. Stitch hoshi kagari around these points. You will do quite a few rows – keep going until the points of the stars reach a little bit (half a centimeter or so) past the extra mark lines you placed in step 1. | |
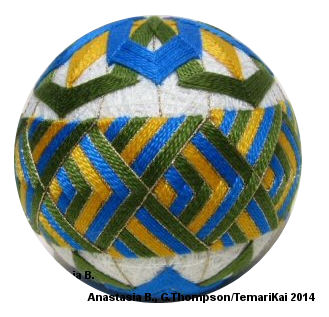
3) For the green layer, follow the green lines and numbers 1 through 20 on the diagram. Start your thread just inside one of the corner points of the pole pentagon created by the hoshi kagari (#1). Take your next stitch around the extra mark line where it crosses the next S20 mark line (#2). Next, take a stitch on the next guideline just below the point of the yellow star (#3). Stitch #4 is a little bit tricky – the stitch is taken around the extra mark line when it crosses the next S20 mark line, reverse the orientation of the threads so that they mirror the stitch at point #2. In other words, if the thread that runs from #2 to #3 crosses over the thread that runs from #1 to #2, then make sure that the thread running from #3 to #4 crosses over, not under, the thread running from #4 to #5. This may seem nit-picky, but it will give you nice symmetrical shapes. Take the next stitch – #5 – just inside the next corner point of the pole pentagon. Continue around in this same manner until you come back to your starting point. For the next rounds, the stitches closest to the pole (points 1, 5, 9, 13, and 17) are uwagake chidori kagari. All other stitches are chidori kagari. Continue stitching these rows until the points nearest to the equator are 2cm from the equator. 4) The blue stitching is done in the same general manner as the green. Before you start stitching, measure about 2cm up from the points of the pentagon you stitched with marking thread in step 1. Begin on a mark line that has one of the hoshi kagari points on it. Start your thread as close to the pole as possible. Take the next stitch around the next mark line over, just below where the green and yellow stitching meet. Take a stitch at the pin you placed on the next guideline. Continue as you did for the green stitching, once again using uwagake chidori kagari at the points nearest the pole and chidori kagari at all other points. Continue stitching rounds until you like the way it looks (but do not go any further than the extra mark lines you stitched in step 1. 5) Repeat this same process on the other pole. 6) Stitch a thimble ring in the wide space left around the obi, or decorate the equator any way you wish to. (Webmaster's note: Thimble rings are just that, made and used in Japan that lend their designs well to Temari obi patterns. They are many and varied, and not the scope of this design instruction). |
This
is a TemariKai.com Printable Page; © 2014, all rights reserved.
Right click to print one copy for personal use.
Last updated 2/2014 © 1998 - 2014 TemariKai.com, G. Thompson/PuffinStuff, Inc.