
Temari
Pattern TB03 / TemariKai
8-Combination Patterns
| Intermediate to advanced design; Interpreted from Naniwa Temari & Miyako Temari / Elegant Temari, ISBN4-8377-0695-0 pgs 7 & 36. Originally posted in 2005; contributed by Terry B. | |
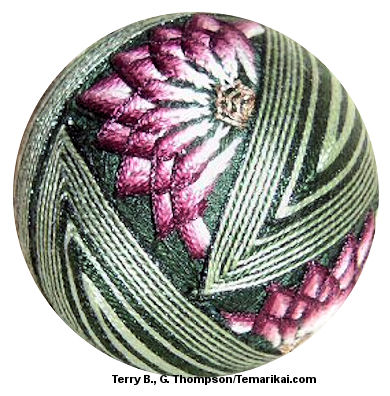 |
Materials: 24 cm circum mari, wrapped in green Pearl Cotton #5 DMC dark green #890, pale green #368, wine #3685, light wine #3687, pale pink #3354, white #blanc. Kreinik 009 #12 dark green braid, #153V #12 dark wine braid, #002V #12 gold braid. Marking thread to match mari wrap Prepare a 8-Combination Division |
 |
Stitch the four lotuses first in four of the 6 squares of the
C8 marking. Locate a series of four squares that connect around
the ball forming a ring. Any four forming a ring around
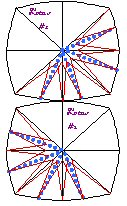
the ball will work. Select a square and add additional marking
lines on half the square, per diagram (light blue dashed lines
are additional markings). These additional marking lines
are as if for marking the full square for a 16 division kiku, so
half square has 8 marking lines. You will be adding 4
additional lines to the existing 4 lines (light blue dashed
lines are additional markings). Run marking lines to
and anchor on existing marking lines. Use uwagake
chidori kagari to create a half of a kiku as per the red
lines on the diagram at right. Measure for the
outside kiku point is roughly 1/3 of the marking line
length. Interior kiku point is close to center, allowing
only for a very small gold flower center. The half kiku is
done as usual, on alternate marking lines. One pass does 4
petals; the next pass does the alternate interwoven 4.
Stitching tip: with a longer needle, you can pass under mari
threads and connect the end of one pass to begin the next pass,
thus eliminating a thread bury, a cut and a thread start. Stitching color sequence is two white, two pale pink, two light wine, two wine and finish with one Kreinik wine braid on the outside. Four wraps of a color will complete the petal stitching of that color. Complete the lotus by back-stitching a gold half circle in the flower center. |
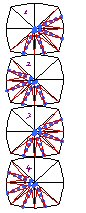 |
Do the next half kiku on an adjacent square. It should be positioned as in the diagram, end point to end point with the kiku facing as per the diagram. Continue doing half kiku, facing as per the diagram on adjacent squares. When completed, the four squares will connect in a ring around the mari. |
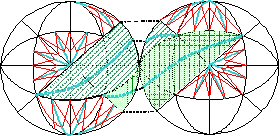 |
The final design element is adding the four leaves inter-twined between the lotus. To find the position of the leaves use the diagram below. Each leaf outline is already laid by existing marking lines. Pairs of leaves are adjacent to each other. |
| You will need to add an additional
marking line down the center of each leaf. The position is
annotated by the teal dotted line in the diagram. Run
marking lines from an intersection where 6 existing lines cross
(and two half kiku meet) to the point on the opposite side of
the leaf. Anchor on existing marking lines. Measure
the line into thirds and place a pin at each third. Each leaf is formed by tsumu kagari / spindle stitch on the new marking line. The sequence of colors, from center out (as it is stitched) is: Green Kreinik, 4 light green, 3 dark green, Kreinik, 2 light green, 1 dark green, Kreinik, alternate light and dark green to fill space ending with Kreinik. Be sure to stretch the points of the tsumu. Position the thread alongside the previous row, holding it out to where it crosses the spindle mark line. The thread will point to where your stitch should be taken (or slightly lower). It’s always further from the previous stitch than you expect it to be. Fill in the center of each half lotus with the gold Kreinik #002V braid by forming a series of half circles using a back-stitch on the marking lines coming together at the center. |
|
This
is a TemariKai.com Printable Page; © 2014, all rights reserved.
Right click to print one copy for personal use.
Last updated 1/2014 © 1998 - 2014 TemariKai.com, G. Thompson/PuffinStuff, Inc.