
Temari
Pattern TB01 / TemariKai 8-Combination
Patterns
| Intermediate design; Interpreted from Edo Temari / Temari from Old Tokyo, ISBN# N-4-8377-0394-1, pg 8. Originally posted in 2004; contributed by Terry B. | |
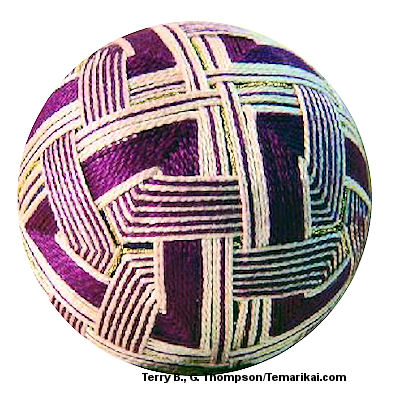 |
Materials: 24 cm circum mari, wrapped in purple Pearl Cotton #5 DMC purple #550, pale pink #225 Marking thread in metallic gold Prepare a 8-Combination Division |
| Stitch all 6 squares of the C8 first. Using the mark
line as an “outside” boundary, stitch toward the center of the
square. For a dark (light) mari, start with the lighter
(darker) color. Stitch 13 lines in each square alternating color
ending with the lighter (darker) color. (Hint: if it
is easier to stitch starting on the “inside” of the square
working out, measure 1.5 cm from the marking thread into the
square. Start there and work out towards the marking
thread.) Lay stitches close together. After completing all squares, work the 8 triangles. They will be worked nejiri style. The triangle positions are easily located at the place where the corners of three squares meet. Stitching starts on the inside of one of the corners of the square (refer to the photos). Alternate “under” and “over” each side of the square using the needle, eye-end first. Go under the first square side (13 threads) then over the next square side (13 threads). Use your needle to clear the way, trying not to catch any mari threads. (Hint: if this becomes tedious, you may want to use paper tabs, slipped between the 13 threads and mari to assist with the weaving. Tabs should be about 1 ¼ in by ½ in, a total of 3 needed). When the next inside square corner is reached, turn the ball so that this corner is pointing up, herringbone stitch under the marking thread. Repeat the “under” and “over” each set of 13 threads. Turn ball and herringbone. “Under” and “over” and you’ve reach the starting point. Each triangle design consists of 2 light rounds, 8 dark rounds, 2 light rounds. Each triangle must be worked with exactly the same under and over sequence. Each side of the triangle is always the same sequence. On the initial side of the first triangle, if you did an “under”, always do an “under” first on subsequent sides of this triangle and also on subsequent triangles. This holds true no matter which corner of the triangle you start in. Lay stitches close together. |
| The final design element is the ring design around the balls
circumference filling in between two opposing triangles.
This is a process of over and under weaving around the existing
elements, following the triangles to determine the
pattern. To set the first “track”, start at any triangle
corner. Following the marking line at the nearby
intersection, weave the same as the nearby triangle on the same
side of the marking line as the thread track you are
laying. (Put another way, if the triangle goes over, the
nearby track goes over, if the triangle goes under, the nearby
track goes under). Weave completely around the ball
to starting point. The circumference ring design consists
of 2 light (dark), 1 dark (light), 2 light (dark) tracks on EACH
SIDE of the marking thread. EACH SIDE (5 tracks) of the
marking thread will be an opposite weave. If one side (5
tracks) goes under a square then the other side of the marking
line goes over (5 tracks). (This is one of those
surprising geometric tricks, since opposing triangle sides will
always be an opposite weave---IF you were consistent in laying
your triangles.) Use photos as guidelines if needed.
Complete the tracks around the 3 major visible circumference
rings. Note when you cross an existing set of tracks,
interweave the one 5 track side over, other 5 track side under
the crossing 5 line tracks (check photos). Design
comment for the 3 inch -- if you don’t have the tracks follow
the adjacent triangle weave the overall design becomes to busy
and thus less pleasing to the eye. Smooth, nudge and adjust threads for consistency in design. Design is complete. Alternative designs: 1. Do the squares in the solid pattern (2 light, 8 dark, 2 light) and triangles in the alternate colors. 2. Instead of alternating colors use a 2 light, 2 dark pattern adding one line to the original 13 alternating lines. The solid pattern could be 1 light, 10 dark, 1 light. |
This
is a TemariKai.com Printable Page; © 2014, all rights reserved.
Right click to print one copy for personal use.
Last updated 1/2014 © 1998 - 2014 TemariKai.com, G. Thompson/PuffinStuff, Inc.