\
Temari
Pattern LO01 / TemariKai
8-Combination Division Patterns
| Intermediate design; interpreted from Yume Temari / Dream Temari Classic to Modern ISBN4-8377-0199-X Originally posted in 2006; contributed by Louise O'D. | |
 |
Materials: 30 cm circum mari, wrapped in white Pearl Cotton #5 in colors of your choice Marking thread in color of your choice Prepare an 8-Combination Division |
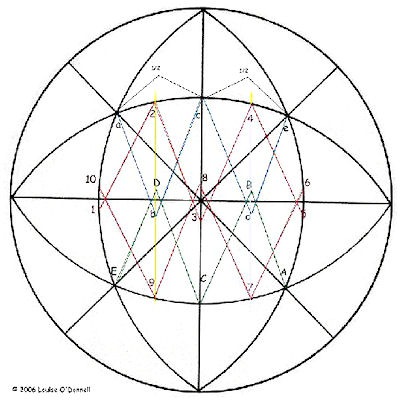 |
After marking the mari into a C8, locate the 6 squares that
are formed around each of the six centers on the C8. Each of
these large squares has four smaller squares in it, whose
corners come together at the pole. You will then divide each of
these small squares in half from top to bottom (see yellow line
in diagram). The 6 large squares will have 8 sections, 4 on each
side of the center line that goes from top to bottom through the
pole. You can either mark it with thread or just measure or mark
the halfway point with a pin. |
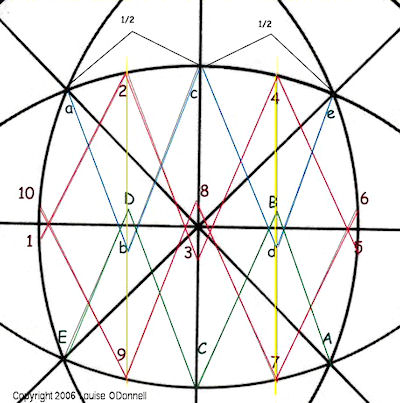 |
Follow the red numbers as in the diagram. This is uwagake
chidori kagari, applied a bit differently. Start stitching
at #1 move up to 2, then down to 3, going “below” the center
line/pole, up to 4 then down to 5, again going past the
mid-line. Now you can exit here and restart or go under the
center line and come out just above. This is important, as you
want to create a ‘half’ diamond on each side of the squares.
(See photo). Then starting at 6 follow the sequence to #10
exiting there. Next is Blue. Enter at ‘a’, then down to ‘b’
(going below the obi), up to c, down to ‘d’ and exit at ‘e’. 4-
This is the last one for round #1, do the same as above, enter
at “A”, up to “B” (going above the obi) down to “C” up to “D”,
and exit at “E”. Repeat these rounds in this order, about 6 rounds in each square. Better to have to few than too many. If to many it will look crowded and loose the diamond effect. |
This
is a TemariKai.com Printable Page; © 2014, all rights reserved.
Right click to print one copy for personal use.
Last updated 1/2014 © 1998 - 2014 TemariKai.com, G. Thompson/PuffinStuff, Inc.