
Temari
Pattern TB05 / TemariKai
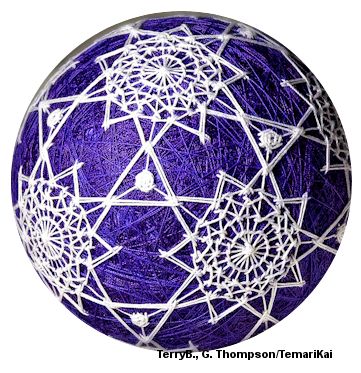
10-Combination Division Patterns
| Accomplished Intermediate design; Original composition, shishuu style, inspired by various designs in Japanese books. Contributed by Terry B., and presented as a TT StitchAlong in September 2014 | |
 |
Materials: 32 cm circum mari, wrapped in color of your choice DMC Cebelia Crochet cotton in white Marking thread is same as stitching thread Prepare an 10-Combination Division using Cebelia thread. |
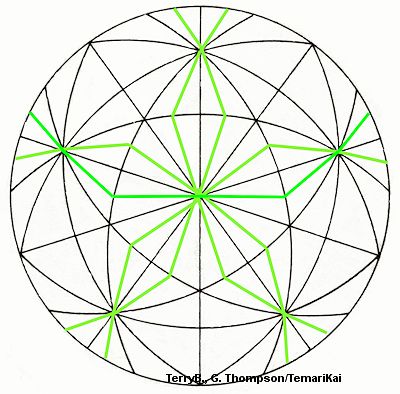 |
Extra marking lines for the C10: These extra lines are not from any multi-face markings but are just to add additional spokes for each C10 centers. When you cross an existing marking line, loop around under it to hold it in place and continue. The crossovers should be at the 1/2 way mark of the small segment line. When finishing on a C10 center make sure you nudge the lines to evenly radiate around the center. |
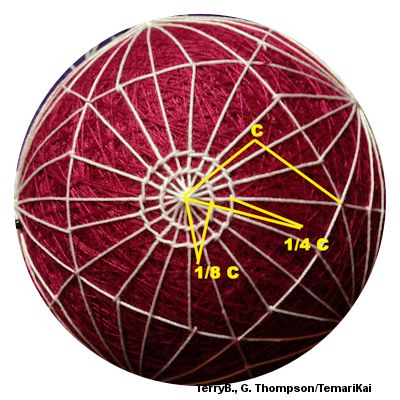 |
Stitch two concentric circles out from each center, using an
offset back stitch. Place first circle 1/8 length of longest
pentagon diagonal (4-5mm) from center. Add second circle
1/4 length of diagonal (4-5mm out from first, 9-10mm from
center). BE CONSISTENT all the way around - if you start the
next stitch “below” the previous, than always start the next
stitch below the previous. If you are not consistent the
circle will NOT have a relatively smooth appearance. Each
stitch starts and ends on a marking line. Groom the
stitches into a smooth circle. Repeat on every center.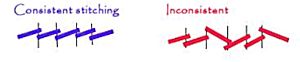 |
 |
Stitch one row of Chidori Kagari around outer circle, using each spoke for a stitch. The width of the chidori is roughly 1/8 of the diagonal (4-5mm) , the same width between the two existing concentric circles. Use your two circles as an eye guide for the width. It doesn’t have to be exact. This is finer stitching compared to normal temari chidori, so take extra small “bites” but be sure to catch mari thread with each bite. Since there is an even number of spokes the design will be correct at the end of the circle. |
| Stitch second row, stitching the
“upper” stitch between the lower point of the previous
row. As you see in the photo, the second row is definitely
not even. Try to get it roughly the same width (1/8 diagonal) as
the previous row, but don’t stress about it. It’s a lace
design, lace is never perfectly even or angular. Repeat on every
center. Still following the photo above, stitch a circle, using back stitch as in the first step, around the outside of the second chidori kagari row. This visually makes the stitching into a circular design as shown in photo. The photo also shows a grooming suggestion using the edge of the needle. It grooms the stitches into a smoother circle. The design should extend roughly ½ the longest diagonal. (If things have encroached close to the edge of the pentagon, it should be removed and repeat these steps using finer/smaller stitches.) Repeat on every center. |
|
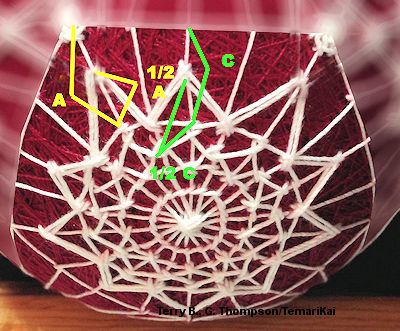 |
Stitch a double row of a larger chidori kagari stitch. Start
this stitching so that the outside of the chidori triangle
points to the corner of the pentagon (i.e. centered on the
longest pentagon diagonal). On the longest diagonal, make the
chidori point reach halfway between the last circle and the
pentagon corner (1/2 A in picture). On other spoke threads
make the stitch reach the halfway point between the circle and
pentagon outline (1/2 C in picture). This step can be done by either using double thread, or stitching 2 rows. It will not result in a symmetrical design. In this C10 section, the design extends to 3/4 of the pentagon shape. When making the chidori stitch, be sure to stretch the point. Repeat on every center. |
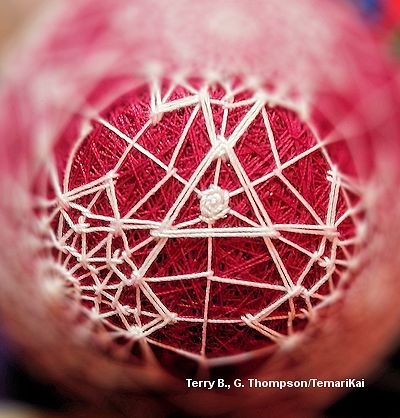 |
Stitch a two row triangle that connects three of the points of the just completed larger chidori kagari. In the center of this triangle, using consistent stitches, stitch a small filled circle to make a "dot". Repeat on every 6 point connection between pentagons. Alternative: a different fill can be used in these triangles, as desired. Examples could be nested offset triangles, smaller toward the center or leave triangle open. |
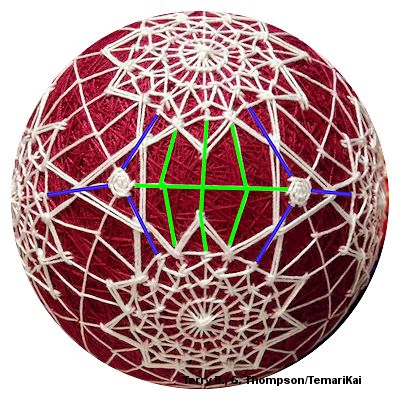 |
The photo at left shows one pentagon side with marking lines colored green. These now will be removed. Note that for the center line of the three almost parallel ones, it is removed all the way to the outer circle done in step 3; don’t stop at the point of the chidori triangle. Also remove the cross line (the pentagon outline) all the way to the design dot in the center of the two row triangle. An alternative would be to also remove the threads marked blue. (These were left intact on this sample.) Removing these all the way from the design dot to the outer design circle might give an even cleaner, airier design. |
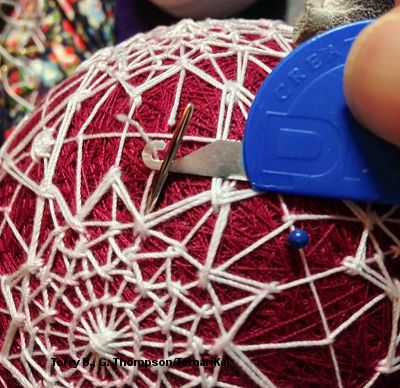 |
An example of how to anchor a snipped marking line: 1) Cut the
marking line in half. This will give you the longest piece
of thread to anchor, both sides being roughly equal. Threads
have to be anchored well otherwise your remaining design could
start to pull out or unravel. The cut pieces are rather short so
it’s much easier to use a needle threader. Notice that the
needle enters close to where the thread will be pulled in.
Also that the needle is parallel to thread, allowing the pulled
thread to be pulled 180 degrees to its existing path. This
creates a firmer anchor. Do a final grooming overall on the ball to sharpen up the design. |
This
is a TemariKai.com Printable Page; © 2015, all rights reserved.
Right click to print one copy for personal use.
Last updated 1/2015 © 1998 - 2015 TemariKai.com, G. Thompson/PuffinStuff, Inc.