
Temari
Pattern ST12 / TemariKai
10-Combination Division Patterns
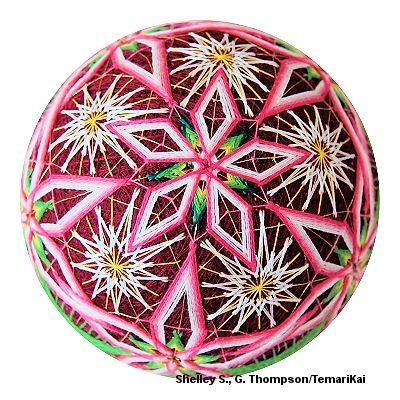
| Accomplished intermediate design; original composition design focusing on integrating various overlapping forms. Contributed by Shelley S. | |
 |
 |
| Materials: 25 cm circum mari, wrapped
in dark red; Stranded
floss in yellow, pale, medium and dark green, white, pale,
medium and dark pink; #80 tatting thread in medium green.
All motifs are are stitched with 2 strands of floss, unless
noted. Pearl Cotton #5 in white, pink and burgundy. Marking
thread: thin gold metallic and thin pink cotton. Prepare a 10-Combination Division with gold metallic. |
|
 |
Subdivide using points 1/3 down the diagonal lines of each pentagon to create stars (see red lines in diagram to left). At the North & South poles stitch, using pink thread, a second subdivision star 1/3 down from the first sub-divide line. In the rest of the pentagon stars, using pink thread, stitch an interior pentagon connecting the inner points from the first subdivision. |
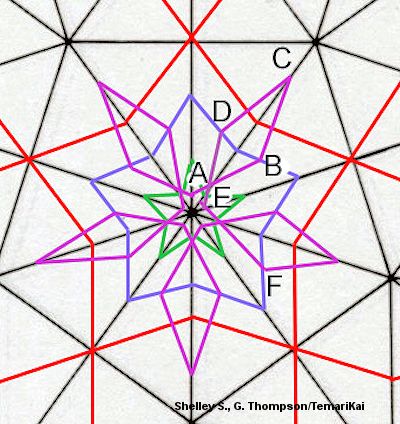 |
In each pentagon stitch an open star, points facing the flat sides of the pentagon. At the N & S poles the points of the first row anchor at the ½ way point to the inner sub-division line. Use one row each of yellow, pale, medium and dark green floss. In remaining pentagons they anchor at the ½ way point to the inner pentagon. At NP using white floss, stitch an open star anchored along the diagonal lines of the original pentagon. Start on a line inside the green star, shown as A in diagram to left, stitch to the right to the 1/3 point of the inner marking line, B, then up to a point ½ way between the outer marking line and the original pentagon, C, back to the 1/3 point to the left, D, then across the first line to E, then repeat to close. |
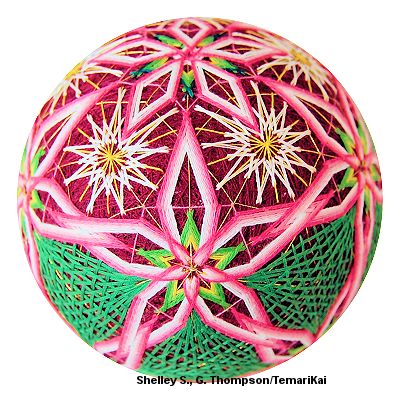
| Using pale pink and dark pink to finish, repeat at the South Pole (now referred to as North and South stars). In pentagons stitch a 5 pointed star. Start as close to the center point as possible and stitch to the 1/3 point on the inside pentagon then just beyond the edge of the original pentagon (refer to first diagram above) using rows of white, pale, medium and dark pink. The points of the stars overlap, except where they enter the North and South pentagon space. Where the floss overlaps at the center point arrange them to create an inner star that overlaps the green star. | |
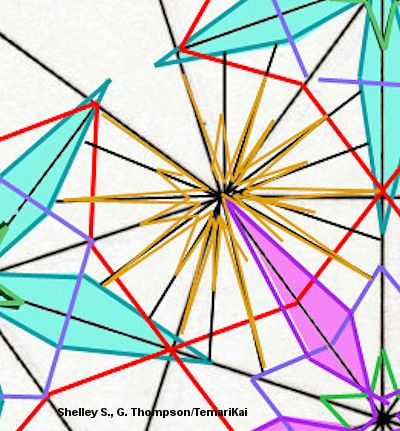 |
Looking at the North Pole star, there is a hexagon space
at the end of each star tip, bounded by the pentagon star
wings. In this space will be stitched the starburst shape
pierced by the wing of the North star. First, subdivide each hexagon triangle into 3 using single yellow thread, shown in detail 3. Then pin a 1/2cm circle to the center of the hexagon shape. Stitch an Uwagake Chidori Kagari starburst in 2 rows, using white floss. Starting on a line closest to the wing of the North star use a long stitch, continue around the hexagon stitching long stitches on every second line. The second row uses short stitches that are ½ the length on the alternate lines. Do not stitch into the North star wing. Complete for all 5 hexagon shapes at both the North and South stars. |
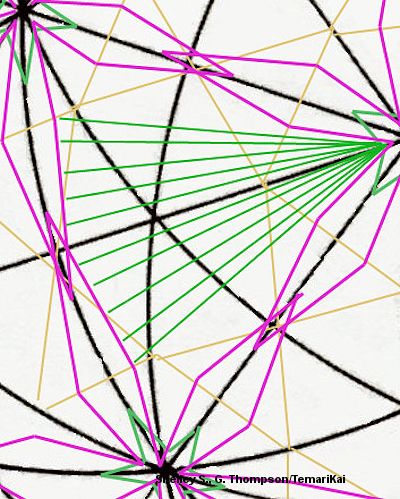 |
Between the pentagon stars is a line of hexagons along the obi line. Use a double thread of medium green #80 tatting thread to stitch 8 long, 4 per side, as shown in diagram to left, from each narrow point to the far side, keeping inside of the gold marking lines. Each hexagon will have 3 interlacing sets of lines creating a net. If required add an additional line to the outside of the lines to fill the space with the netting. Repeat for all hexagons. |
This is a TemariKai.com Printable Page; © 2015, all rights reserved. Right click to print one copy for personal use.
Last updated 2/2015 © 1998 - 2014 TemariKai.com, G. Thompson/PuffinStuff, Inc.