
Temari
Pattern ST04 / TemariKai
10-Combination Patterns
| Intermediate design; personal composition inspired from Japanese sources. Originally posted in 2006; contributed by Shelley S. | |
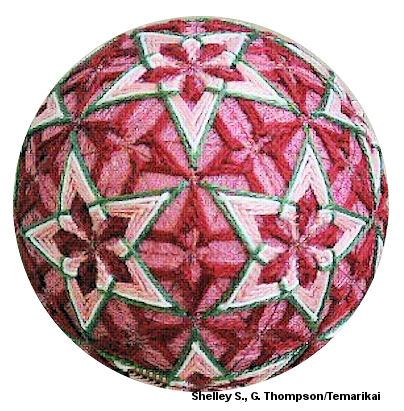 |
Materials: 25 cm circum mari, wrapped in pink Pearl Cotton #5 in burgundy, pink, white and green Marking thread in thin metallic red Prepare a 10-Combination Division |
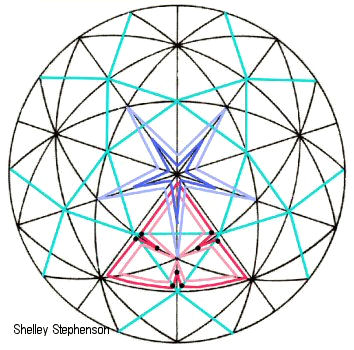 |
Stitching the Design: This is a 2-layer design. The diagram on the left shows the 2 layers as red and blue. The darker colors show the starting row of the pattern and the lighter color shows the last row of the pattern. The first layer, shown as red in the diagram, uses the triangles as the framework. On the detail diagram (below) note the location of the 9 black dots within the triangle, 6 are located on the blue secondary marking lines just inside the triangle (2,4,6,8,10,12) ; these are the outer anchor points. The 3 black dots closest to the center of the triangle are the upper anchor points (3,7,11). These 3 points are located 1/2 way from the center of the triangle. |
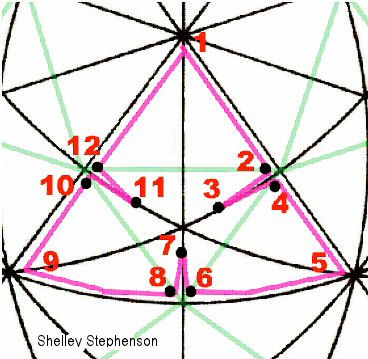 |
The first row, shown in red, starts just inside the point of
the triangle, shown as 1 on the detail sketch and continues down
to the first black dot, 2, then using uwagake
chidori kagari moves to the upper black dot, 3 then to the
next outer black dot 4. Then follow the numbers around until you
get back to the starting point. Repeat for 3 rows until the
points inside the triangle meet. Repeat for all triangles. The second layer is hoshi kagari / 5 point star starting as close to the center of the C10 pentagons as possible and going up to the ½ way point of the adjacent line. See the blue star in diagram 1. Use 3 rows of pink, one row of white and one row of green. This should bring the points of the star to the same junction point as the first layer. |
This
is a TemariKai.com Printable Page; © 2014, all rights reserved.
Right click to print one copy for personal use.
Last updated 1/2014 © 1998 - 2014 TemariKai.com, G. Thompson/PuffinStuff, Inc.