
| Advanced design; learned from JTA classes in Tokyo by Sarah R. and Sue H. Originally posted in 2001; contributed by Sue H. | |
 |
 |
| 40cm circumference mari, wrapped in black. Pearl Cotton #5 in 20 different or graded colors - 10 for each "half", (about one 36"/90cm piece for each color should be sufficient if working a 5-6"/40cm ball). Very fine gold thread. Prepare a 10 Combination division in thread to match the mari wrap (Invisible) | |
 |
|
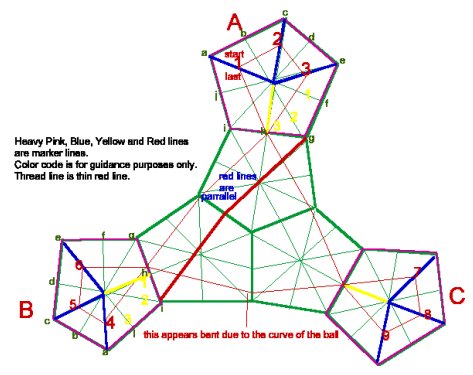
| Division, Orientation, Preparation: Using color-coded pins, place one color at the center of the North Pole (NP) pentagon (for example, a green pin), and the other at the center of the South Pole (SP) pentagon (for example, a pink pin). |
| Using a spare piece of thread, string, or other item that can
be easily used to mark the circumference of the ball, (this is
not stitched into place, it is only used as a pin placement
guide), start at the NP and wrap the marking thread once around
the ball. Now, looking in one direction N to S - notice that
between the NP and the SP there will be two pentagons that are
very close to the string-marker; one slightly to the left and
one slightly to the right. There are a similar two
pentagons on the exact opposite side of the ball, looking from S
to N. (Using the example color pins) Working in only one
direction, N-S, Place a SP-color/pink pin in the center of the
first pentagon that is closest to the NP pin. Find the
pentagon that is the exact opposite of this on the other side of
the ball and place a NP-color/green pin in the center of that
pentagon. Find the second pentagon that was along your
mark-line, and place a NP-color/green pin in the center of that
pentagon. Find the pentagon on the exact opposite side of
this and place a SP-color/pink pin in the center of that
pentagon. Remove the marker line. You should now have
three pins of two different colors (six pins total) alternating
to create a slightly zigzag division of the ball into two
hemispheres (East and West). Looking at the ball from one
hemisphere side, there will be three pentagons in the center
that are not marked by any pins, repeat observation of same on
the other side. While still looking at the ball in a hemisphere
position, note the position of the three "green" pins.
Think of these designated pentagons as "wings" forming one very
large triangle, with the furthest point of the pentagons leading
outward from the wings away from the unmarked center.
Repeat, looking at the other side with the "pink" pins. Choose
any color thread and any pin to start with. Each
hemisphere is worked independently - all the pink pins will be
worked from one side, all the green pins will be worked from the
other side.At your chosen start pin, locate the three "long"
legs of that pentagon that are furthest away from the "empty"
pentagons (where there are no pins) - or the three "long" legs
that are the furthest away from the other two pins of the same
color. These legs will be designated left (L), middle (M) and right (R). L M R shown as 1,2,3. Work your stitches from left to right (put your needle in to the right of the line and out at the left of the line so the thread crosses over the entry point as you make the 2nd stitch to the right of the 1st stitch; 3rd to the right of the 2nd). The first round will be placed on these three legs (L,M,R) at a point that is 1/2 distant from the center of the pentagon and the edge of the pentagon. |
 |
| START - East Hemisphere, Round 1: Wing 1: 1st stitch - bring your needle up to the left of line L at the 1/2 way-point, securing the tail of the thread in the ball. 2nd stitch - move to line M, and stitch ("in" to the right of the line, "out" to the left of the line) at the 1/2 way-point. 3rd stitch - move to line R and stitch as above at the 1/2 way-point. Center: Follow the line of Wing 1 that makes up the edge of the pentagon and is just to the right of the 3rd stitch. It should pass through two of the un-pinned pentagons in the hemisphere. Continue to follow that line as it reaches the next pinned pentagon. Locate the three long legs that are furthest away from the center of the hemisphere as you did in Wing 1. Adjust your long thread as it passes through the two unmarked pentagons so that it is about 1/2 from the center of the pentagons and the outer edge of the pentagons. (you may later find it useful to add a temporary support of pins to hold this thread in place and keep it from slipping until subsequent rounds are added) Wing 2: Once you have located the next three long legs, repeat the stitches as above (L,M,R) 4th stitch - after crossing the two center pentagons - at about 1/2 from their centers to their outer edges - and locating the LMR of the next same-color-pinned pentagon that you encounter, place a stitch at the 1/2 point on leg L. 5th stitch - move to the center point of leg M, and place a stitch. 6th stitch - move to the center point of leg R, and place a stitch. Center: Follow the line of the Wing 2 pentagon that is just to the right of the 3rd stitch. It should cross over the long thread extending from Wing 1 then pass through two of the un-pinned pentagons in the hemisphere. Continue to follow that line as it reaches the next pinned pentagon. Locate the three long legs that are furthest away from the center of the hemisphere as you did in Wings 1 and 2. Adjust the long thread that passes through the two unmarked pentagons so that it is about 1/2 from the center of the pentagons and the outer edge of the pentagons. Add support pins as necessary. Wing 3: Once you have located the next three long legs, repeat the stitches as above (L,M,R) 7th stitch - after crossing the two center pentagons - at about 1/2 from their centers to their outer edges - and locating the LMR of the next same-color-pinned pentagon that you encounter, place a stitch at the 1/2 point on leg L. 8th stitch - move to the center point of leg M, and place a stitch. 9th stitch - move to the center point of leg R, and place a stitch. Center: Follow the line of the Wing 3 pentagon that is just to the right of the 3rd stitch. It should pass over the long thread extending from Wing 2, then pass through two of the un-pinned pentagons then over the long thread from Wing 1. Continue to follow that line as it reaches the next pinned pentagon. Locate your 1st stitch and run the final stitch under the 1st. Bury the end in the ball and clip any remainder. If done correctly, you should now have three diamond-shaped wings branching out from a triangle center. |
| Choose a different color and repeat the above steps starting
your next round to the outside edge of Wing 1 at stitches 1, 2,
and 3. As you cross the center triangle, round 2 will
"naturally" lay to the "inside" of the 1st round, then move back
to the outside edge again as you reach Wing 2. Place
stitches 4,5 and 6 to the outside edge of Wing 2. Repeat
same for Wing 3, and end the last thread under the 1st stitch.
Repeat the above for a total of 10 rounds, using a different
color for each round. START - West Hemisphere, Round 1:
Repeat all instructions for East Hemisphere, using different
colors than what were used for the East Hemisphere. If done
correctly, you should now have two large triangles on opposite
sides of the ball. Both are surrounded by three large
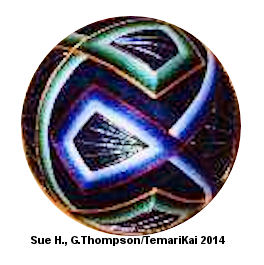
diamond-shaped kite-figures. FINISHING DETAILS:
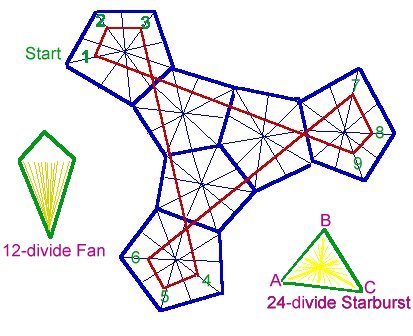
Using together, one of each color of the single-strand thread, create a separate line in-between each of the 24 spaces created by the gold. These lines should be only about 1-2 cm in length, and do not cross through the middle of the gold star, nor touch the outer edge of the triangle. (Sue's note: I personally found it too tight to place these extra threads, and left them off my first ball.) Diamonds/Kites: Using the very fine gold filament, and working within one of the 6 kite-figures: come up close to the edge of the long point of the diamond. Make 12 "legs" fanning out evenly from this point toward the other three corners. Repeat on all 6 Diamond-kite figures. If the two single-strand thread design was used for the center diamonds, it should be repeated in the spaces of the 12 gold legs in the kite diamonds. |
Last updated 1/2014 © 1998 - 2014 TemariKai.com, G. Thompson/PuffinStuff, Inc.