
Temari
Pattern SC04 / TemariKai
10-Combination Patterns
| Advanced design; interpreted from Kii Temari / Temari from Kii Region ISBN4-8733-0393-3. Originally posted in 2006; contributed by Susan C. | |
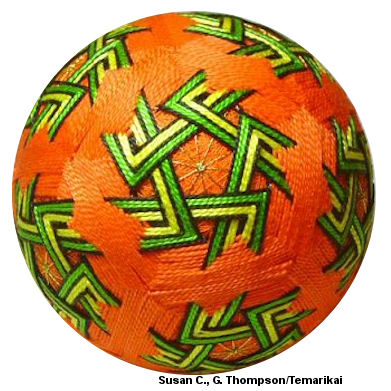 |
Materials: 28 cm circum mari, wrapped in orange Pearl Cotton #5 in orange, black, lt green, yellow Marking thread in metallic gold Prepare a 10-Combination Division |
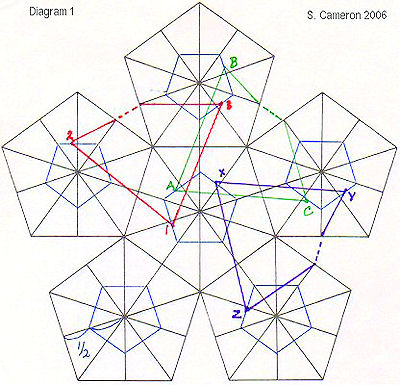 |
With a different color marking thread (mine is white), which
will not show on the completed temari, add an offset pentagon
inside every original pentagon (of the C10 marking), so that the
points are at 1/2 the distance from the poles to the sides of
the original pentagons, on the short marking threads. (See
lower left pentagon in Diagram I.) (Note: on my temari that is
pictured, the small offset pentagons were marked 2/3 of the way
from the poles. This resulted in larger openings at the
poles and shorter tails on the ribbons than I would have liked,
which is why I am recommending using a 1/2 measurement.) |
| All of the triangles are stitched on
the marking lines that form the small offset pentagons (which
you did in your second marking color.) Using one of
the colors for your striped triangles (mine is black), stitch
the triangle shown in red on Diagram 1. Begin at 1 on the
small offset pentagon within the NP pentagon. Advance to 2
in the adjoining pentagon, then 3 in the next adjacent pentagon,
then back to 1. Next you’ll stitch the triangle shown in green on Diagram I, but before you do so, it's a big help to understand how the triangles will be woven. The rule is: The points of all triangles should always be on top of the sides of any adjacent triangles which they intersect. For example, say that you have stitched the red triangle in Diagram I and are now ready to stitch the green triangle described in the following paragraph. In doing so, as you go from A to B of the green triangle, you will come to point 3 on the red triangle --- weave under it. Then as you go from green triangle point C back to point A you will come to red triangle line AB --- your green point A should be on top. So remember, all points on top, always. |
|
 |
 Take your thread under the wrap from 1 to A, and, keeping in mind the weaving rules described above, stitch from A to B, to C, and back to A. Next you’ll stitch the triangle shown in purple on Diagram I. So take your thread under the wrap from A to X, and stitch from X to Y, to Z, and back to X – don’t forget to weave under the points. In Diagram I, it appears that there is a space between the parallel lines of adjacent triangles. It was drawn this way so that you could see where you are taking your stitches on the small offset pentagons. |
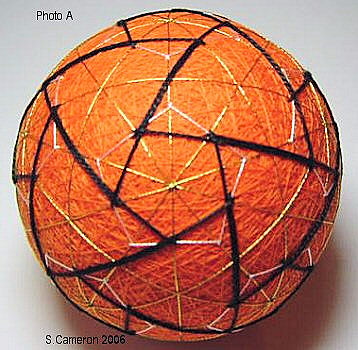
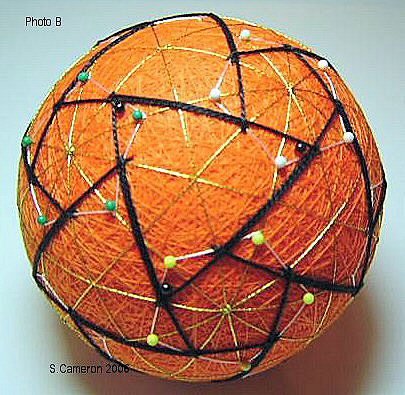
| In actuality, your threads should lie directly next to each other. (See Photos A and B.) Also, on Photo B, there are green pins, yellow pins and white pins at the points of three adjacent small offset pentagons … these may help you to get the positioning of the triangles. Continue in the same manner until you have formed five triangles around the NP, and then do the same around all the other poles on the mari. (Since there is an overlap with other poles, some of the triangles will already have been stitched.) | |
 |
After stitching one complete round of triangles, you are ready
to stitch one round of pentagons. These are done in the
perle that matches your mari wrap. These pentagons are in
the same orientation as the original large pentagons of the C-10
marking (i.e., they’re stitched on the long lines that go from
the poles to the points.) They should be placed so that
the threads are perfectly parallel to the threads of the
original pentagons, and so that the center of each thread butts
up closely to the point of the small offset pentagon that it
encircles. (See Diagram II and Photo C.) There is no
weaving to be done with the pentagons. |
| Continue alternating rounds of triangles and pentagons -- changing colors in the triangles to give the striped effect -- until the points of the striped ribbons butt up to the sides of the adjacent triangles. Then continue to fill in with rounds of pentagons in your background color and your temari is finished. As an alternative, you can do your final round of pentagons in a metallic thread or one of the contrasting colors used in your ribbons. | |
This
is a TemariKai.com Printable Page; © 2014, all rights reserved.
Right click to print one copy for personal use.
Last updated 1/2014 © 1998 - 2014 TemariKai.com, G. Thompson/PuffinStuff, Inc.