
Temari
Pattern GT42 / TemariKai
10-Combination Patterns
| Advanced design; interpreted from Owari Temari / Special Temari from Owari, Japan ISBN4-8377-0391-7. Originally posted in 2007; contributed by Ginny T. | |
 |
Materials: 30 cm circum mari, wrapped in ecru Pearl Cotton #5 in dk pink, dk yellow, med blue and dark blue Marking thread in metallic gold Prepare a 10-Combination Division in fine gold |
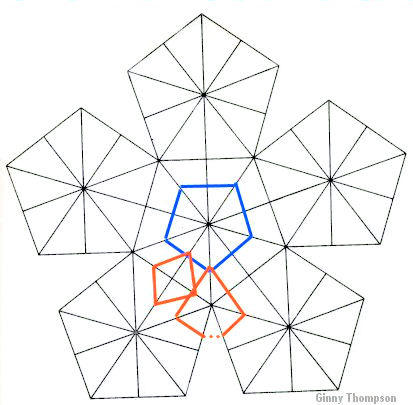 |
Being by locating the pentagons, diamonds and triangles shown
the diagram at left. The placement is such that 1/2 the distance
between shapes is used throughout: Pentagons are placed so that
they are 1/2 the distance between centers and side boundaries;
same for the diamonds and also the triangles. The design is kousa style. Using your chosen design colors (not white), stitch one round of pentagons (one in each pentagon all over the mari); likewise stitch one round in each of the diamonds and each of the triangles. |
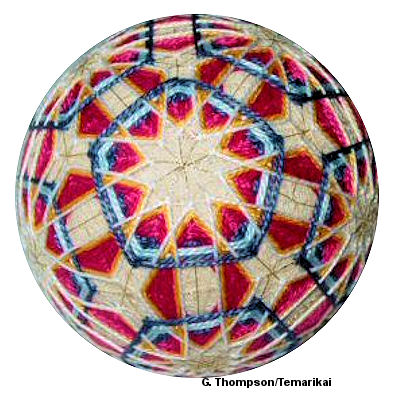 |
Work repeated rounds over the mari, until you have worked
about 1/4 of the way in toward the centers when looking at the
diamonds and triangles. You will also have worked out, towards
the corners, 1/4 of the way with the pentagons. This distance is
only an approximation as you'll see in the next illustration but
it gives you a rough idea and allows you to choose and place
colors. In this example, the pentagons were worked in alternate
stripes of two rounds each. The diamonds and triangles were
worked in dark pink with one row of dark yellow. Make the last round white; you will be working the diamonds and triangles in white from now on, but continuing with the colors you have chosen for the pentagons when working them. |
 |
The special effect on this design is accomplished by altering
the manner in stitching the diamond and triangle layers. When
stitching the diamonds, pass the working thread under the
previous layers of the adjacent triangles; likewise, when
stitching the triangles, pass the working thread under the
previous layers of the adjacent diamonds. The key to determining when to begin passing under as opposed to the regular stitching, is to look at when you can pass the thread under the adjacent layers and still have your thread lie straight for the stitch you are taking. In other words, when stitching a diamond, if you can pass the thread under the adjacent triangle layers as shown in the photo at left, and have the thread/stitch for that side lie straight as is would if you were not passing under, then it's time to start "weaving" (under adjacent shapes but continue over the pentagons). |
| If you attempt to pass the thread under previous layers and it's pulled out of alignment, continue to work regular rounds (like when you started) until you can pass under without it being skewed. In the example above, you can see that it took six "regular" rounds (layers) to get to this point, so that the needle/thread is straight and true on patten to stitch the diamond. | |
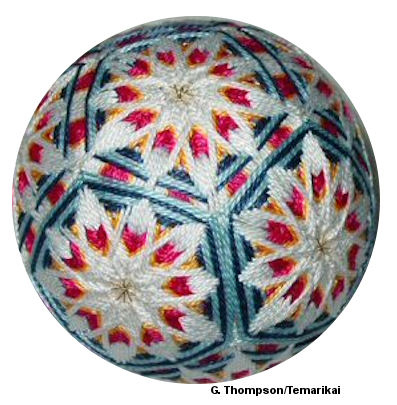 |
Continue working the design, one round per shape on each
layer, with the only difference being that you are passing the
working thread under the previous rounds of the adjacent shapes. You can end the design when the space fills, or you can add one or two rounds of white by returning to the "regular" stitching method (not passing under) - you can see in this example that two rounds of white were stitched at the end, by not passing under. This adds some dimension and depth to the pattern. Continue to finish the pentagons to close in the sides and cover the ball. |
This
is a TemariKai.com Printable Page; © 2014, all rights reserved.
Right click to print one copy for personal use.
Last updated 1/2014 © 1998 - 2014 TemariKai.com, G. Thompson/PuffinStuff, Inc.