
Temari
Pattern GT41 / TemariKai
10-Combination Patterns
| Advanced design; interpreted from Sousaku Temari / Cosmo Book 2, (ISBN4-9377-0280-5), pg 25 & and Ai's lessons. Originally posted in 2007; contributed by Ginny T. | |
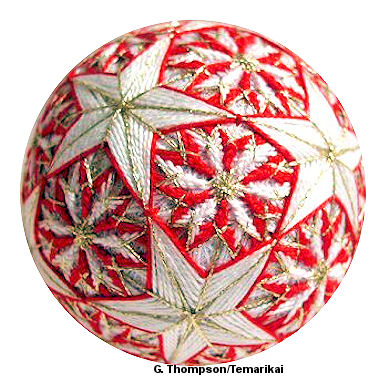 |
Materials: 26 cm circum mari, wrapped in white Pearl Cotton #5 in white and red; others may be substituted Marking thread in fine & medium metallic gold Prepare a 10-Combination Division in fine gold |
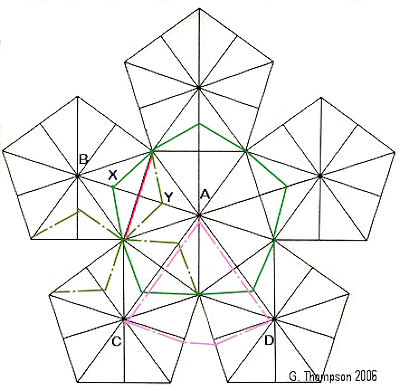 |
Add extra marking lines (jiwari) after completing the Combination 10 marking, as shown in green in diagram at left. You will be stitching offset pentagons, around the center of each C10 pentagon. The points of the additional pentagons fall half way between the centers of the ball and the common borders of the C10 pentagons (shown in red). Point Y is half way between Center A and the pentagon side/border. Point X is half way between Center B, and the same shared pentagon side/border. Mitsubishi diamonds will form as you go.The design is worked in two layers. The first layer focuses on the triangles that form around each 10-center pole, with a kiku motif worked in each one, using a modified Uwagake Chidori Kagari, so that rather than a point at the bottom of the zigzag, a passing stitch is taken to the next set of marking lines at the outer border of each triangle. This allows the bottom point disappear and become invisible under the wrapping threads. |
| The method of working uwagake chidori kagari in each triangle, but passing the bottom stitch of the uwagake chidori under the mari threads rather than creating the usual bottom point, is the crux of working this design | |
 |
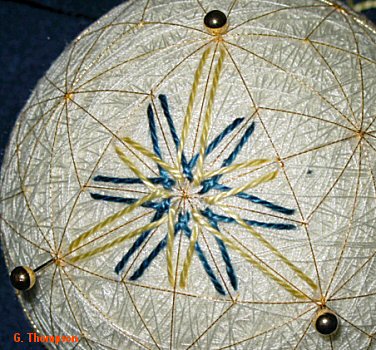
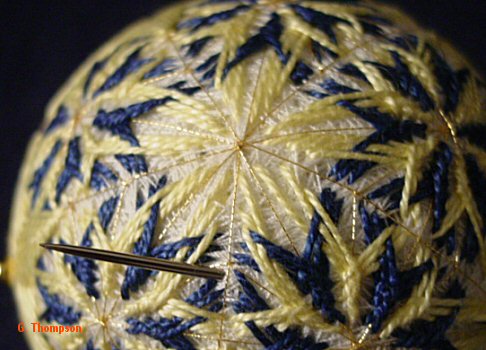
Locate the triangle formed where three pentagons overlap, as shown by the pins. The additional jiwari formed a 10-pt center in this triangle. The kiku motif will be stitched with two sets of five lines. The upper stitches are worked in usual Uwagake Chidori but the bottom point is hidden by passing under the mari threads. Begin with the contrast color - (blue here, red in the completed photo), and enter the thread as shown in Step 1 in the photo. The easiest way to work is to hold the ball with the center of the triangle as though it were 12 o'clock when taking the pole/center stitch; for the next stitch that will pass under the marking thread, turn the ball upside down, so that the border of the triangle where you pass under the marking threads now is at 12 o'clock. |
| Work Uwagake at the center, and then take a small stitch at the bottom (shown as steps 3 and 4 in photo above) that passes under the mari threads to hide the point at the bottom stitch. Take the next Uwagake stitch at the center, and then a small stitch to pass under and move to the next section of the triangle. Repeat until you have worked Uwagake on five lines at the center, as shown. | |
 |
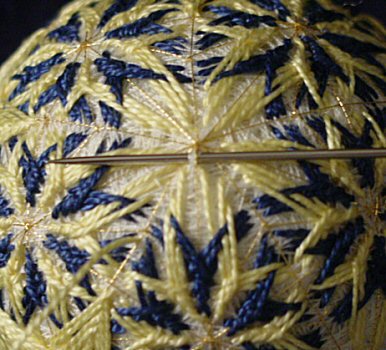
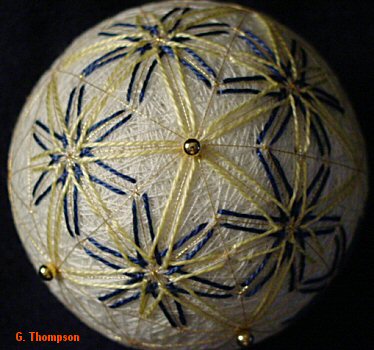 Using the coordinating thread color (white in photo; yellow here) repeat the same uwagake chidori technique, passing the bottom of the stitch under the mari threads to hide the point using the alternate set of lines in the triangle. You can complete each triangle like this before moving on to the next one, or you can work the ball in layers; the motifs are independent of each other. The actual number of layers will depend on the size of the mari; judge by how well-filled it becomes. |
 |
 The overlaid stars are working in shitagake chidori kagari. To start, enter the thread (coordinating color) just under the long point of the diamond formed with the extra jiwari. |
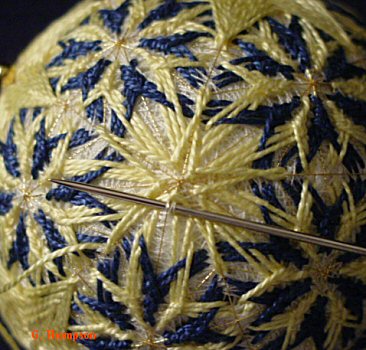 |
Continue to work each star in Shitagake, tucking the next pole
stitch as tightly under the previous one as you can. Bottom
stitches should be placed to form sharp star points, they do not have to "fit" in between stitches on the previous layers. End just above the marking line dividing the diamond. |
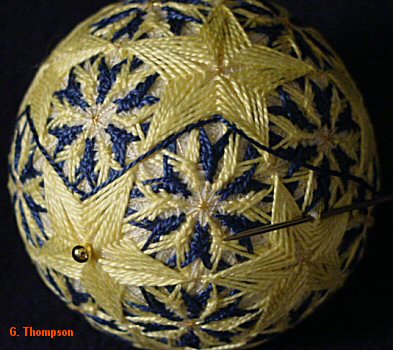 |
Work Shitagake star on each center, about the same number of
Uwagake rounds, but you may need one more or less. You may
overlay contrast threads on the stars if desired (see example
finished photo above).. Work out-line in contrast thread, zigzagging around from start indents as shown. |
| The story behind this pattern is: somewhere around 2003a good temari friend plopped the Cosmo book in my lap and said "ok, figure how to stitch this one for me". Well... we tried. Actually several of us tried. And we came real close. Very close, in fact. But not a direct hit. It was not until spending time with Ai (this was my first question to her) that we found out that this is one of few patterns in the Japanese books that no matter how well we can figure things out from photos and diagrams, you needed to be able to read the Japanese text in the book to learn how the design was worked. So much for three years of trying. Within TalkTemari it's become known as "Ginny's Head-scratcher". (Ai was very supportive in saying how close we had come for not being able to read Japanese, and she was very sincere in it.) I've stitched this pattern in various color combinations - the book shows a white mari stitched with red and white, plus gold metallic. I think the best result is having the one stitching color match the mari wrap as shown in the top photo. I used contrasting here to be able to show the stitching (which is still nice). | |
This
is a TemariKai.com Printable Page; © 2014, all rights reserved.
Right click to print one copy for personal use.
Last updated 1/2014 © 1998 - 2014 TemariKai.com, G. Thompson/PuffinStuff, Inc.