
Temari
Pattern GT38 / TemariKai
10-Combination Patterns
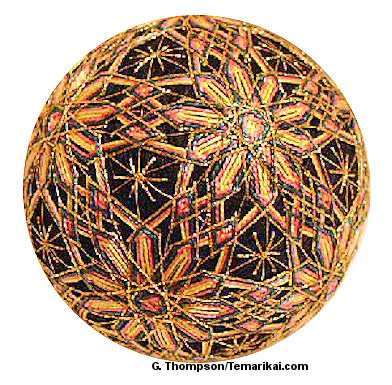
| Advanced design; interpreted from Atarashii Temari 7 / Cosmo Book 7, ISBN 4-8377-0885-4; photo is on page 28. Originally posted in 2005; contributed by Ginny T. | |
 |
Materials: 30 cm circum mari, wrapped in black Pearl Cotton #5 in colors as you desire Marking thread in fine gold; medium gold for embellishing Prepare a 10-Combination Division |
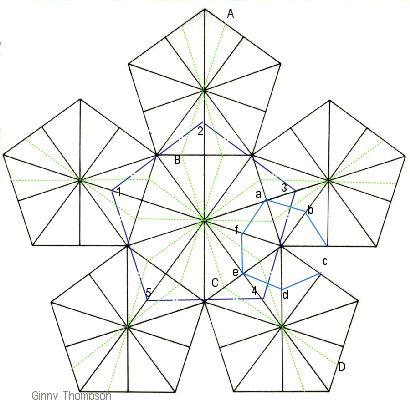 |
Add additional marker lines using same marking thread, as
shown in the diagram to the left. Stitch large pentagons as
shown on the blue dotted line, around the center of each pole.
Use points 1, 2, 3, 4, 5 which are halfway between center and
sidelines in the adjacent pentagons for reference. Stitch the solid blue hexagons using points a, b, c, d, e orienting on the intersections and the half way points of the point spokes of the pentagons; you are stitching in the larger triangles formed between the center points of the pentagons. Lastly add the green dotted lines as shown - Points A, B, C, D etc are on the halfway points of the pentagon sides, between corner and mid-line. |
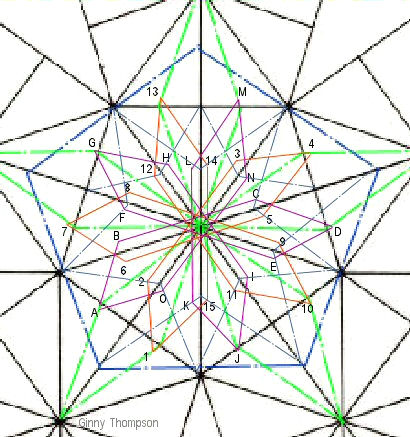 |
This design is combined kousa
and renzoku
style. You will work the pattern in layers, completing one
full layer on the ball before repeating in order to create an
interwoven design. The "flower stars" on each pentagon are
worked in two stages, represented by the stitching sequences of
1 through 15 shown in red, and A through O shown in purple. Begin with the first set, at Point A. This and all stitches along the edges of the pentagons should be placed just beyond the pentagon marking line into the adjacent pentagon. Follow the sequence A, to B, etc and close it off back to A when you reach Point O. Note that points B & C, E & F and all such pairs are placed on the extra marking lines. Orient your stitch so that you can proceed to the next point. Place your stitches as close to the center spokes of the pentagons if you want a tight, closed center. If you would like a little open space that allows a bit of the mari background and the marking thread to show, then move the stitches outward a tiny bit. When you return to Point A, end off your thread and reinsert it at Point 1. Repeat the process, shown in red to complete the second half of the flower star motif. |
| When you are finished with both
sections, move to another adjacent pentagon and repeat. Keep
track of the order you use to move among the pentagons for the
best interwoven outcome. Consider placing colored pins, or
numbered pin flags in the pentagons so that you repeat the
rounds in the same order from pentagon to pentagon. When you have completed one full set on each pentagon, return to the first and begin the second round. Continue until you have completed as many rounds over the temari as you would like to create the depth of the design. You may work the last round in metallic to highlight the pattern if you desire, as well as adding straight stitch sprays in the six point intersections between stars. |
|
This
is a TemariKai.com Printable Page; © 2014, all rights reserved.
Right click to print one copy for personal use.
Last updated 1/2014 © 1998 - 2014 TemariKai.com, G. Thompson/PuffinStuff, Inc.