
Temari
Pattern GT27 / TemariKai
10-Combination Patterns
| Intermediate design; interpreted from various Japanese books. Originally posted in 2001; contributed by Ginny T. | |
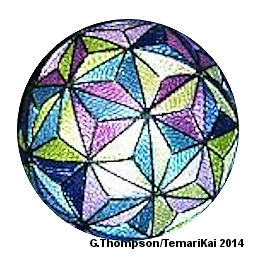 |
Materials: 24 cm circum mari, wrapped in muted color Pearl Cotton #5 in two shades each of blue, green and purple plus black Marking thread in muted color Prepare a 10-Combination Division |
 |
This is an all-over design; the thread wrap will not show when
completed. Likewise the marking threads will not show so don't
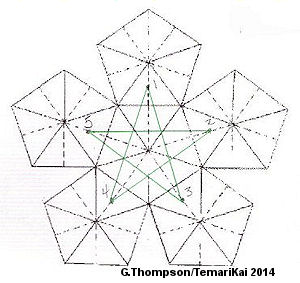
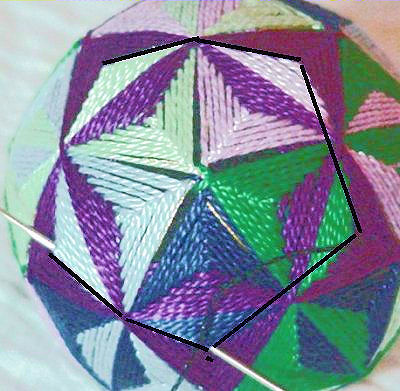
use bright or fancy marking threads. In each pentagon work a star as shown by working points 1-3-5-2-4-1. Work one round in each pentagon (the colors of that round in each pentagon can change). One round in each pentagon completes a cycle. Repeat the cycle until the ball is covered. The star points will meet at the pentagon centers and the long sides will work over them to meet along the long sides. |
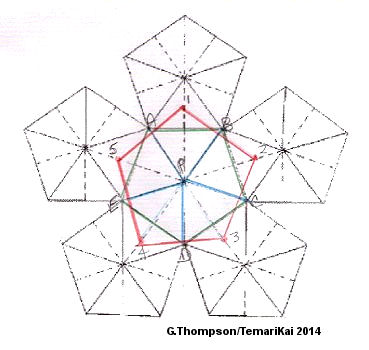 |
After the stitching is complete you attain the stained glass effect by using black thread to outline the sections. First work the red line (follows the points of the stars), then the blue and then the green. The green accents the star points down the center of them to the center point, and the red divides the small diamonds long-ways. However, there is a smoother path to follow: |
 |
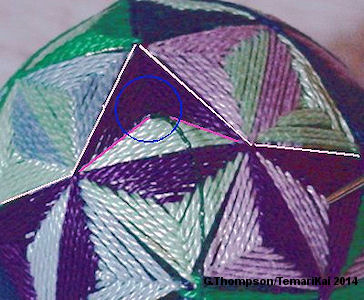 First locate the sections - the white lines outline the main stars you have been stitching on each pentagon.The points of the stars from the adjacent pentagons come together in the center of each star to form a smaller five point star - the green lines. Also locate the small triangles outlined in pink. Enter a length of black (or desired color) thread at the top point of a small triangle - the blue circle. |
 |
Work an outline stitch from the top of the small triangle to
the next, all around the main star. Repeat this for all 12 of
the main stars - and your stitches will overlap forming
mitsubishi (three prong star) around the small triangles. |
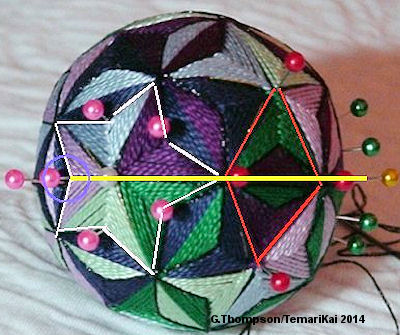 |
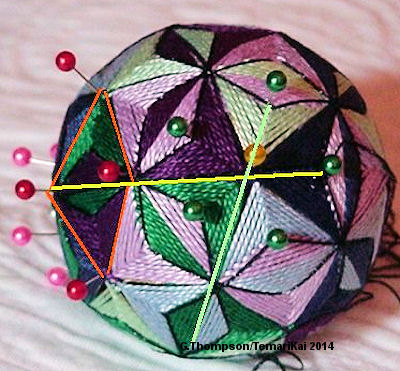 Now locate the inner stars outlined in white, the adjacent diamond outlined in red and the next inner star (green pins) - enter a length of thread at the inner angle of the white star (blue circle) - carry it across the star, across the diamond, and across the next inner star. Insert to end the stitch in the inner angle of the small star. Bring the needle up one inner angle to the left (counterclockwise), and repeat, through the inner start, through the diamond, through the next inner star, and end the stitch in the inner angle. |
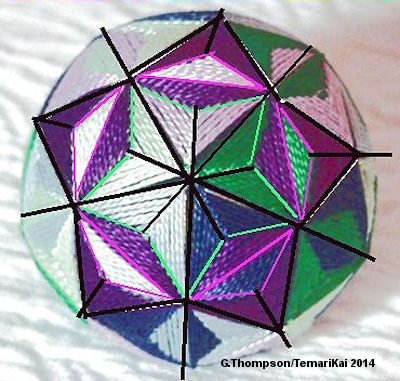 |
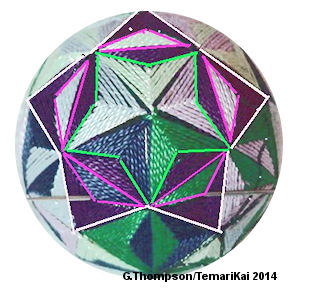
Continue working over all star centers. You will not always have continuous repeats - end the thread and restart as needed to cover all the areas. When you are finished, you will have outlined each section around the ball shown here with black. The small diamonds formed with the pink and green lines will not be outlined in black. |
This
is a TemariKai.com Printable Page; © 2014, all rights reserved.
Right click to print one copy for personal use.
Last updated 1/2014 © 1998 - 2014 TemariKai.com, G. Thompson/PuffinStuff, Inc.