
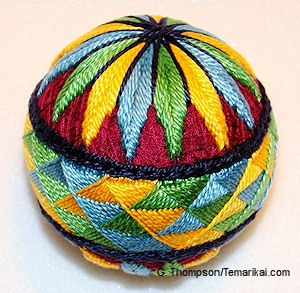
Yubinuki Obi on Temari
There are some delightful patterns seen on temari that are inspired or directly interpreted from yubinuki (Japanese thimble ring). They are usually worked as obi designs, keeping in mind the proportional width of a yubinuki as well as the proportional width of an obi, as a baseline for size in relation to the temari. As mentioned in the Yubinuki page, the designs can be simple, or rather intricate and involved. The same methods used in Yubinuki making, such as multiple needles (threads), multiple layers, subdivided
 sections,
and working in both directions around the mari are applicable to working
yubinuki obi on temari. The info here is offered as some overall help in
working the designs, as opposed to actual patterns. You will find
Yubinuki-inspired obi designs in various print and web resources.
sections,
and working in both directions around the mari are applicable to working
yubinuki obi on temari. The info here is offered as some overall help in
working the designs, as opposed to actual patterns. You will find
Yubinuki-inspired obi designs in various print and web resources. In general, the designs are rather solid and dense, and worked so that the stitching completely comes together and covers the obi area on the temari, the same as when making a yubinuki the entire base ring is solidly covered. This usually takes a bit of practice in spacing and stitching, just as in making the thimbles. A combination of stitch angle, size of the mari, size of the design band and tension all comes together in sort of a "perfect storm" to create an effective design; changes to any one of these factors usually requires adapting the others a little bit. Many months of happily learning and practicing has led to this info that can help working these designs. This included learning how to make the thimbles, since the advice I was given was that to really learn how to apply the designs to temari, it helped to first learn the thimbles).
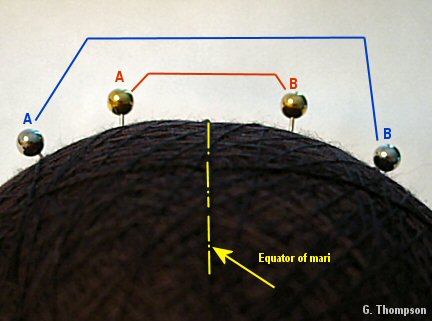
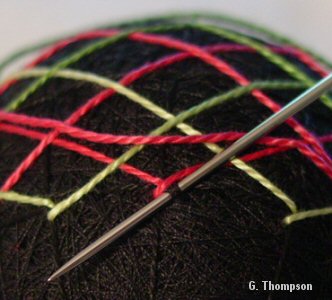
It helps to remember that the wider you try to make the design, the more difficult it may be to achieve full and smooth coverage (you hit a similar issue when trying to reduce the width, if you try to go too small). If you look at the equator/obi area "from the side", as though you were looking "over the
 top"
of the equator with it held a 12 o'clock (see photo left), you can see
the "curve" (or conversely, the "flatness") of the mari over the area
that you are going to be stitching. The "flatter" the area, the easier
it will be to attain a smooth, fully covered band of design - thus the
larger the mari and/or more narrow the design band, usually the easier
it will be to get a smooth outcome with full coverage. It will generally
be easier to work a band using the red AB area than the wider, blue AB
area.
top"
of the equator with it held a 12 o'clock (see photo left), you can see
the "curve" (or conversely, the "flatness") of the mari over the area
that you are going to be stitching. The "flatter" the area, the easier
it will be to attain a smooth, fully covered band of design - thus the
larger the mari and/or more narrow the design band, usually the easier
it will be to get a smooth outcome with full coverage. It will generally
be easier to work a band using the red AB area than the wider, blue AB
area. Working the yubinuki designs in a wider format may be more difficult when it comes to getting close, tight coverage within the design. Because of the increased curve (remember, these designs are originally intended to be worked "flat", on a thimble ring) on the mari, the threads do not lay quite the same and therefore don't fill in quite the same; much of this can be avoided by remembering to keep the width of the band in proportion to that "flat" area around the mari equator before the curve of the ball takes over.
 |
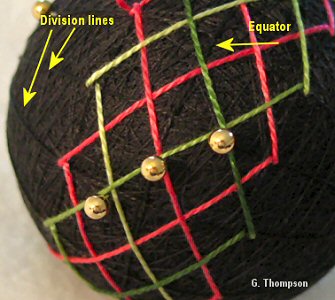
The vast majority of yubinuki designs are used to create
equator/obi designs, and they are the focus or certainly have a
major role of the overall embroidery on the temari. The mari is
prepped with a Simple Division, according to the number of
sections the yubinuki design requires. Use a marking thread in
the same color of the mari wrap - you'll stitch over the marking
lines for the yubinuki pattern, but the remainder of the Simple
Division lines will show afterwards (and can be used to create
polar designs to complete the temari, or removed and other
finishings applied). Alternately the marking lines can be
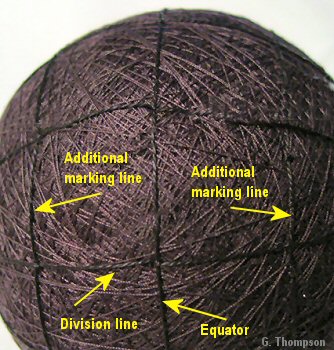
removed, and/or others added. It's a great help to place additional guidelines around the mari, north and south of the equator, so that the total distance between these additional lines is the width of the finished yubinuki obi band. Thimble designs can be done without the extra lines but - they essentially are the upper and lower boundaries of the band, and since keeping these stitching borders as straight and even as possible is most important, having these extra lines keeps things accurate. |
 |
Stitching a yubinuki usually is done with an adapted zig-zag (chidori kagari) stitch. as you work up and down the threads will "weave" into a design. The zigzag yields a nicely "bound" edge as the thread is carried to the next stitch position. The finished obi edges need to be as straight and even as possible. Place stitches just above/below the extra guidelines at the equator. Keep the tension even, especially as you continue to work. If you start pulling the thread tighter, the edge will "wobble" and creep downward to the equator, even if your stitch placement has been even. There really is no shortcut other than attention to detail and practice to get the stitching even and straight. |
 |
Designs form based on "skipping" from one section to the next,
in particular sequence. The goal is to have even edges (straight
horizontal stitch placement), with stitches of ensuing rounds
snugly placed next to each other. Designs generally require
complete coverage of the mari as the thimble pattern
develops. Keep oriented as to which is north and south
pole - changing orientation in the middle won't work. It also
helps to mark your starting line. Once the first round of the design is established, it sets the angle that the threads lay. In ensuing round. The angle will adjust based on the design, and sizes of mari and band. Depending on the size of the mari, width of the band and the design itself, you will find the "right" combination of stitch size (although usually always rather small), angle and tension. |
 |
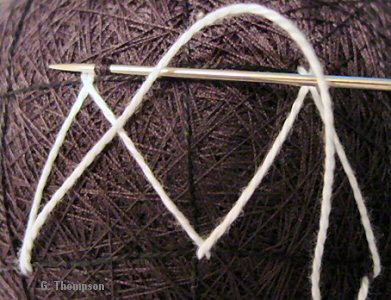
In addition to the stitch placement, keep track of the horizontals cross-overs running in the design. The threads will cross each other at at least one place in the pattern (i.e., the equator), and more detailed patterns will have threads crossing at additional points. In this example, the pink and green threads cross at the equator. Additionally, the pink threads and green threads each cross each other at points half way between the equator and the upper/lower extra horizontal marking lines. The pins show the crossing points. The weave of the design will create visible horizontal "lines" that need to appear straight in the finished design; paying attention to this as you stitch is a must (a little grooming can be done when finished, but it's tough to do major straightening after completion). Either eye-ball it well, or place pins to help, or even put down extra horizontal marking lines (you will stitch over them and the design should fill in completely so they will not be seen). The final outcome will be in trouble if the horizontal cross-overs are wobbly. |
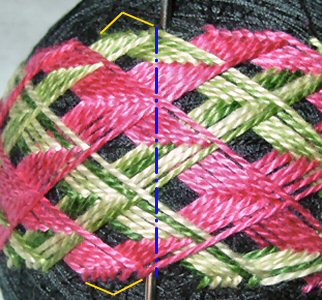 |
The verticals need to be on track, also. Keep tabs on the vertical alignments that are created with the koma (pattern sections). If you drop a perpendicular (shown with the needle as well as blue line here), the koma (section) edges should be even with each other. The yellow brackets show a koma; at any given time at the end of a round, if you drop a vertical line from the top edge to the bottom of the last round of stitching in a koma, it should be perpendicular (straight up and down). If your stitch spacing has "crept", you'll lose the vertical alignment. Vertical accuracy comes from keeping the spacing between the stitches even, as well as controlling tension and stitch size. If things start to creep the design will be skewed. |
 |
This shows an example of what things should result in.... even sections, even borders, all sections filling in at the same time, horizontals and perpendiculars aligned. The more you work and get the feel for yubinuki designs, the easier they become. It's very important to keep an eye on the whole project as you work, and if you spot a stitch that has "wobbled", work back and correct it. For example, the stitches in the red section along the top were redone to straighten the top line (that shows a bit crooked in the photo). It's worth fixing errors like this, since it will really detract from the finished temari. |
References/resources:
"Kinu ito de Kagaru Kagano Yubinuki"; "Atarashi Temari 3"
(Cosmo 3);
"Tanoshii Temari Asobi " (Fun with Temari); "Tsurusi-temari "(Stringed/Suspended Temari);
much appreciation for guidance and translation goes to Ai M. & Tomiko W.
"Tanoshii Temari Asobi " (Fun with Temari); "Tsurusi-temari "(Stringed/Suspended Temari);
much appreciation for guidance and translation goes to Ai M. & Tomiko W.
This is a TemariKai.com Printable Page; © 2014, all rights reserved. Right click to print one copy for personal use.
Last updated 1/2014 © 1998 - 2014 G. Thompson/PuffinStuff, Inc.