
Wrapping the Dodai Mari
As in any art form, many times crafting a temari relies more on attention to detail than pure "artistic talent". What will make or break the finished design begins with preparing the ball. Thus, making the mari and wrapping it are required skills to learn and master., and are as integral a part of making a temari as is the embroidery that is to come. There are two important things happening when you make the dodai mari: the ball itself is being constructed, and the stitching surface is being created.
Wrapping the mari is a multiple step process in that under layers of yarn and thread are laid down, and then a final layer of single-strand sewing thread (by definition, a temari has a final layer of single strand sewing thread. There can be some artistic variations if needed for the design but, the traditional temari is has an outer layer of simple thread). There are some older references that show just a single layer of thread being used, but the accepted modern practice is that of multiple layers, going from thick to thin. Wrapping the mari generally adds between 1/4 to 3/4 inch (1 to 1.5cm) to the size of the mari core (it will vary based on the personal style you develop, but the bulk of the ball is the mari core, not the wrapping).
The mari needs to be as round as you can possibly make it - and yes, with a little practice you will make them round. Getting a round ball will come about easily if you remember three things: Keep the ball moving as you wrap, keep even tension as you wrap, and work from thicker to thinner wrapping materials. The biggest trick to keeping even tension while you wrap is to be sure that your yarn or thread "feeds" easily as you need it - be sure it's not catching on anything or pulling against itself. This can be aided by putting the yarn balls or thread cones in a small container at your feet, or, for thread, using a spool holder. There should be enough tension in the process that the wraps stay on the ball if challenged with a small amount of friction, but not so tight that you are stretching either yarn or thread, making it "squeak" as it passes through your fingers, or causes major distortion of the ball. No two sequential wraps should be laying next to each other, so a small movement of the ball is required each time. The goal is to have a completely randomized surface when you are through - similar to a felted surface, in that there is no warp or weft direction. Building the stitching surface will happen as you wrap - but it's important to remember that you are doing this. Using multiple layers of materials as you make the mari not only builds the ball, but also builds the stitching surface, which is much more than simply the final layer of thread. Don't skimp or you'll end up frustrated later.
As the mari is wrapped, one works from thicker to thinner materials. There is a nice rule of particle mass in science that naturally helps out when making a mari: Think of filling up a bucket with rocks. If you use only big ones you won't get a smooth top and not many in the bucket. If you start with big ones and then fill in with smaller and smaller ones, and top it with sand (sand is tiny rocks) - you'll get a nice smooth top and the bucket will be full, with no air holes between the rocks. The smaller and smaller pieces fill in the holes between the bigger ones. When you start wrapping a mari with four ply yarn, it's going to be a little lumpy; when you change to a thinner yarn, the crags get filled in as the thin yarn covers the thicker, and the same when you change to the yet-thinner sewing thread. This smooths the ball out wonderfully and it will give you a great stitching surface. The smaller the stuff, the smoother it will be. Go from thicker yarn to thinner yarn to thread. Each adds to the stitching base and each goes another step in smoothing out the surface of the ball.
Having chosen your mari base, begin wrapping with four-ply yarn; the actual weight is not critical, just something like average sweater yarn. It need not be "good
 stuff" - and it
need not match the color of the thread you will use to wrap the final
layer since it's deep into the mari. It can be wool, acrylic, anything
that is soft. You want to cover the mari core completely and as
evenly as possible - but not add so much that you are "exploding" the
size of the ball. When wrapping (now and all times) keep the ball moving
- you never really want two successive wraps around the ball to be in
exactly the same place. The wraps should be random, but
they need to always go around the full circumference of the ball.
This not only stops them from slipping off, but it's an integral part of
that "even pressure to the mass" thing (see the Making
a Mari page). Keep an eye on things and as you wrap, use your
fingers to push in any lumps or bumps. Roll the ball in your hands like
you were making a snowball, or using modeling clay); continue to
"mold" the core into roundness as you wrap. It is easier to see if the
ball is round by "looking past it", rather than directly at it: hold it
up and focus more on the wall behind the ball while you turn it around
slowly, and let your eyes see the "edge" of the circumference like you
were looking at a clock face. You'll be able to see if it's round or
not. (Note: if I do purchase yarn for the first layer wrap, I always use
baby yarn. It's softer than regular 4 ply yarn and molds a bit better.
stuff" - and it
need not match the color of the thread you will use to wrap the final
layer since it's deep into the mari. It can be wool, acrylic, anything
that is soft. You want to cover the mari core completely and as
evenly as possible - but not add so much that you are "exploding" the
size of the ball. When wrapping (now and all times) keep the ball moving
- you never really want two successive wraps around the ball to be in
exactly the same place. The wraps should be random, but
they need to always go around the full circumference of the ball.
This not only stops them from slipping off, but it's an integral part of
that "even pressure to the mass" thing (see the Making
a Mari page). Keep an eye on things and as you wrap, use your
fingers to push in any lumps or bumps. Roll the ball in your hands like
you were making a snowball, or using modeling clay); continue to
"mold" the core into roundness as you wrap. It is easier to see if the
ball is round by "looking past it", rather than directly at it: hold it
up and focus more on the wall behind the ball while you turn it around
slowly, and let your eyes see the "edge" of the circumference like you
were looking at a clock face. You'll be able to see if it's round or
not. (Note: if I do purchase yarn for the first layer wrap, I always use
baby yarn. It's softer than regular 4 ply yarn and molds a bit better. 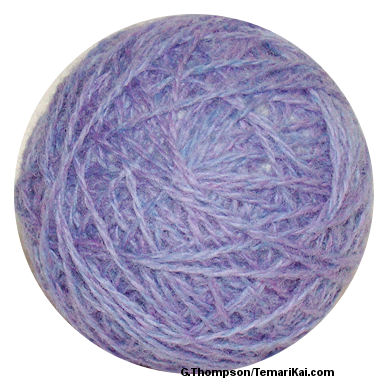 The next layer is
one of thinner yarn. Ideally, one or two ply sport, fingering, sock or
similar is great - but it can be hard to find and a bit expensive. Some
folks will un-ply regular knitting yarn (no, I don't). Good alternatives
can be weaving suppliers, knitting machine yarn, punch needle yarn or
the like. Check out places like eBay for odd lots of thin yarns. Again,
they don't need to match the thread you will use for the final wrap, but
neither do you want bright contrast to your final thread wrap. My
practice is to keep one light and one dark color on hand and choose
accordingly based on what thread color I will use. Avoiding high
contrast helps avoid "bleed through" - the yarn showing through the
thread wrap (ideally your thread wrap will prevent this but, it's
something to consider). Again, as you wrap, keep the ball moving, be
sure the wraps are going all in random directions over the full
circumference of the ball and you're checking to be sure the ball is
coming up round. You should be adjusting for roundness as you wrap - not
when you are finished. A ball that is not round will only give you
unevenly spaced stitching designs at best - or be impossible to divide
and mark at worst. If you DO need to apply a bit more tension in an area
to level things out, then do so.
The next layer is
one of thinner yarn. Ideally, one or two ply sport, fingering, sock or
similar is great - but it can be hard to find and a bit expensive. Some
folks will un-ply regular knitting yarn (no, I don't). Good alternatives
can be weaving suppliers, knitting machine yarn, punch needle yarn or
the like. Check out places like eBay for odd lots of thin yarns. Again,
they don't need to match the thread you will use for the final wrap, but
neither do you want bright contrast to your final thread wrap. My
practice is to keep one light and one dark color on hand and choose
accordingly based on what thread color I will use. Avoiding high
contrast helps avoid "bleed through" - the yarn showing through the
thread wrap (ideally your thread wrap will prevent this but, it's
something to consider). Again, as you wrap, keep the ball moving, be
sure the wraps are going all in random directions over the full
circumference of the ball and you're checking to be sure the ball is
coming up round. You should be adjusting for roundness as you wrap - not
when you are finished. A ball that is not round will only give you
unevenly spaced stitching designs at best - or be impossible to divide
and mark at worst. If you DO need to apply a bit more tension in an area
to level things out, then do so.Historically, the next layer would be single strand thread. However, through the last years, we've discovered that applying an additional layer that is 2 or 3 strands of sewing thread, and then dropping down to one strand, does a wonderful job in helping to smooth out the ball surface. Even experienced temari crafters, used to going from thin yarn to one strand of thread, when they try the extra layer of 2-3 strands of thread, are amazed at the difference it makes. This is nothing to do with speeding up the process, how fast the yarn layer gets covered, or anything else to do with "short-cutting". It's completely about how much smoother a mari is made if this layer is added. It is optional, to be sure, but you'll most likely find it helpful. The extra strands of thread don't need to completely match your final layer color but they should be close and not a drastic contrast. So, with this in mind....
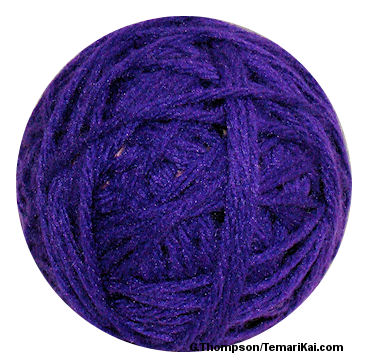
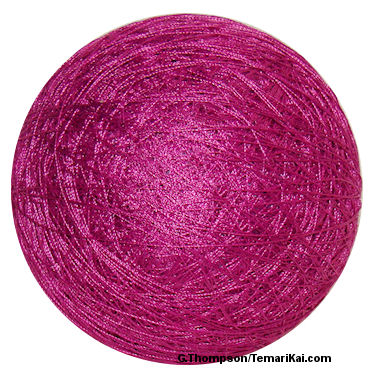
Change to sewing thread for the final layer(s). Use plain old thread - nothing fancy. In fact, specialty or fancy threads make things more difficult. Cotton, cotton
 blend or
polyester is preferable, and it should be specifically sewing/serger
thread. It's much easier and less expensive to purchase thread on cones
- fabric stores and online sources carry thread like this for serger
machines (be careful not to get thread for machine embroidery - stay
away from rayon, quilting or other "fancy" things). Wrapping a mari is a
case where "cheaper the better" - a rougher thread wraps better and
gives a fine result, even better than a pricier one. This is because
less expensive threads are made from shorter staple fibers - they will
look a little "fuzzy" if you look closely, and often they will tangle up
in a machine. But, it's this "fuzz" that contributes to the friction
when wrapping the mari and greatly helps things along. If you are using
2-3 strands, hold them as one and wrap. Again, keep the ball
moving, wrap around the largest reach of circumference - the thread
layer should be totally random in appearance, similar to a "felted"
surface that has no warp or weft to it. It's this randomness that will
hold your stitches in place. When you have completely covered the thin
yarn layer, drop down to one strand of thread. If you are using one
strand only, it's the same - wrap until you can see no more of the yarn
layer. In either case, when you think you are through, keep wrapping a
little more. To end things off, just clip the thread from the cone or
spool, thread it into a needle and run the end randomly into the mari to
secure it.
blend or
polyester is preferable, and it should be specifically sewing/serger
thread. It's much easier and less expensive to purchase thread on cones
- fabric stores and online sources carry thread like this for serger
machines (be careful not to get thread for machine embroidery - stay
away from rayon, quilting or other "fancy" things). Wrapping a mari is a
case where "cheaper the better" - a rougher thread wraps better and
gives a fine result, even better than a pricier one. This is because
less expensive threads are made from shorter staple fibers - they will
look a little "fuzzy" if you look closely, and often they will tangle up
in a machine. But, it's this "fuzz" that contributes to the friction
when wrapping the mari and greatly helps things along. If you are using
2-3 strands, hold them as one and wrap. Again, keep the ball
moving, wrap around the largest reach of circumference - the thread
layer should be totally random in appearance, similar to a "felted"
surface that has no warp or weft to it. It's this randomness that will
hold your stitches in place. When you have completely covered the thin
yarn layer, drop down to one strand of thread. If you are using one
strand only, it's the same - wrap until you can see no more of the yarn
layer. In either case, when you think you are through, keep wrapping a
little more. To end things off, just clip the thread from the cone or
spool, thread it into a needle and run the end randomly into the mari to
secure it. Tension should be firm enough to hold the threads in place, but not so that you are "burning" your fingers, stressing or breaking the thread, or compressing the ball into something that is so hard you can't insert a pin or needle. The ball itself should be firm and hold its shape; the stitching surface should have a little "cushioned give" to it (just a little). The thread wrap needs to be tight enough provide a firm and stable surface to stitch into - otherwise the thread layer can skew so that both marking threads and stitching threads slip and move out of place. If, as you are stitching your temari, you find that you constantly need a "needle puller" to finish getting your needle through the mari as you take a stitch - your wrapping layers are too tight. It shouldn't be that hard.
The most common question is "how much do I wrap?". There is no quantitative answer. We give a guestimate of about 300 yards of thread for a 24 cm ball just so that you know that you cannot wrap a ball with one spool of thread. Beyond that, it is all qualitative. There must be enough yarn to begin to round out the core; there must be enough thin yarn to smooth out and cover the thick yarn; there must be enough thread to complete a smooth, round mari and finish off the stitching surface. It's by feel, not specs. Like anything else, it takes some trial and error and practice to get there.
Learning the "feel" of wrapping takes a little practice, and nothing really compensates for that. While a finished, well-wrapped mari will not "unravel" - that is the threads will not slip off or move, there will be a little "give" to the surface (even though the ball itself holds its shape as round and is not "squishy"). Wrapping a mari is very much like kneading bread dough. It's very difficult to describe to someone when the dough is ready, but once you "feel" it, you know it. And, that feel can change in a matter of seconds from "not ready" to "fine". The mari is the same. One stitcher routinely says that if you have to ask yourself if you've wrapped enough, keep wrapping. Another says that when you think you HAVE wrapped enough, wrap a little more. Both are good pieces of advice. You need to be sure to cover the ball completely and with a deep enough thread layer that the yarn is not showing through, nor will it when the stitches are placed into the mari. If, as you start to stitch, your needle is hitting or grabbing the mari core, obviously you need to add some more layers in there. If your stitches are revealing the yarn underneath the thread, you need to use more thread. Absolute amounts are very difficult to calculate, since it obviously always depends on the size of the mari, as well as every individual crafter's habits. Don't get hung up on "using this much of that". Use what you need to in order to obtain a mari that works and you are comfortable using. Incidentally, another curious note of nature: as we make mari, unless we are definitively trying to make a "target" size, we all tend to naturally make mari of a size that fits comfortably in our hand. No, none of us can make a perfectly round ball, but we can indeed come darned close, and that's the goal (close enough that you can't see that it's not).
You can view a photo tutorial of mari wrapping; please use it in conjunction with this text.
Here are some tips:
- Crochet cottons don't work well for wrapping (inner or outer layers) - they are too hard a cord to smooth out and stitch into.
- There is no preference/ difference for wool over acrylic; however things like cotton, silk and other "unique" fibers also tend to not smooth well.
- If you are truly unsure if you are wrapping "too much" - use a needle, toothpick or similar and "measure" how deep the layers are - insert till you hit the mari core; most common is 1/4 to 3/4 inch.
- Yes, the mari is going to "play" with you and pop out of your hands from time to time as you wrap - it's all part of the process. If you really need to, try using rubber gloves, or slightly dampen your fingertips to help control it.
- If you have ever stitched on felt, or pieces of a knitted garment together, you know that you can take a bite of the base that looks large, but when you snug the stitch it almost disappears. This is the type of surface that you are striving for on the mari. You need for it to be secure enough to precisely hold the stitch placement, yet have a little give.
- We can't say it enough: cheap threads work better: you want cheap threads for the under wrap of yarn on the mari and for the mari itself, so by all means feel free to skimp on cost here and save your pennies for stitching threads. Cheap threads are cheap because they are of short staple (the fibers which make up the yarn or thread), so there are little breaks of thread all along the length - the result is it is not smooth (think of hair with lots of split ends). Smoothness in fibers comes from using material with longer staple length (although this is not the proper term for anything except plant fibers, length is a factor in all fibers.) The rule to remember is the smoother the thread the longer the staple. The longer the staple, the more expensive to produce. When you wrap the mari you want the wraps of thread to stick to each other, which is why you want a thread with short staples - and that means cheap thread. Likewise, threads which are polished smooth (like quilting thread), or made of things like rayon or polished polyester are too smooth to stay on the ball. As tempted as you may be for those bright shiny threads to wrap a mari - don't. Spend your thread budgets on stitching threads, not wrapping threads.
Remember - making temari is supposed to first and foremost be enjoyable (yes, it is). Way back when we all first came together on TalkTemari, in 1999 and were all trying to learn together, we had a post from Nicole. It remains something to ponder... "Learning to wrap was the hardest part of the process for me. I would pull so tight I would get thread burn on my fingers, just to have all the threads pop off like a bad hair day when I tried to roll my way to round. I crunched foam balls until I had balls that looked like the moon.... I finally learned that Perfect Roundness is a lofty state which is acquired after much practice. It also helps if you learn to fudge a bit and work on Nearly Perfect Roundness. This state can be acceptable, although it does not bring the same level of bliss. (Being a very literal person, I just about gave up for my lack of perfection, until several of the more experienced mari makers confessed that Perfect Roundness is the goal, but it is rarely achieved.) ...This one was a shocker to me: I get better results making my own mari .... Once, in a fit of desperation when I had to stitch and had not brought any forms, I just grabbed some tissues and started wrapping. I was amazed at how well it worked up! Since then I have tried rice hulls and plastic bags and have had much rounder bases to work on."
Thanks
to all web readers and TT folks who have contributed through the
years
This is a TemariKai.com Printable Page; © 2014, all rights reserved. Right click to print one copy for personal use.
Last updated 12/2013 © 1998 - 2014 TemariKai.com, G. Thompson/PuffinStuff, Inc.