
Keeping a Temari Notebook
You'll see keeping a notebook referenced in many places throughout Temarikai.com. Doing so can't be encouraged enough. It will help you learn and it will keep a record of your temari journey. There is no right or wrong for how to do it; by far the important thing is just that you do. It becomes invaluable to help you refer back to see how you did something, be able to share a pattern with someone, help you be able to teach someone else how to make temari, watch how your learning and growth progresses, and be the resource you turn to if you decide to apply for Japan Temari Association certification.
A temari notebook is far more than simply a journal or photo album of your completed work. It also should include some basic information about the pattern that you completed. Doing so gives you a working reference of what you have accomplished, and helps you figure things out in the future. It's also very rewarding to be able to look back and see how much you are learning and gaining through time. This is routinely done by Japanese Temari crafters, and in fact is an actual requirement if you are taking classes in Japan. A later requirement for advanced certification is the ability to record and communicate patterns in a manner that others can understand, follow and reproduce the temari. When taking classes in Japan you are not given a step-by step "handout" of the day's project; rather, the finished project is placed before you, and you "figure it out", with help from your Sensei as needed. You keep your own notes of how to do it. As you progress and begin working your own composition designs, you likewise record them in your notebook. Then, when applying for certification, your notebook is examined as well as your actual temari-making as part of the process. There are notebooks made just for this in Japan, available from the JTA and other select sources. However, it's just as easy - and perhaps even better - to create your own, since the JTA books are very limited in space. Create your own format that works best for you and you enjoy.
The scope of information for each design usually includes: a finished photo of the temari; pattern diagram(s) of how to stitch, as many as needed for you to be clear about it; the original reference inspiration of the design (is it original, or are you working an interpretation from a Japanese book, or a website, and if so where this resource is); size of the dodai mari used; what was used to wrap the mari; threads used to divide and mark; what threads and colors used in stitching (including color #s and dye lots if you choose); text notes to support the diagrams and sketches; any special notes that would help you to make it again in the future; specific stitch names; when you stitched it; and any special thoughts or tips you encountered while making it as well as general text instructions to support any drawings or diagrams. You may also want to include the date that you made it, and whether you gave it to someone, etc. As you progress you may want to begin to catalog your patterns so that you can easily locate them again (perhaps by division type).
In addition to including records of your work, many people also include accumulated information that they collect when learning how to make temari. This becomes especially helpful for those of us that can't read Japanese and therefore can't learn directly from the Japanese books. There are various resources available as well as discussion groups, classes, etc., so that compiling the notes you collect from these sources becomes a primary reference. Nor are you limited to one notebook - I have several as do many others, depending on the need and organizing preferences.
Your personal notebook(s) can be as involved or as simple as you like, as long as it works for you and you are able to catalog and save your information. While the JTA notebooks are regular soft-bound books, most of us have come to adopt using 3-ring binders or presentation binders (which are like books of sheet protectors) since it makes adding pages, photos, etc much easier and neater. Hard or spiral bound notebooks, sketchbooks, etc. can also be used and pasted-up as needed to add images, but the real disadvantage of a permanently bound book is that you cannot remove or insert pages. And of course, there are those that go totally digital, but this may not be all it's cracked up to be, especially when it comes to viewing actual colors and detail. How you organize it is up to you: some people keep it in chronological order, others organize it by pattern division, etc. Regular/colored pencils or fine point markers are generally used for diagramming. A ruler and compass/protractor helps, too. Other than that, don't go crazy with extra drawing tools and templates; they just don't really help. With the advent of digital cameras, it's a great opportunity to take photos of the temari in progress, so that you can see how it worked and especially to show any special or new techniques you used in making it. You don't have to be an "expert artist" these days to be able to illustrate a working notebook - digital cameras, scanners, and camera phones all make it doable for just about everyone. Other things that may be included are a section for future projects and ideas: things like color source inspirations, patterns seen out and about, etc.; thread and supply sources and info; and Japanese book information.
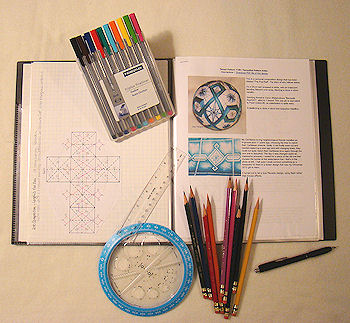
The photo above right shows my composition notebook and tools. This is an example of keeping a record of a design idea, in this case the border of my neighbors' pool liner. Personally, I like to use presentation binders. They can be obtained in office supply stores but I prefer the ones gotten through art supply stores since they have more pages (some up to 200). This allows me to rearrange things as needed. I have one for designs I'm composing, different ones for each of the standard division patterns I've worked, and a separate one for my JTA certification work. I have a good-quality thin-lead pencil for sketching and writing, and then use mostly thin-lead colored pencils for diagramming as well as some good-quality fine-point art markers. A 6 inch ruler and a circular protractor are the basic tools I use along with a small French curve to connect lines. I very much like using 1/4" grid/graph paper since the grid makes laying out the notes, diagrams, photos, etc. much easier and neater. Archival-quality double-stick tape serves the purpose to adhere photos and diagrams to the pages. The page on the left shows my working notes of the design I composed; the page on the right is how it is more formally presented in the TemariKai.com Patterns Section. I include the full writeup in my notebook if it gets that far, otherwise it's just my working notes and a photo.
This
is a TemariKai.com Printable Page; © 2014, all rights reserved.
Right click to print one copy for personal use.
Last updated 1/2014 © 1998 - 2014 TemariKai.com, G. Thompson/PuffinStuff, Inc.