
Needles: Choosing, Care and Threading
The only rules for choosing a needle for temari-making is that it carries the thread appropriately, and it is comfortable to use. There isn't a specific "temari" needle; it's much more important to choose one of good quality that you are comfortable using and works for the project you are making. That means considering the size of the mari you are working on and the threads you are stitching with.
Needless to say, the larger the thread you are using the more you need to adapt the size of the eye of the needle so that it threads easily. This is important not only to control your frustration level but even more so for the thread. If you are consistently trying to force a thread into a needle eye that is too small, you will wear and damage the thread which will, over the course of working your project, become evident and detract from the effort you are putting into the temari. Conversely, using a needle with a huge eye in comparison to the weight of the thread causes the thread to slip and slide around inside the eye, causing wear and erosion on the thread sometimes to the point of literally slicing or cutting the thread. All of this shows up in the finished temari. You may even find that you need to use more than one needle on the same temari - one for pearl cotton thread and another for example, finer metallic threads. Similarly, the larger the mari you are working on, the longer the needle you will find helpful. it can be very difficult to pass a short needle from one place to another on a larger (and flatter) mari. In reverse, if you are working on a small or teenie temari, a long needle can be downright frustrating, if not dangerous (spoken from experience).
Fortunately most needles are not overly expensive, so experiment a bit and find what works for you under what circumstances. Most stitchers have an assortment, that have been collected through experiment and experience, to use depending on what is being worked with and on. A good starting point is a cotton darner (that's the name of the needle style) somewhere in the size 14 to 18 range; play from there and see what you like. When you are working on larger mari, something like a doll-making/soft sculpture is helpful - they are long and usually available anywhere from 4 to 6 inches in length. Conversely, if you are working on small and teenies, something shorter like a crewel needle may be needed.
Needles can be very inexpensive, or one can invest more highly (and, for very serious sewers and embroiderers, the word is invest). Once you find out what sizes you like and use, then think perhaps about purchasing a few higher (though it need not be highest) quality needles in those sizes. A common, better-quality needle in the US and UK is John James or Colonial; there are others - check your local needlework store or online. The "everyday" brands found in craft and fabric shops, like Dritz, work just fine for many people, too. Quality is affected by what the needle is made of. It can be anything from inexpensive steel up to gold or platinum; others may have gold eyes (to protect the thread), others may be made of a combination/alloy of metals. This can all affect how the eye treats the thread, and how the point holds that point and stays sharp. It can also affect the weight in your hand, how strong it is, and one of the most important, how smooth it is (or stays). The other factor in a better needle is the effort put into production: how straight, polished and sharp it is to begin with, and how tight the quality control is to be sure that you don't get a burred or dull one in your package.
Major benefits of "trading up" to a higher quality needle is that you will often find them sharper in the point and more well polished - both the shaft of the needle that passes through the materials you are working on, as well as the inner lining of the eye, that can affect your thread as you thread the needle and it rides in the eye. In addition to a higher quality needle usually being made of stronger, smoother metals, the craftsmanship and quality control of the process usually gives a smoother, sharper and longer-lived item. Even if you can't see or feel burrs or spars on the needle, the thread and mari will.... and depending on what materials you are using for your mari, it can make a difference. If you are working with silk, rayon or other finer threads, even the tiniest burr can wreak havoc.
Needles DO wear out; the life span of the needle is related to the starting quality and the care it gets during use and storage. Some needles have over-coatings on them that are designed to help them slide smoothly - when that begins to wear off, life can be miserable. Ditto, points can dull, and rough spots can emerge. If you feel the needle "grabbing" as you try to pull it through, it's probably time to retire it as well as when you can no longer "stick" it into your project without breaking out the hammer. Likewise, if the eye is fraying or grabbing your stitching thread, it's time to break out a new needle. Life can be extended with some basic care. Be careful where you are "sticking" them. Avoid sticking then into the arm of the chair or couch, your clothing or whatever happens to be handy to "temporarily" keep them "safe". Use a good pincushion, being careful what is inside of it - some have almost anything in there that can be damaging to the needle and your pins. Use emery (an emery bag or very fine emery cloth) as needed to clean and polish your needles, and be sure keep them dry. Good, real (not synthetic) wool felt is a traditional way to hold and protect needles - needle books with felt "pages" are certainly recommended. They are more protective than loose needles rolling around unattended in a larger container. Slender needle cases are also more protective, and are sturdy so they cannot be bent or broken. If you are having difficulty pulling the needle through your work, don't ram it with the hub of your scissors or grab the saw-thoothed needle-nosed pliers to yank it through. If you are consistently not able to pass a needle through your work, it's because of a dull point to start with or you need to make some other adjustments to ease the problem (in temari it may well mean you are wrapping the mari too tightly). If you DO need help to pull on occasion, use a rubber needle puller or other protected helper. Be careful with hand lotions or body oils as they can accumulate a residue on the needle let alone stain or mar your project. Needles are as an important part of your toolkit as a good pair of scissors or anything else - with a little basic care they will serve well.
It's common to see needles packaged that say "for thus and such craft or technique". This can be a help because there are various styles of needles have proven themselves to be more applicable for certain uses. The recommendation is being made that this size and style will work for what you want to do, and can be very helpful if you are new to the craft or needlework in general and don't have an idea of where to start. However, it does not (usually) mean that those needles are made
 precisely
for THAT craft, and are the only ones that should be used. You may find
thread companies (such as Kyo, from Japan or DMC from the US) selling
needles for their threads or particular applications; this is usually
more marketing-based but may be worthy, since if a thread company is
endorsing a particular needle maker it may mean that they believe that
needle is of a quality that works well with their threads. Just remember
that it's not an unbreakable rule, and other equivalent-quality needles
will likely do the same job. As was said, the most important thing is
that you find the needle that satisfies two things: it's the right size
for the thread and project, and it's comfortable for you to use. That's
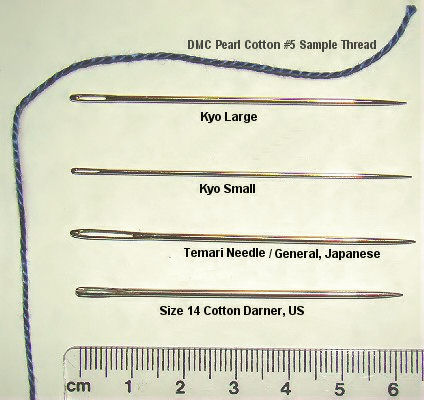
all that matters in the end. The photo shows several common needles used
in temari-making, to compare size and to pearl cotton #5
precisely
for THAT craft, and are the only ones that should be used. You may find
thread companies (such as Kyo, from Japan or DMC from the US) selling
needles for their threads or particular applications; this is usually
more marketing-based but may be worthy, since if a thread company is
endorsing a particular needle maker it may mean that they believe that
needle is of a quality that works well with their threads. Just remember
that it's not an unbreakable rule, and other equivalent-quality needles
will likely do the same job. As was said, the most important thing is
that you find the needle that satisfies two things: it's the right size
for the thread and project, and it's comfortable for you to use. That's
all that matters in the end. The photo shows several common needles used
in temari-making, to compare size and to pearl cotton #5Having procured a needle, it's time to thread it. It should not be difficult; if it is, the eye is too small for the thread being used. There are also a few tried and true tips to help: Be sure that the end of the thread has a clean cut. After the thread has been in use for a bit, especially if a lot of "re-threading" is happening, the end will fray and make it difficult. Clip it off a bit. Likewise, moistening the end of the thread tends to make it more cohesive and easier to ease into the needle. Many experienced embroiderers will agree that it's not so much threading the needle, but "needling the thread": hold the clean cut end of the thread firmly between the pads of your fingers of your thumb and index finger. Bring the needle eye to your finger tips, and gently & slowly open your fingers as you move the eye of the needle towards the end of the thread. This should all be happening "in your fingers", not out in mid-air. The thread will nicely ease into the eye. Some threads will enter the eye more easily if they are "looped" - that is, folded back once on itself so the fold is inserted into the eye (just fold it over the needle). If the thread tends to fray very easily, folding it helps a great deal rather than trying to thread the cut end. Using a needle threader is just fine; be sure to adjust your needle size so that you can use it easily.
This
is a TemariKai.com Printable Page; © 2014, all rights reserved.
Right click to print one copy for personal use.
Last updated 1/2014 © 1998 - 2014 TemariKai.com, G. Thompson/PuffinStuff, Inc.