
Multiple Faces Marking: Tamentai - Step by Step for 92/272 Faces
This will step through the process of creating an incomplete 92-face marking, and then upgrading it to a complete 272 face marking. Review the general information page on Tamentai before proceeding through this - it will make things easier. Refer back and forth as needed.
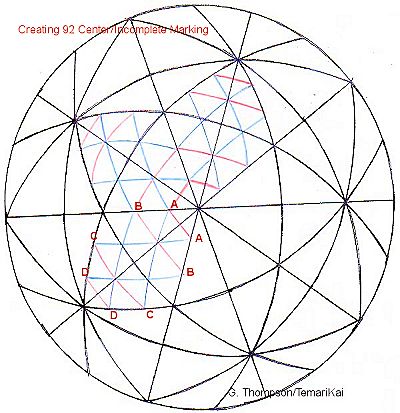 |
Use the Tamentai Reference Charts to determine that a 92-face marking uses the diamond sub-set of extra markings. The 92 face is incomplete; if carried up to complete then it creates 272 faces. To begin, locate the diamond face from the original 10-Combination marking, as shown in the diagram to the left. The side of the diamond needs to be divided into3 segments (per the chart). Note that it's segments, NOT points. Therefore, points A and B are identified, and there are now 3 segments: 10-pt pole to A; A to B; B to 6-pt center. |
| Both methods of laying down the extra jiwari can be seen. The blue lines use the cross-hatch: Each segment A-A, B-B, C-C, D-D is stitched, and then connected as shown, A-C, B-D, C-A, D-B. The red lines connecting pairs of points (A-A, B-B, C-C, D-D) become the concentric pentagons around the working pole. When each of these lines are stitched across the diamonds, they coalesce to the pentagons. Then add the connecting lines to the pentagon corners. Remember - use one or the other method, which ever is more comfortable for you. | |
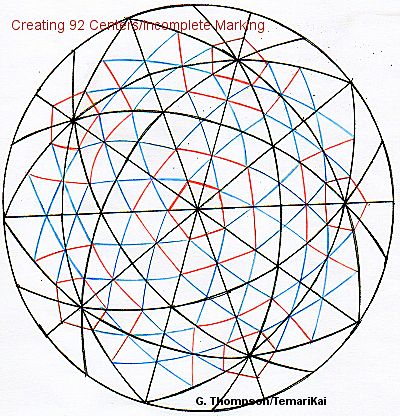 |
The diagram to the left shows continuation of the lines being laid from above. The red and blue line orientation has been maintained so it's possible to see how the whole thing comes together. Tack the cross-overs on the original major C-10 lines; do additional tacking according to personal preference. |
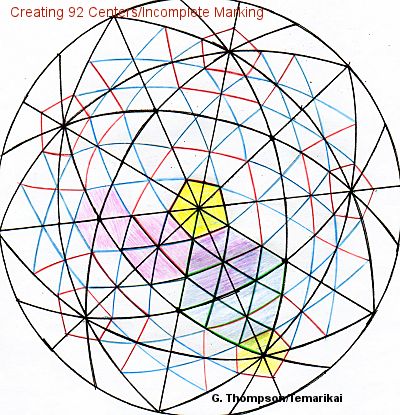 |
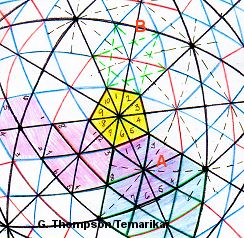
To get oriented, using the diagram to the left: The original
C10 pentagon centers are shown in yellow. Samples of the
hexagons that have been created are shown in pink, blue and
green. Notice that the hexagons and pentagons have their sides
adjoining, not their corners, for correct orientation. Another
point to bear in mind is that a 92-center marking has 2 hexagons
running vertically between 2 adjacent pentagon centers. This is
how to work backwards if you are trying to determine how many
faces are on a completed ball. This now is an incomplete 92 face marking, ready for any design using this value. Note that this is incomplete because of the hexagons not all having 12 wedges - they have 6 or 8. The pentagons are complete - they each have 10. |
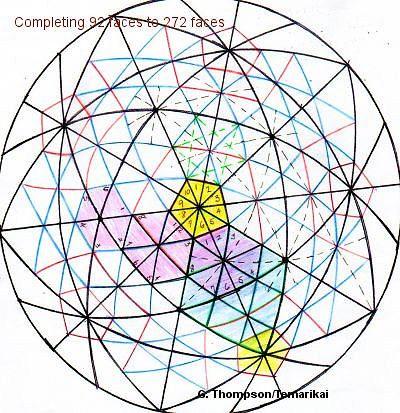 |
The 92 face can be further worked to the complete stage by adding more marking lines so that the hexagons all have 12 wedges; this will increase the total number of faces to 272. Begin by adding the dotted black lines that are shown in the diagram to the left. Note that there is no real "method" to do this - whatever is easiest for the stitcher is fine. The point is to bisect the sides of the hexagons while traveling through the hexagon centers, as shown in the purple shaded hexagon. |
|
This shows a closer view of the dotted lines being added, and
how they bisect the remaining sides of Hexagon A so that it goes
from 8 to 12 wedges. Likewise, the hexagons that had 6 wedges
will be bisected to the full 12. After these lines are laid,
then work the green lines as shown in Hexagon B, in each face.
Again, there is no preferred way to accomplish this other than
what is comfortable. When all hexagons have been completed
in this manner, there will be 272 faces and the marking is a
complete multiface. |
Lessons
and translations (with deep appreciation): Ai M.
Direct translation and translation assistance: Milly K., Kiyoko T.;
Publications: Kaga Hana Temari (ISBN4-8377-0292 -9), Sosaku Temarizikushi (ISBN4-8377-0696-7), Edo Temari (ISBN4-8377-0394-1)
Direct translation and translation assistance: Milly K., Kiyoko T.;
Publications: Kaga Hana Temari (ISBN4-8377-0292 -9), Sosaku Temarizikushi (ISBN4-8377-0696-7), Edo Temari (ISBN4-8377-0394-1)
This is a TemariKai.com Printable Page; © 2014, all rights reserved. Right click to print one copy for personal use.
Last updated 2/2015 © 1998 - 2015 TemariKai.com, G. Thompson/PuffinStuff, Inc.