
Bin Temari - Temari in a Bottle
Bin means bottle (pronounce the "i" as an English long "e") in Japanese. Bin Temari is literally the temari version of that age old craft of ship in a bottle. When first coming upon bin temari, you usually sit there in some disbelief about how it came to be. The answer is the same way ships in bottles are crafted: the ship is built, and then the mast and rigging is collapsed to allow the model to be slid into
 the bottle. Once inside the
ship is re-rigged in the bottle. It's rather daunting to realize
that one makes a temari, from scratch, and then undoes a perfectly good
piece to stuff it into a bottle (kind of like skydiving - jumping out of
a perfectly good airplane). Bin temari popularity ranges based on areas
in Japan, but there is a museum in Echigawa, Shiga Prefecture that is
devoted solely to them (photo at right).
the bottle. Once inside the
ship is re-rigged in the bottle. It's rather daunting to realize
that one makes a temari, from scratch, and then undoes a perfectly good
piece to stuff it into a bottle (kind of like skydiving - jumping out of
a perfectly good airplane). Bin temari popularity ranges based on areas
in Japan, but there is a museum in Echigawa, Shiga Prefecture that is
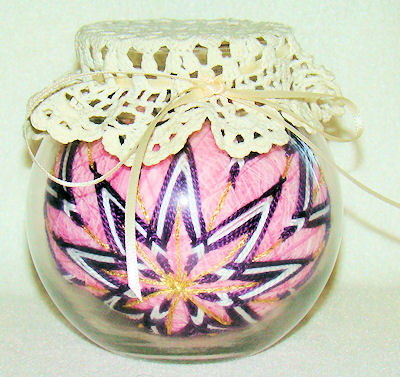
devoted solely to them (photo at right).The general process is that as the mari core is made, it is done so that there is a rod of some sort adhered to the core material. The temari is completed around this rod. After completing the temari, one merrily un-stuffs the mari by pulling the rod, and thus the core stuffing, out; inserts the temari shell into the bottle and then replaces the core stuffing. Usually a fabric or doily is placed over the opening of the container and tied in place. It's important to note that to be a bin temari, the mari size has to be significantly less than the opening of the container. Simply popping a temari into a glass something, or even if it needs a bit of a push to get inside, doesn't qualify as a bin temari.
Not long into the life of TalkTemari and TemariKai, one of the TT members decided to give it a try, and Amy most kindly shared her experiment. "... thread the end of a source of yarn through a straw ( a bit of a larger one if you can find them) and use the yarn to wrap and form the mari core. You want the size of the mari to be very close to the diameter of the bottle or jar. It would probably be better to make it a larger than you think you need to; that way when you re-stuff it, it will form to the shape of the bowl and won't move after it's inside. wiggle. After the mari core is formed with the yarn that is running through the straw, wrap a plastic bag around it. Now wrap the mari as usual (when you are doing the final thread wrap, carefully place extra wraps around the straw since it will leave a gap when the straw is pulled out; use the extra thread there to fill in the space), with a yarn and thread layer, and then stitch it. Once the
 ball is done, pull the yarn
out through the straw (all of it). Carefully flatten/ compress the
temari shell and insert it into the container, being careful to keep the
straw in place and have it coming up through the container opening.
Using fiberfill and a long thin tool such as a knitting needle or
crochet hook (it has to fit through the straw) and re-fill the temari
with the fiberfill. Be sure to fill it completely. When finished, remove
the straw. Push the ends of stuffing and the plastic bag in under the
mari wrap. Once it's stuffed, pull out the straw and squish the
ends of the plastic lining bag inside too. Maneuver the wrapping threads
around a bit to conceal the opening."
ball is done, pull the yarn
out through the straw (all of it). Carefully flatten/ compress the
temari shell and insert it into the container, being careful to keep the
straw in place and have it coming up through the container opening.
Using fiberfill and a long thin tool such as a knitting needle or
crochet hook (it has to fit through the straw) and re-fill the temari
with the fiberfill. Be sure to fill it completely. When finished, remove
the straw. Push the ends of stuffing and the plastic bag in under the
mari wrap. Once it's stuffed, pull out the straw and squish the
ends of the plastic lining bag inside too. Maneuver the wrapping threads
around a bit to conceal the opening."Anne W. in another bin-maker and offers her method (minus the straw): Starting with some sort of thick "slippery" nylon/polyester/rug-like yarn, string, rope... whatever, ...while holding the inner "tail" (so later you can unwind from the center out - like a skein of yarn) loosely wrap this cord/yarn to create a center core. This core should be about 1cm circumference less than the external measurements of the container you will be putting it into. Still keeping the inner tail hanging out, cover with a plastic bag of the inner core, and gather the edges of the bag around the tail of the inner core material. Use a small piece of string or a twist-tie to hold in place. Pop a few air holes in the plastic so you don't trap a lot of air. Continue with thin yarn and thread to create your mari, taking special care to wrap in close and tight around the tail area. (be sure to leave the tail hanging free) A good build-up of thread and yarn around where the tail enters the mari will give you lots to work with at the end when you will nudge these threads to cover the opening. Mark and stitch your pattern. One of the trickiest parts is to have the tail/hole in an open area of the pattern design... it's difficult to visualize NOT having the tail as part of a pole. Also, it is good to try and choose a pattern with small stitches - this will help hold your mari together when it is collapsed. Another hint is to try and keep your stitches shallow - if you go too deeply with your needle, you may catch some of the inner core, and that will cause havoc when you go to remove the core. Remove all stickers and clean off all smudges and finger prints from your container - especially the interior. Remove the thread/string/or twist tie from the tail/plastic. Carefully spread the plastic out like a collar around the core hole and begin pulling the tail. If you encounter any knotted areas or tangles, use a thin metal crochet hook to reach inside and un-snag the tangles. Do NOT remove the plastic liner yet. Once the inner core is removed, gently slip the mari through the opening into the container. Using blunt-ended chopsticks, bamboo skewers, unsharpened pencils, etc. and batting, carefully re-stuff the inner core cavity with batting. The plastic will help by working like a funnel for the batting. Take it a little at a time, making sure that you work the batting into the sides of the mari. If done correctly, your mari will eventually have the firmness of a traditional mari. When your mari is as firm as you can get it, VERY CAREFULLY snip away the plastic liner close to the surface of the mari - be careful not to cut any of the threads. Tuck the raw edges of plastic into the opening. Now, using either pointed bamboo skewers, knitting needle, or other such object, gently ease the outer threads over to cover the opening. Go easy with this step - ease and nudge the threads, don't pull or force.
Other hints:
*) Use a smooth twine or rope such as nylon for the inner core - much easier to un-stuff.
*) Wrap the inner core neatly and it will un-stuff much more easily
This
is a TemariKai.com Printable Page; © 2014, all rights reserved.
Right click to print one copy for personal use.
Last updated 1/2014 © 1998 - 2014 TemariKai.com, G. Thompson/PuffinStuff, Inc.