
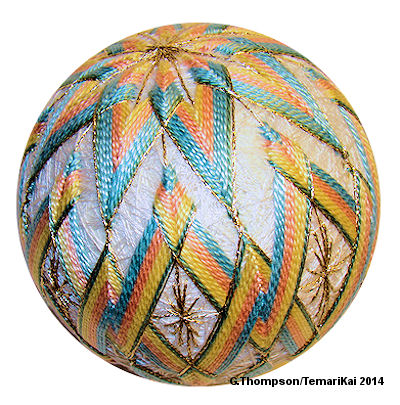
TemariKai ToolKit - Uwagake Chidori Kagari 上 掛け千鳥かがり
Uwagake Chidori translates to: uwa, over; gake, stitch; chidori, zigzag. It is a particular application of the basic Chidori Kagari worked in repeating rounds or rows, such that the working thread of the second or higher round is carried over the previous rounds before
 inserting
the needle to complete the stitch. Which marking lines or sets of
marking lines are worked on, and whether there are any variations from
the basic stitch will be contained in the directions for the particular
temari design you are making. The only thing that is needed to learn is
this basic stitch execution. Uwagake chidori kagari is one of the
requirements for JTA
Honka certification.
inserting
the needle to complete the stitch. Which marking lines or sets of
marking lines are worked on, and whether there are any variations from
the basic stitch will be contained in the directions for the particular
temari design you are making. The only thing that is needed to learn is
this basic stitch execution. Uwagake chidori kagari is one of the
requirements for JTA
Honka certification. 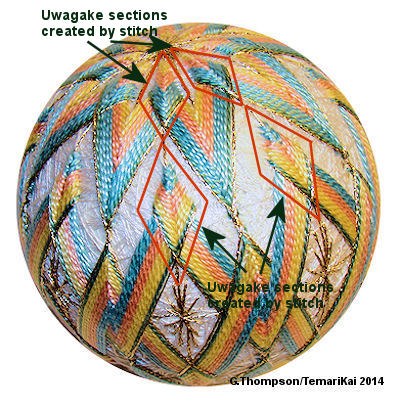 |
The photo at left highlights several of the uwagake areas creating while executing uwagake chidori kagari in this design. Notice that they form an interwoven section, in the shape of an inverted "v" or wedge. This is the hallmark characteristic of uwagake chidori. |
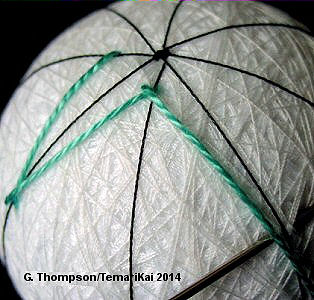 |
This example is worked on a Simple 8 division. Anchor a working length of thread and enter it to the left of a marking line a short distance from the pole. Work one round of chidori kagari around the pole. All upper stitches should be the same distance from the pole, and all lower stitches should be the same distance from the equator. Proceed to the next step before taking the last stitch of this round near the pole. |
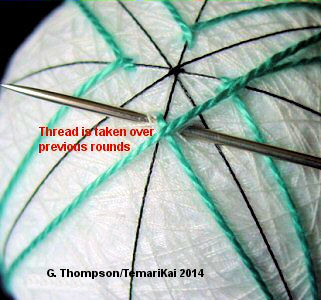 |
Carry the working thread over the thread of the previous stitch as shown in the photo to the left. |
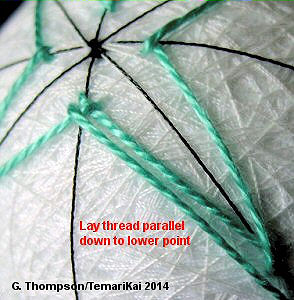 |
Following the rule of "place the thread, then take the stitch to keep it there", lay the thread parallel to that of the previous round, tracking down to the bottom point of the zig zag. Take a small stitch on the marking line under the point of the first round. |
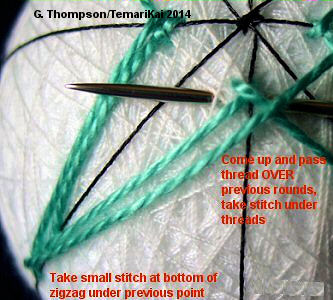 |
Lay the thread parallel to the previous round and carry the thread up to the pole. Continue to carry the thread over the previously laid threads, and take a stitch around all of them. Allow the stitch width to widen as needed, rather than keeping to the standard tiny size of kagari. This is what creates the widening wedge of uwagake. Repeat these steps around the line set to complete the round. |
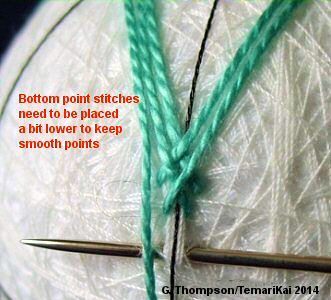 |
Repeat the steps for the next round. When stitching the bottom points, it is important to stretch the stitch position. Notice the distance the stitch is being taken below that of the previous one. An allowance must be made for the volume of the thread to turn the corner of the point. If the stitch is placed too close, the point will not lay smoothly, flat and sharp. for #5 pearl cotton, the stretch distance is usually about 2mm, but this is not a constant value. It will change based on the thread, number of divisions and size of the mari. The important thing is to pay attention and adjust as needed for a smooth point. |
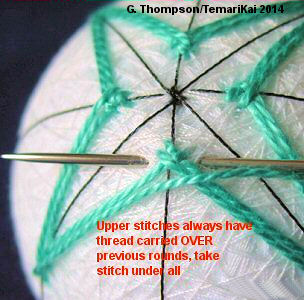 |
Each top stitch will widen as there are more threads to pass over; this is natural and needed for the execution of the stitch. Each ensuing round will be about 1 thread-width wider and lower than the previous one. |
Last updated 11/2015 © 1998 - 2015 G. Thompson/PuffinStuff, Inc.