
TemariKai ToolKit: Basics and the Little Things
As in any stitching technique (or anything in general), unless one is giving due attention to "the little things", much is always lost. In addition to the basic stitches and skills of temari, there are other "little things" that, if learned and paid attention to, make a tremendous difference in the outcome of the project. Some of the most useful hints, tips and tricks are some of the most simple and straightforward. Others are a little more obscure. They do, however, apply to all levels of stitchers from beginner to the most experienced. While these tips and tricks may seem insignificant, collectively they can add up to being the "make or break" of a finished piece. If you are experienced in other areas of embroidery or sewing you may be familiar with some of them; others are rather unique to temari making. They are easy to forget or overlook, but really go hand in hand with temari basics to form a solid foundation for your work.
These techniques are generally applicable across the board, no matter what design you may be working on (needless to say there can always be an exception). Some of them have been learned by experience, others are little nuggets that are buried in the Japanese text that may not be obvious through diagrams. They are in no particular order, but all are equally valuable and need a place in your skill set as much as specific temari techniques.
If you concentrate on them at first, you'll soon come to realize that they become habit, and you employ them automatically in your work, without thinking. In the beginning as you learn, and you have questions about why your finished temari seems to lack the punch or crispness in the design that you'd hoped for, chances are good that some or all of these tips will help. There can't be enough emphasis on the importance of paying attention to the "little things" - remember, as they say, "it's all in the details".
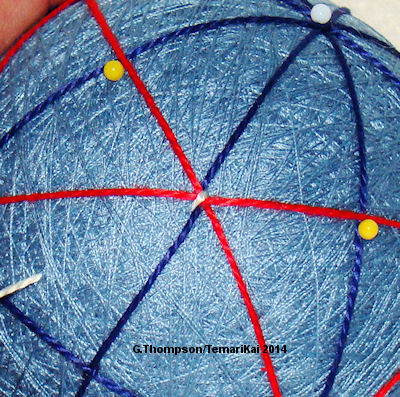
| Placing Pins and Marking Threads (jiwari): When placing marking pins that will be used for placing division/marking lines on the mari, be sure to insert them perpendicular to the mari surface (straight up-and-down). Pin shafts have volume, and placing them on an angle can affect the placement of the marking threads. This can become especially important the smaller the dodai mari. | |
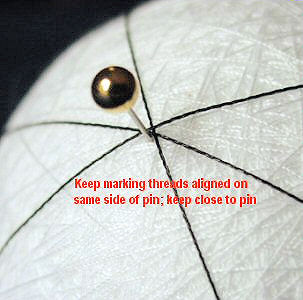 |
When laying the marking/division lines (jiwari),
ideally they should all pass on the same side of the pin
creating one tidy and tight intersection. If threads pass to
both sides of the pin, the width of the pin can begin to affect
the accuracy of placement. It is also much easier to make a
sharp tack stitch (if one is
used) to hold the jiwari in place if all the threads are on the
same side of the pin. The exception is if, while laying the
thread along a sequence of pins, the line is obviously uneven.
Given the choice of laying the thread on the same side of all of
the pins against having a less-than-straight line, go for the
straight line. When placing marking lines, take the time to lay them straight and true. Adjust and groom them as needed as you work. These thoughts may seem "insignificant" in terms of the amount of error that could occur but remember that when working on a sphere, small errors multiply greatly as things progress. Even the width of the pin shaft can be the jump-off for an out-of-kilter design later on. |
| Tacking Jiwari Intersections and Matsuba Bundles: Nothing can upset an otherwise great design than to have a messy center, and/or to have the intersections of the marking lines sticking out like sore thumbs. Ideally, tacking at any given place should be accomplished with one stitch, and it's not hard to do (click to the indicated pages). | |
 |
 |
| Passing Threads Under the Mari Surface: Passing threads under the mari wrap can be done for 2 reasons: it's critical to anchoring the threads when starting and ending in the normal stitching process. It can also be used in actual design work. It's a handy trick to make threads disappear when working designs and you only need parts of shapes to show in the temari pattern. This is frequently seen in more intricate designs found in Japanese books.For whatever reason it's being done, it's critical to do it properly so that no "bleed through" shows - none of the working thread should be seen traveling under the mari wrap. | |
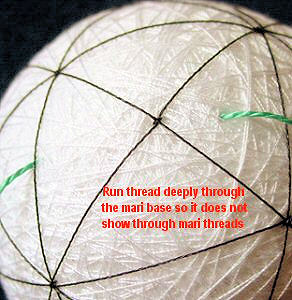 When passing stitching thread under the mari surface, whether it is for anchoring a thread or moving to another stitching location, be sure to stitch deeply into the mari so that there is no "bleed through": you should not be able to see and of the stitching thread through the mari threads. |
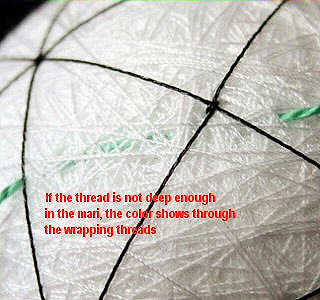 If the stitching thread is not taken deep enough into the mari threads, color from the stitching thread will show through the mari wrap. The more contrast between mari and stitching thread the more this is a problem but, even with colors that are close you can still see changes in texture, etc. if the thread is too close to the surface. |
| Taking a Stitch: Kagari Unless there is a style variation being applied, such as Uwagake, virtually all temari stitches are taken in this manner. | |
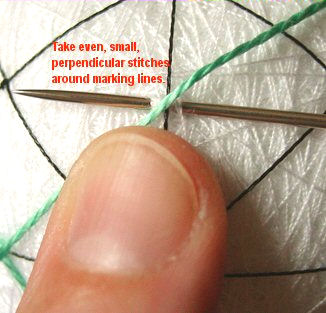
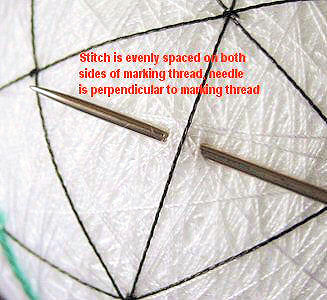 When taking a stitch around the jiwari (marking lines) the needle should be perpendicular (right angle) to the jiwari. The "bite" should be small (about 1-2 mm) and even on both sides of the jiwari. |
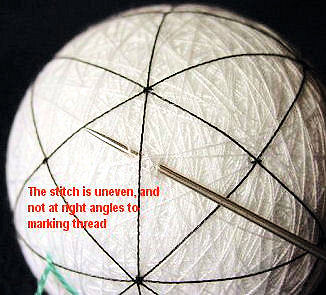 If the needle is not perpendicular, and/or the bite of the mari threads is not evenly set on both sides of the marking line, the resulting stitch will be uneven and affect the design appearance overall. |
| Kagari
- tiny stitch, (literally, "Iike a hem stitch")
is the basis of all temari work, unless a specific style
or exception is being applied (such as uwagake). |
|
 Again, be sure the stitch taken is small, evenly placed on either side of the jiwari (marking line), and the needle is at right angles to the marking line. Lay the thread where you want it to be, and take the stitch to keep it there. |
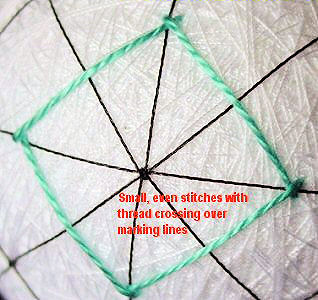 The goal is to have small, even stitches that center around each marking line, with enough tension on the thread to give a sharp, crisp shape. |
| Placing
Stitching Threads - the golden rule for carrying
thread from one stitch to the next is to lay
the thread where you want it to go, and then taking the next
stitch to keep it there.
Don't move to the next point, take a stitch, and drag the
thread along hoping that it will fall into place; it has to be
placed where it should be. |
|
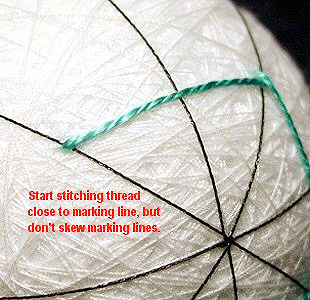 When starting a thread, place it close to the jiwari (marking line); the jiwari should not be split, or moved out of place by the stitching thread. |
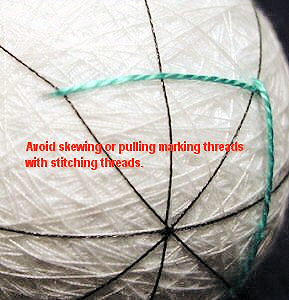 If the stitching thread is too close to the jiwari (marking line) or pulled too tightly no matter where it is placed, it can pull the jiwari (marking line) out of place, which skews the design as you work. |
| Placing
threads and stitches - what to avoid: All threads need
to lay smoothly, straight, and be aligned next to each other as
designs grow. This cannot happen unless stitches are small and
accurate, and the tension is such to keep the threads straight
and true. |
|
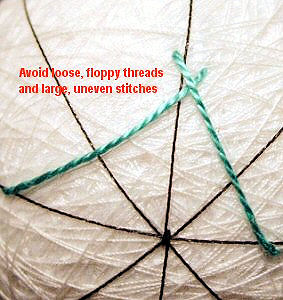 Use enough tension to avoid loose, sloppy threads and stitches. Be sure to center stitches around the jiwari, not trending towards one side or the other to avoid the design skewing and becoming misshapen. |
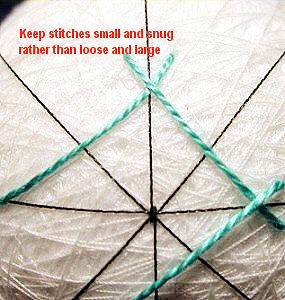 Large, loose stitches and threads that drape and droop, rather than being nicely smooth and taught (but not tight) are required. Otherwise the design will not emerge at all, or at best be very messy. |
| Starting and Ending threads - to knot, or not: there is no one answer to this question. It depends on the thread, and the stitcher. Most commonly the thread is run under the surface of the mari for an inch or two (about 2 to 5 cm) , backtracked in the same path and the needle brought up where the stitching begins. Some folks tie a small overhand or rolled knot, and bury it in the mari wrap. Ending a thread usually is done by running a small length of thread under the mari threads. As long as the design work is secure, and the method of ending or starting does not adversely affect the appearance of the final design (i.e. no one should be able to see it) - whatever works for you is fine. | |
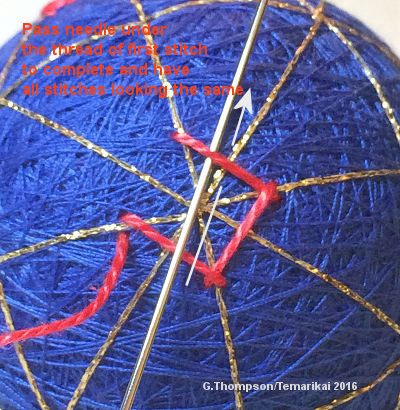
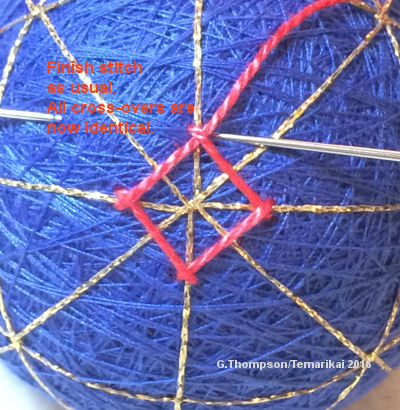
| Ending Stitching in a Design: When starting and ending threads in a design, work them so that the start and stop points can't be seen or found; the flow of the stitch or design should be uninterrupted. Carry the working thread under the starting thread to achieve this, and then complete the stitch. | |
 |
 |
This is a TemariKai.com Printable Page; © 2014, all rights reserved. Right click to print one copy for personal use.
Last updated 2/2016 © 1998 - 2015 TemariKai.com, G. Thompson/PuffinStuff, Inc.